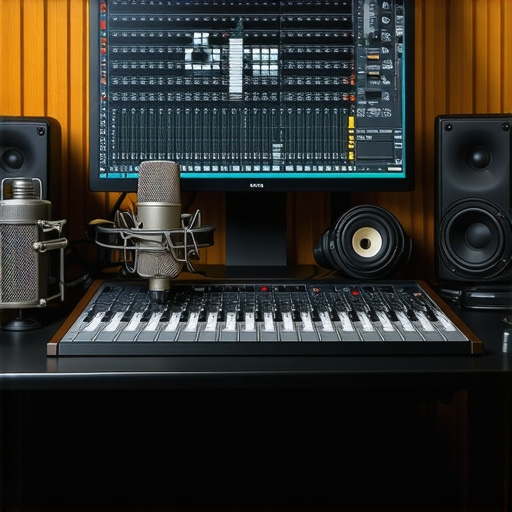
Discovering the Perfect DAW and Microphone Setup: A Personal Perspective
When I first started exploring voiceover work, I was overwhelmed by the sheer variety of digital audio workstations (DAWs) and microphone options available. I remember spending countless nights researching and experimenting, trying to find that sweet spot where my recordings sounded professional without breaking the bank. My journey has been filled with trial and error, but each step taught me valuable lessons about creating a home studio that truly works for voiceover projects.
Choosing the Right DAW: My Top Picks and Why They Matter
After trying several DAWs, I found that the best DAW software for voiceover and podcast editing in 2024 perfectly suited my needs. I prioritized ease of use, flexibility, and powerful editing tools. My experience has shown me that a user-friendly interface accelerates workflow, especially when editing lengthy recordings. I also recommend exploring ultimate guides to DAW software to compare features and find what fits your style.
Microphone Setup: From Budget to Professional Quality
My first microphone was a basic condenser, but I quickly realized that the quality of my microphone significantly impacted my recordings. After some research, I upgraded to a studio-grade microphone, which transformed my voice recordings into crisp and clear audio. For those just starting, I suggest reading voiceover setup essentials to understand the importance of microphone placement, acoustic treatment, and the right audio interface.
How Does Microphone Choice Impact Your Voiceover Quality?
Choosing the right microphone is more than just a purchase; it’s about understanding your voice and environment. For instance, a cardioid condenser microphone can effectively minimize background noise, making it ideal for home studios. Personally, I found that investing in a studio headphones and audio interface helped me monitor my recordings more accurately, ensuring consistent quality.
What are some common mistakes beginners make when setting up their voiceover studio?
Many beginners overlook acoustic treatment, leading to echo or background noise. Also, choosing incompatible equipment can cause frustrations, such as poor audio quality or latency issues. I recommend reading authoritative sources like Sound on Sound for expert advice and tips.
If you’re passionate about creating professional-quality voice recordings, I encourage you to share your setup stories or ask questions in the comments. Remember, the right combination of DAW software and microphone setup can make all the difference in your voiceover journey!
Unlocking the Nuances of Microphone Selection for Professional Voiceovers
Delving deeper into microphone choices, it’s essential to recognize that not all microphones are created equal—especially when aiming for studio-quality recordings in a home environment. While a condenser microphone is generally favored for its clarity, understanding the polar patterns and frequency response tailored to your voice can significantly impact your results. For example, a cardioid pattern minimizes background noise, making it ideal for less-than-ideal acoustic spaces, whereas a hypercardioid can provide even more focused sound isolation. High-quality studio headphones and a reliable audio interface also play crucial roles in monitoring and capturing your voice accurately, ensuring nuanced details aren’t lost during recording.
Optimizing Your DAW Workflow for Efficiency and Precision
Beyond choosing the right software, mastering your DAW’s workflow can dramatically improve your productivity. Techniques such as customizing keyboard shortcuts, utilizing templates, and employing batch processing for editing tasks streamline the editing process. For instance, integrating the best DAW software for voiceover can empower you with tools like automatic level normalization and noise reduction, saving valuable time. Additionally, exploring plugins designed for voice enhancement—such as de-essers, compressors, and EQ—can elevate your recordings to professional standards without extensive manual editing.
How Can Advanced Acoustic Treatments Elevate Your Voiceover Recordings?
Many professionals overlook room acoustics, yet it’s a critical factor in achieving studio-quality sound. Simple measures like adding bass traps, diffusers, and acoustic panels can drastically reduce echo and unwanted reverberations. For example, positioning foam panels strategically around your recording space minimizes reflected sound waves, allowing your microphone to capture your voice more accurately. Investing in acoustic treatments tailored to your room’s dimensions and sound profile can be a game-changer, especially when combined with proper microphone placement and soundproofing techniques. For more detailed insights, consult authoritative sources like Sound on Sound.
What Are the Practical Challenges of Achieving Studio-Quality Voice Recordings at Home?
While equipment and room treatment are vital, many voiceover artists face practical hurdles such as budget constraints, space limitations, and background noise. Balancing affordability with quality requires strategic choices—opting for versatile microphones like the best audio interfaces for voiceover and portable acoustic panels can provide cost-effective solutions. Additionally, implementing effective noise reduction techniques—such as using a dedicated recording closet or soundproofing materials—can significantly improve your audio quality. Remember, the goal is to create a controlled environment where your voice can shine without interference.
If you’re eager to elevate your voiceover recordings further, I invite you to share your setup stories or ask questions in the comments. For more expert tips, explore the latest in studio headphones and soundproofing strategies to refine your environment and achieve that professional edge.
Refining Your Microphone Technique: Beyond the Basics
When I transitioned from amateur to semi-professional voiceover work, I realized that microphone technique played a pivotal role in achieving a polished sound. It’s not just about the microphone you choose but also how you position yourself and handle your voice during recordings. I started experimenting with mic distance, angle, and even the subtle nuances of my breathing. Small adjustments, like maintaining a consistent distance—roughly 6 inches from the mic—and using a pop filter, dramatically reduced plosives and sibilance. These seemingly minor tweaks contributed to a more professional and consistent tone. For those eager to elevate their craft, I recommend exploring resources like voiceover setup essentials to master proper mic technique and room acoustics.
Mastering Advanced Acoustic Treatments: Creating an Ideal Listening Environment
While basic foam panels are a good start, I found that advancing my acoustic treatment made a noticeable difference. I invested in bass traps for corners to control low-frequency resonances and diffusers to scatter sound waves, preventing standing waves and flutter echoes. This setup created a more neutral environment where my voice was accurately captured, and my listening experience was more precise. I also discovered that employing a dedicated control room, even if small, with proper acoustic design, allows for better mixing and editing. As Sound on Sound highlights, acoustic treatment is an investment that pays for itself in improved sound quality and workflow efficiency. Do you have unique acoustic challenges or solutions? I’d love to hear your stories—share in the comments!
Is Your Digital Workflow Optimized for Speed and Quality?
In my journey, I realized that even with the best microphone and room setup, a sluggish workflow can hinder progress. I dedicated time to customizing my DAW, setting up templates, and learning keyboard shortcuts to streamline editing. I also explored advanced plugins for noise reduction, de-essing, and EQ, which saved me countless hours during post-production. For example, using the best DAW software for voiceover has been instrumental because of its automation features and intuitive interface. If you’re curious about optimizing your workflow, I highly recommend checking out software and tools suggestions tailored for voiceover artists. What’s your biggest workflow challenge? I invite you to share your experiences—together, we can find solutions that make your editing faster and more enjoyable.
How Do You Balance Cost and Quality in Your Home Studio?
Balancing budget constraints with the desire for professional quality is a challenge I grappled with extensively. I found that strategic investments—such as choosing a versatile microphone like the best audio interface for voiceover—delivered significant improvements without breaking the bank. I also learned to utilize DIY acoustic treatments, like homemade diffusers and foam panels, which provided noticeable sound improvements at a fraction of commercial costs. It’s about making smart choices—prioritizing equipment that offers the best results for your specific environment and voice. If you’re interested in budget-friendly tips, I suggest exploring comprehensive setup guides that help you maximize your resources. Do you have a story of how you optimized your setup on a tight budget? Share your insights—I believe the community benefits from collective experiences.
The Journey Continues: Exploring New Frontiers in Voiceover Recording
As I continue refining my studio, I remain curious about emerging technologies and techniques. From ambisonic microphones to AI-powered editing tools, the landscape keeps evolving. I encourage you to stay curious and open-minded, continuously seeking ways to enhance your craft. Remember, mastery isn’t just about equipment but also about your dedication to learning and experimentation. If you’re interested in exploring these innovations, I recommend following industry-leading resources like ultimate guides to DAW and studio setup to keep updated. What new techniques or tools have you recently tried? I’d love to hear your experiences and insights—let’s grow together in this dynamic field.
Harnessing the Power of High-Resolution Audio Formats for Studio Fidelity
One of the often-overlooked aspects of professional voiceover recording is the choice of audio format during the editing and delivery process. While most artists stick to standard WAV or AIFF files, exploring high-resolution formats like FLAC or DSD can preserve nuanced details of your voice, ensuring your recordings retain their richness even after compression. I discovered that working with uncompressed or losslessly compressed formats during editing minimizes quality degradation, which is crucial when working on projects that demand the utmost clarity. Additionally, as noted by industry experts in Sound on Sound, mastering these formats can elevate your final product to a professional standard that stands out in competitive markets.
Integrating AI-Driven Editing Tools to Streamline Post-Production
The advent of AI-powered audio editing tools has revolutionized the post-production landscape. From intelligent noise reduction to automated de-essing, these tools can significantly cut down editing time while enhancing audio quality. For instance, platforms like Izotope’s RX suite incorporate machine learning algorithms that adapt to your voice, providing tailored cleaning solutions. I personally experimented with AI-driven plugins that learn your voice’s unique characteristics, allowing for more natural-sounding edits without over-processing. According to a recent study on AI in audio production, integrating these technologies not only improves efficiency but also unlocks new creative possibilities by freeing up time to focus on artistic nuance rather than technical adjustments. If you’re curious about incorporating AI into your workflow, I recommend exploring these advanced editing hacks.
What Are the Most Critical Acoustic Treatments for Achieving Studio-Grade Sound in a Limited Space?
Achieving studio-grade acoustics in a constrained space is a challenge that requires strategic planning. Beyond the basic foam panels, I found that bass traps in corners and diffusers on walls help control low-frequency resonances and scatter sound waves for a more balanced environment. I also experimented with movable acoustic panels, which provide flexibility depending on the project. For a truly professional setup, integrating a dedicated control room with optimized soundproofing and acoustic treatments can dramatically improve your recording quality. Research by Sound on Sound emphasizes that precise acoustic treatment is an investment that yields measurable improvements in clarity and consistency. Have you tried innovative treatments or DIY solutions? Share your experiences—your insights could inspire others to elevate their home studios.
How Can Advanced Monitoring Systems Enhance Your Critical Listening and Mixing Precision?
Precise monitoring is the backbone of professional voiceover production. I transitioned from standard studio headphones to high-end monitoring systems, which revealed subtle nuances in my recordings that were previously unnoticed. Using nearfield monitors with flat frequency response, coupled with acoustic treatment, allowed me to make more informed mixing decisions. Additionally, employing a calibrated audio interface ensures that what I hear is an accurate representation of the final product. The importance of reliable monitoring is underscored by studies indicating that proper audio calibration reduces ear fatigue and enhances critical listening skills. For detailed recommendations, I suggest exploring top-tier headphones and audio interfaces. Do you have a monitoring setup that transformed your workflow? Share your journey—I’d love to hear how you achieved studio accuracy in your environment.
What Are the Latest Innovations in Microphone Technology for Voiceover Artists?
Microphone technology continues to evolve, with recent innovations focusing on capturing more natural and detailed sound. Emerging microphones utilizing advanced capsule materials and digital signal processing can adapt to different voice characteristics, providing a more personalized recording experience. For example, some models incorporate real-time adaptive polar patterns, which optimize rejection of background noise dynamically. I explored the potential of these cutting-edge microphones and found that, combined with proper placement and acoustic treatment, they can elevate voice quality to new heights. Industry insights from Sound on Sound highlight that staying abreast of these innovations allows professionals to future-proof their setups while achieving a competitive edge. Are you experimenting with new microphone models or tech? Share your insights, and let’s discuss how these advancements can redefine voiceover standards.
Things I Wish I Knew Earlier
The Power of Acoustic Treatment
When I first started recording at home, I underestimated how much acoustic treatment could improve my sound. Adding bass traps and diffusers transformed my space from echoey to professional-sounding, saving me hours of editing. If I had known sooner how crucial room acoustics are, I would have prioritized it from day one.
The Importance of Microphone Placement
Initially, I thought microphone choice was everything, but I discovered that proper placement and technique are just as vital. Moving my mic slightly or adjusting my distance made a noticeable difference in clarity and plosives. Mastering mic technique early on would have elevated my recordings significantly.
Workflow Optimization Saves Time
Early in my journey, I spent too much time fiddling with settings. Creating templates, customizing shortcuts, and automating repetitive tasks streamlined my editing process. Investing time upfront in workflow setup pays off in the long run, freeing you to focus on your craft.
Investing in Quality Monitoring
Upgrading from standard headphones to studio monitors and calibrated audio interfaces revealed subtle nuances in my recordings. Accurate monitoring is essential for making informed mixing choices and achieving that professional sound everyone seeks.
Resources I’ve Come to Trust Over Time
- Sound on Sound: An industry staple providing in-depth articles and reviews, it’s my go-to for understanding technical aspects and staying updated with the latest gear.
- Recording Revolution: A personal favorite for practical tips on home studio setup and workflow, helping me implement improvements step-by-step.
- Izotope Blog: For insights on AI-driven editing tools, their blog offers valuable tutorials and updates that keep me at the cutting edge.
Parting Thoughts from My Perspective
Building a professional voiceover studio at home is a journey of continuous learning and experimentation. From choosing the right DAW software for voiceover and podcast editing to understanding the nuances of microphone selection, every step reveals new insights. Remember, the most important aspect is your dedication to refining your craft and creating a space that inspires you. If this resonates, I’d love to hear your own experiences or questions—let’s grow together in this exciting field. Feel free to share this article with someone starting out or seeking motivation. Happy recording!
http://Emma%20Carter
Reading this comprehensive overview really resonated with my own journey into voiceover. I remember feeling overwhelmed at first with all the equipment choices and software options out there. What helped me was focusing on a few core pieces—like choosing a decent microphone and learning the fundamentals of acoustic treatment—before investing in more advanced gear. I especially appreciated the section on optimizing DAW workflow; I used to spend hours fiddling with settings, but now I customize templates and shortcuts to save time. It’s amazing how much more confident and efficient that makes me feel during recording and editing sessions. One thing I’d love to hear others’ thoughts on is balancing cost with quality—what budget-friendly equipment or setups have worked well for you while maintaining a professional sound? Sharing these insights can really help those just starting out avoid rookie mistakes and get to their ideal setup faster.
http://Michael%20Bradford
This post really hits close to home for me. When I began my voiceover journey, I also felt overwhelmed by the myriad of equipment and software options. Starting with a decent condenser microphone and investing time into acoustic treatment made a huge difference in my early recordings. I’ve found that mastering workflow optimization—like creating templates and shortcuts—really accelerates post-production and allows me to focus more on delivering authentic performances. One aspect I’d love to explore further is how different room sizes and shapes influence acoustic treatment strategies. Have others found certain DIY solutions or specific products particularly effective in small or irregular spaces? I believe sharing practical tips can empower newcomers to tailor their setups without overspending. Overall, this guide offers a fantastic roadmap for budding voiceover artists, reminding us that patience and continuous learning are essential in building a professional setup.
http://Liam%20Foster
This article really resonated with me, especially the emphasis on building a space suited specifically for voiceover work. I started with a basic setup, but I quickly learned how much acoustic treatment makes a difference. I found DIY solutions like sealing doors with weatherstripping and using affordable foam panels to significantly reduce echo and background noise. A question I have for others is: how do you manage soundproofing in smaller spaces or shared environments without breaking the bank? Sometimes, I feel like balancing sound isolation with practicality can be quite a challenge, and I’d love to hear some creative solutions from the community. Overall, focusing on the fundamentals like mic placement, acoustic treatment, and workflow optimization has truly elevated my recordings. Would you suggest any specific products or DIY techniques for those working in tight, budget-constrained spaces? Sharing experiences like this really helps everyone improve their home studios.
http://Sophia%20Jenkins
This post really hits the mark for me, especially the focus on balancing quality with budget constraints. When I first built my home studio, I was overwhelmed by the options and the costs involved. I found that investing in a decent condenser microphone and a solid audio interface made a huge difference early on without breaking the bank. Additionally, I learned that DIY acoustic treatments, like foam panels and bass traps in corners, can significantly improve sound quality at a fraction of commercial prices. I’m curious, how do others approach soundproofing in small or shared spaces? I’ve experimented with portable solutions like movable acoustic panels and filling gaps with weatherstripping, which helped a lot. Has anyone found innovative or affordable methods that work well in tight spaces? I believe that smart, strategic choices in equipment and room treatment are key to creating a professional sound in a manageable setup. Looking forward to hearing more ideas from this community of passionate voiceover artists!
http://Rachel%20Morgan
This post really highlights the importance of not just picking the trendy gear, but truly understanding what works for your specific voice and environment. I started out with a basic USB mic and DIY acoustic treatments, which were surprisingly effective without a huge investment. The major breakthrough for me was investing in a dedicated audio interface and understanding microphone positioning—these small changes made a noticeable difference in clarity and professionalism. I’ve also found that good monitoring headphones are worth every penny; they help me catch issues I wouldn’t notice otherwise. For those just starting out, how do you balance learning about gear versus spending on equipment? I believe focusing on core concepts like mic technique and room acoustics often has the greatest impact early on. Would love to hear about others’ experiences with budget setups that still deliver professional results.