I remember the exact moment it hit me—mid-recording, my voiceover suddenly sounded off, distorted just enough to break my concentration. Turns out, my desk’s vibrations were sneaking into my microphone, causing unwanted noise and ruining the take. Frustrating? Absolutely. Realistic? More than you’d think. That lightbulb moment led me down a path to discover how desk vibrations can sabotage quality, especially in the increasingly common *2026* voiceover setups.
Why Desk Vibrations Are the Hidden Enemy in Your Studio
For many creators, the secret culprits behind muddy or inconsistent recordings are hidden in plain sight—desk vibrations transmitted directly into your microphone. These low-frequency thumps can arise from everyday activities like typing, moving chairs, or even the hum of appliances. What’s startling is that even a well-treated space can’t always prevent these vibrations if your shock mount isn’t up to the task.
Recent research emphasizes the importance of proper microphone isolation, noting that
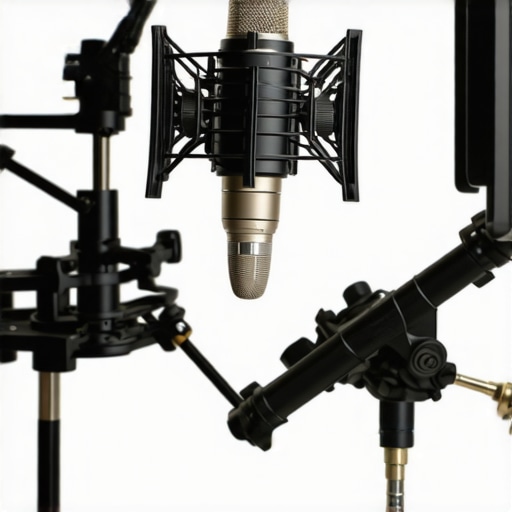
Secure Your Microphone with Proper Mounts
Begin by attaching your microphone to a high-quality shock mount, which acts like an airbag for your gear, absorbing vibrations from your desk. I remember experimenting with different mounts—initially opting for cheap plastic ones—that allowed desk vibrations to sneak in, causing unwanted noise. After upgrading to a professional-grade shock mount, I noticed an immediate reduction in rumble and thumps, leading to cleaner recordings.
Isolate Your Desk to Prevent Vibrations
Use Vibration Dampening Pads
Placing heavy rubber pads or mats underneath your desk can significantly diminish vibrations transmitted through your furniture. Think of it like placing a car on a shock absorber—less jarring, smoother ride. When I added thick foam under my desk, I observed a drastic decrease in low-frequency thumps, especially during lively typing sessions.
Reinforce Your Desk Structure
If your desk is wobbling or creaking, tightening screws or switching to sturdier materials prevents additional movement. Consider swapping out a hollow desk for a solid-wood or metal one. I once had a flimsy particleboard table, which amplified every tap; replacing it with a dense oak desk brought clarity and stability to my recordings.
Optimize Your Voiceover Environment
Creating a controlled recording space minimizes room reflections and ambient noise. Using acoustic panels or blankets can tame echoes. I installed foam panels on my walls and noticed my vocal recordings became warmer and more intimate, reducing the need for heavy post-processing.
Set Up Your Audio Interface with Precision
Connect your microphone to a reputable audio interface that provides clean gain and minimal noise. Proper gain staging is crucial—setting the preamp levels too high introduces hiss, while too low results in a weak signal. During a my recent setup, I adjusted gain settings according to expert tips, achieving a balanced, noise-free sound.
Select Headphones That Reveal Every Detail
Invest in studio headphones known for neutrality and minimal distortion. They act like a lens—letting you see the true quality of your recordings. I initially used consumer-grade earbuds, which masked room issues or subtle background noise. Upgrading to studio-grade headphones allowed me to detect issues early and adapt quickly.
Implement Voice Isolation Techniques
Use a reflection filter or a portable vocal booth to prevent room reverb from coloring your recordings. During a project, I set up a makeshift booth using a portable shield, which isolated my voice beautifully, making it easier to produce professional-sounding audio without extensive post-production.
Monitor and Adjust During Recording
Always listen in real-time through your headphones, paying attention to low-frequency noises or pops. Record a short test and review it immediately, making small adjustments as needed. This iterative process saves time during editing and ensures your final product is crisp and clear.
Solidify Your Workflow
Develop a consistent setup routine—configure your DAW, check levels, and ensure your environment is quiet before recording. For example, I create a checklist that includes turning off fans and doors, which drastically reduced background hums. Streamlining this process helps maintain quality and reduces the need for repetitive corrections.
By applying these steps methodically, you’ll transform your setup into a professional-sounding environment. Remember, each component—from shock mounts to environment tweaks—plays a vital role in capturing pristine audio, making your voiceover projects stand out.
 Many enthusiasts believe that purchasing high-end studio headphones, the latest DAW software, or premium audio interfaces will automatically produce professional-quality recordings. However, even seasoned pros often get caught up in common myths and advanced mistakes that undermine their efforts. For instance, a prevalent misconception is that all studio headphones are suitable for mixing, when in reality, not all headphones offer the flat response necessary for accurate monitoring. Relying solely on consumer-grade headphones can lead to misjudged mixes, which sound fine on casual setups but falter in expert environments. To avoid this trap, check out the studio headphone buying guide for insights into the optimal specs.
Another frequent error involves the misconception that the newest DAW automatically guarantees better results. What truly matters is choosing a DAW that aligns with your workflow and system stability. Many overlook the importance of optimizing DAW settings, which can lead to crashes or latency issues, especially with complex projects. An advanced mistake is ignoring the impact of buffer sizes and plugin management, which can cause audio stutters or synchronization problems. For a detailed understanding, review this article on DAW optimization.
The choice of audio interface is also often misunderstood. Many assume that higher price directly correlates with better audio quality. While quality is essential, matching your interface’s preamp specs, gain levels, and connectivity options to your microphones and needs is critical. An advanced mistake is neglecting to consider the interface’s compatibility with your system, leading to driver issues or latency anomalies. For expert advice, visit this review on audio interfaces.
When setting up a voiceover station, beginners often focus solely on microphone choice, overlooking the room’s acoustics and monitoring environment. This oversight results in recordings that sound professional but are tainted with room reflections or background noise. Advanced creators use tools like reflection filters and acoustic treatments strategically. Equally crucial is calibrating your studio headphones accurately; many fail to realize that uncalibrated headphones can distort your perception of mix balance. For tips on calibration basics, see this calibration guide.
Lastly, a common error in podcast editing is believing that software alone will fix poor audio. While DAW tools are powerful, they can’t compensate for fundamental issues like mic placement, background noise, or inconsistent levels. Editing becomes much more effective when you combine proper setup with editing techniques. For instance, employing noise-reduction plugins without addressing the source often results in artifacts or muffled audio. To streamline your workflow and avoid these pitfalls, explore advanced podcast editing hacks.
Remember, truly professional sound hinges on understanding these nuances and avoiding common traps. If you’ve ever fallen into any of these pitfalls, share your story in the comments and let’s discuss how to improve. Your journey toward pristine audio is as much about knowledge as gear—so keep learning, experimenting, and refining your setup. Have you ever fallen into this trap? Let me know in the comments.
Keep Your Hardware in Top Shape
Regular maintenance of your studio equipment is essential for consistent quality. I personally schedule monthly checks of my audio interface and headphones, inspecting cables for wear and cleaning connections with contact cleaner. This proactive approach prevents unexpected failures that can cause delays or compromised recordings. Remember, just like a car, your gear benefits from routine servicing to prolong lifespan and ensure optimal performance.
Choose Reliable Software for Peace of Mind
Investing in robust DAW software, like the best DAW options for 2026, is crucial. I recommend selecting one that offers auto-save and crash recovery features—these give you peace of mind during lengthy editing sessions. Keep your software updated, as developers frequently release patches that fix bugs and improve stability. This habit saves time and prevents frustration caused by software crashes or glitches.
Use Diagnostic and Monitoring Tools
Monitoring your system’s health with tools like latency analyzers and hardware diagnostics helps catch issues early. For example, I utilize a system monitor to identify any driver conflicts or resource bottlenecks that could cause audio dropouts. A common mistake is neglecting these checks, leading to unpredictable performance during critical recording or mixing sessions. Consistently tracking system metrics allows for timely adjustments, ensuring your workflow remains smooth and efficient.
Implement Long-Term Maintenance Routines
Creating a maintenance calendar with scheduled backups, firmware updates, and physical inspections is a game-changer. For instance, I backup my project files weekly, using cloud storage for redundancy. Firmware updates for your audio interface or headphones also often include performance improvements and bug fixes—don’t skip these. Additionally, periodically cleaning equipment with soft brushes and microfiber cloths prevents dust buildup, which can cause overheating or connectivity issues over time. These small, consistent efforts keep your setup reliable and ready for any project.
Prepare for Growth with Scalable Tools
As your projects expand, so should your toolkit. I recommend upgrading to higher-quality, open-back headphones, like the open-back models with true-flat response, to accurately assess spatial mixes. Additionally, investing in a more versatile audio interface with multiple input options ensures you can accommodate new microphones or instruments without replacing your entire setup. Planning for scalability from the start reduces future disruptions and accelerates your workflow.
How do I maintain my studio setup over time?
Consistency is key. Set routine checks for hardware cleanliness and connection integrity, keep software and firmware updated, and monitor your system’s performance regularly using diagnostic tools. Establishing these habits ensures your studio remains reliable, enabling you to focus on creativity rather than troubleshooting. For tailored advice or to explore custom solutions, consider reaching out through our contact page. By staying proactive, you’ll enjoy long-term consistency and quality in your recordings and mixes—try integrating a monthly maintenance check today to see immediate benefits.
Busting My Own Myths About Studio Equipment
One of the hardest lessons I learned was the false belief that top-tier gear alone guarantees professional results. I spent countless hours chasing after expensive headphones and shiny interfaces, only to realize that correct setup and environment had a far bigger impact. This epiphany pushed me to focus more on acoustics, calibration, and proper placement, which drastically improved my recordings without extra spending.
Why Listening in Real-Time Changed Everything
Initially, I trusted post-production to fix issues, but I found that monitoring during recording is crucial. Listening with high-quality headphones while recording allows immediate detection of vibrations, background noises, or mic proximity problems. This real-time feedback loop shaved hours off my editing process and elevated my confidence in the final product.
Less is More in the Soundproofing World
I used to think that elaborate soundproofing was necessary, but my experience taught me that strategic placement of simple materials like blankets and reflection filters often yields more than costly acoustic panels. Prioritizing these small, effective tweaks created a noticeably cleaner voice capture, validating that smart decisions trump expensive solutions every time.
Curated Gear That Keeps Me Moving Forward
Through my journey, I’ve come to rely on a few trusted tools. The studio headphone guide helped me choose headphones that reveal every nuance, and the DAW selection tips ensured my software matched my workflow without glitches. These resources keep my setup simple, reliable, and ready for the next project.
Harnessing Your Passion for Better Audio Outcomes
This journey reaffirmed that a thoughtful setup, continuous learning, and patience are your best allies. Don’t let the complexity or initial setbacks discourage you; every tweak and upgrade is a step toward your unique voice being heard loud and clear. Embrace the process, and let the pursuit of quality inspire your daily work.
What unexpected lesson has transformed your approach to building a professional voiceover environment? Share below and keep the momentum going!
http://Samuel%20Turner
This post hits close to home for me. I used to think that investing in high-end gear was your best bet for quality recordings, but I’ve learned that the environment and setup play a bigger role than I initially thought. I especially agree with the point about using vibration dampening pads under your desk—since I added those, I noticed a significant reduction in low-frequency noises that used to ruin my takes. It’s fascinating how something so simple dramatically impacts your sound quality.
One challenge I’ve faced is balancing between acoustic treatment and desk setup, especially in a smaller room. Have others here found effective ways to manage desk vibrations without sacrificing space? I’m curious if the community has tried specific materials or techniques that gave particularly good results, especially in compact setups. It seems that focusing on these details can save so much time in post-production, and makes the entire recording process more enjoyable.