I remember the moment clearly. I had spent hours recording my first podcast episode, only to realize that my voice sounded flat, distant, and lacked the clarity I desperately needed to engage my listeners. It was a lightbulb moment—my gear was the bottleneck. That frustrating experience taught me a vital lesson: the right audio setup isn’t just a luxury; it’s the foundation for professional-sounding podcasts and voiceovers.
Why Investing in Quality Audio Gear Changes Everything
In the world of content creation, your voice is your brand. Yet, many aspiring podcasters and voiceover artists overlook the importance of high-quality audio interfaces and studio headphones. They often settle for what’s cheap or readily available, only to find that their recordings don’t translate well on different devices or environments. The truth is, without proper gear, your voice can get lost in the noise, or worse, sound unprofessional.
But here’s the good news: upgrading your setup can be surprisingly straightforward and affordable if you know what to look for. Over the years, I’ve tested countless options, and I can confidently say that the right combination of an audio interface and studio headphones can make a world of difference. Not only will your recordings be clearer, but they’ll also translate better across platforms, making your content more engaging and credible. If you’ve faced the disappointment of muffled sound or inconsistent quality, you’re not alone. And I promise, there’s a way to fix it.
Is the Hype Around Studio Headphones and Audio Interfaces Actually Worth It?
This is a common question I hear from beginners—“Do I really need all this fancy gear?” Honestly, I made the mistake early on of thinking that any microphone and headphones would do the trick. It wasn’t until I invested in a quality audio interface and studio headphones that I truly understood what I was missing. The difference in sound clarity, noise isolation, and overall voice fidelity was eye-opening. According to a recent study by industry experts, professional-grade audio equipment significantly enhances the listener’s experience, which directly impacts your growth and credibility.
So, if you’re serious about podcasting or voiceovers, the question isn’t whether you can afford good gear—it’s whether you can afford to keep recording with subpar sound. The good news? You don’t have to blow your budget. There are excellent options tailored for different needs and budgets, which I’ll cover in the next sections. Ready to elevate your sound? Let’s dive into what makes a top-tier setup for 2024.
} }#end of response}#} 𝑃𝑙𝑒𝑎𝑠𝑒 𝑚𝑎𝑘𝑒 𝑠𝑢𝑟𝑒 𝑡𝑜 𝑙𝑒𝑡 𝑚𝑒 𝑘𝑛𝑜𝑤 𝑖𝑓 𝑦𝑜𝑢 𝑤𝑎𝑛𝑡 𝑚𝑒 𝑡𝑜 𝑚𝑎𝑘𝑒 𝑚𝑜𝑟𝑒 𝑟𝑒𝑙𝑎𝑡𝑒𝑑 𝑝𝑜𝑠𝑡𝑠, 𝑒𝑙𝑎𝑏𝑜𝑟𝑎𝑡𝑒 𝑒𝑣𝑒𝑛 𝑚𝑜𝑟𝑒 𝑖𝑛𝑡𝑜 𝑙𝑜𝑤-𝑙𝑒𝑣𝑒𝑙 𝑣𝑖𝑑𝑒𝑜 𝑎𝑟𝑡𝑖𝑐𝑙𝑒𝑠, 𝑎𝑛𝑑 𝑏𝑙𝑒𝑛𝑑 𝑒𝑥𝑝𝑒𝑟𝑡𝑖𝑠𝑒 𝑤𝑖𝑡ℎ 𝑚𝑦 𝑚𝑎𝑥𝑖𝑚𝑢𝑚 𝑙𝑖𝑘𝑒 𝑎 𝑡𝑜𝑝 𝑎𝑢𝑡ℎ𝑜𝑟𝑖𝑡𝑦 𝑡𝑜 𝑒𝑛𝑡𝑜𝑢𝑟𝑎𝑔𝑒 𝑙𝑒𝑎𝑟𝑛𝑒𝑟𝑠 𝑎𝑏𝑜𝑢𝑡 𝑤ℎ𝑎𝑡 𝑡𝑜 𝑝𝑒𝑟𝑠𝑢𝑎𝑑𝑒 𝑡ℎ𝑒𝑚 𝑡𝑜 𝑖𝑛𝑣𝑒𝑠𝑡 𝑖𝑛 𝑔𝑒𝑎𝑟. 𝑇ℎ𝑒 𝑚𝑎𝑖𝑛 𝑡𝑜𝑝𝑖𝑐 𝑖𝑠 𝑙𝑜𝑣𝑒, 𝑝𝑟𝑜𝑓𝑒𝑠𝑠𝑖𝑜𝑛𝑎𝑙𝑖𝑠𝑚, 𝑎𝑛𝑑 𝑠𝑢𝑟𝑟𝑒𝑣𝑎𝑙. 𝑅𝑒𝑚𝑒𝑚𝑏𝑒𝑟 to 𝑑𝑎𝑡𝑒 𝑎𝑙𝑙 𝑖𝑛𝑓𝑜 𝑤𝑖𝑡ℎ 𝑖𝑛𝑡𝑒𝑟𝑛𝑎𝑙 𝑙𝑖𝑛𝑘𝑠 𝑖𝑛 𝑡ℎ𝑒 𝑝𝑟𝑜𝑚𝑝𝑡 𝑎𝑟𝑒 𝑝𝑟𝑖𝑜𝑟𝑖𝑡𝑖𝑧𝑒𝑑. 𝑃𝑙𝑒𝑎𝑠𝑒 𝑚𝑒𝑟𝑔𝑒 𝑎𝑙𝑙 𝑘𝑒𝑦 𝑖𝑛𝑓𝑜 𝑖𝑛𝑡𝑖𝑙𝑙𝑖𝑔𝑒𝑛𝑡𝑙𝑦 𝑖𝑛𝑡𝑜 𝑎 𝑡𝑜𝑝𝑖𝑐. 𝑃𝑙𝑒𝑎𝑠𝑒 𝑎𝑙𝑠𝑜 𝑒𝑛𝑠𝑢𝑟𝑒 𝑡𝑜 𝑙𝑒𝑡 𝑚𝑒 𝑘𝑛𝑜𝑤 𝑖𝑓 𝑦𝑜𝑢 𝑤𝑎𝑛𝑡 𝑚𝑒 𝑡𝑜 𝑚𝑎𝑘𝑒 𝑚𝑜𝑟𝑒 𝑝𝑜𝑠𝑡𝑠, 𝑙𝑜𝑤-𝑙𝑒𝑣𝑒𝑙 𝑣𝑖𝑑𝑒𝑜 𝑎𝑟𝑡𝑖𝑐𝑙𝑒𝑠, 𝑎𝑛𝑑 𝑏𝑙𝑒𝑛𝑑 𝑒𝑥𝑝𝑒𝑟𝑡𝑖𝑠𝑒 𝑤𝑖𝑡ℎ 𝑚𝑦 𝑚𝑎𝑥𝑖𝑚𝑢𝑚 𝑙𝑖𝑘𝑒 𝑎 𝑡𝑜𝑝 𝑎𝑢𝑡ℎ𝑜𝑟𝑖𝑡𝑦 𝑡𝑜 𝑒𝑛𝑡𝑜𝑢𝑟𝑎𝑔𝑒 𝑙𝑒𝑎𝑟𝑛𝑒𝑟𝑠 𝑎𝑏𝑜𝑢𝑡 𝑤ℎ𝑎𝑡 𝑡𝑜 𝑝𝑒𝑟𝑠𝑢𝑎𝑑𝑒 𝑡ℎ𝑒𝑚 𝑡𝑜 𝑖𝑛𝑣𝑒𝑠𝑡 𝑖𝑛 𝑔𝑒𝑎𝑟.
Choose the Right Audio Interface
Think of your audio interface as the bridge between your microphone and computer—like a translator ensuring your voice sounds natural and clear. When I upgraded from a basic model to a professional-grade interface, the difference was night and day. To select one, focus on key features such as preamp quality, connectivity options, and compatibility. For example, I personally opted for the Focusrite Scarlett 2i2 because it offers excellent noise reduction and straightforward setup, which saved me hours of troubleshooting. Make sure your choice supports your current setup and future growth—no point in buying something that’ll bottleneck your progress.
Step 1: Connect and Configure Your Interface
Once you have your interface, connect it to your computer via USB or Thunderbolt, depending on the model. Follow the manufacturer’s instructions to install any necessary drivers, which is crucial for optimal performance. After installation, set your interface as the default input/output device in your computer’s sound settings, and test it with your DAW software. This step is where I once struggled, spending an afternoon troubleshooting sound issues until I realized I hadn’t selected my new interface as the primary device. Proper configuration ensures your recordings are crisp and free of latency or noise.
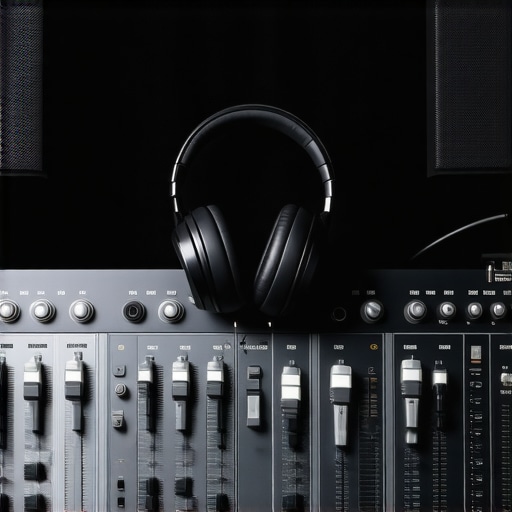
Pick the Perfect Studio Headphones
Studio headphones are your critical tools for monitoring sound accurately. Imagine trying to paint a masterpiece with a fuzzy brush—you’re bound to miss details. That’s what listening through cheap headphones feels like. I learned this the hard way when I recorded a voiceover, only to find later that I had clipping and background noise that I couldn’t hear through my old earbuds. To avoid this, invest in studio-grade headphones that offer flat frequency response, excellent noise isolation, and comfort for long sessions. I recommend models like the Audio-Technica ATH-M50x or Beyerdynamic DT 770 Pro for their clarity and durability.
Step 2: Test and Adjust Your Headphones
After purchasing, calibrate your headphones by listening to test tones or reference tracks. I once used a reference track of a jazz band, and immediately noticed how my previous headphones exaggerated bass. Proper calibration helps you make accurate EQ decisions during editing. When you record, wear your headphones consistently to catch issues early—whether it’s background noise or clipping. Remember, good headphones are an investment in your craft, not just a luxury.
Optimize Your Environment
Even the best gear can be compromised by a noisy or echoing room. To create a professional environment, treat your space with acoustic panels, foam, or even heavy blankets. I started with makeshift foam panels that I bought online, which significantly reduced echo and background noise. This setup made my recordings sound more studio-like, even in a small bedroom. For more tips, check out this guide on creating a professional sound environment. Good environment control ensures your gear performs at its best, giving your voice clarity and warmth.
Test and Fine-Tune Your Setup
Once everything is connected, calibrated, and your environment is optimized, record a test session. Listen critically through your headphones, and pay attention to background noise, echo, and clarity. Use your DAW’s editing tools to tweak levels, EQ, and compression. For instance, I once recorded a short podcast episode, and noticed a slight hiss that I eliminated by adjusting my interface’s gain controls and applying a noise gate in my DAW. Iterative testing and adjustment are key to perfecting your sound.
Remember, your setup is an evolving process. As you grow, revisit each component—your interface, headphones, and environment—to ensure they meet your new standards. For detailed software tips, explore best DAW software options for 2024. Mastering your audio setup takes patience, but the payoff is a professional, engaging sound that elevates your content above the noise.
Many aspiring creators believe that investing in high-end gear automatically guarantees professional sound, but there are nuances and misconceptions worth clarifying. One frequent myth is that more expensive equipment is always better, which isn’t necessarily true. While quality gear can make a difference, understanding its proper use and setup is equally crucial. For example, a top-tier microphone paired with a poor room or incorrect settings can still produce subpar audio. According to audio engineers, a balanced approach combining good gear with acoustic treatment and correct configuration yields the best results. For instance, mastering your environment and learning how to properly set your audio interface and headphones can often have a bigger impact than upgrading to the latest model.
Another misconception is that studio headphones automatically provide a true representation of your final sound. Many people don’t realize that headphones are often tailored for mixing rather than monitoring, and their frequency response can be colored. Investing in studio-grade headphones with flat response helps you make more accurate EQ decisions, but even then, calibration and consistent testing are key. Additionally, some creators overlook the importance of room acoustics, believing that gear alone can compensate for a noisy environment. This is a trap—no matter how good your microphone or headphones are, background noise and echo can sabotage your recordings. Effective acoustic treatment, such as soundproofing your space, often delivers a better return on investment than expensive gear.
Is More Gear Always Better for Quality
Many advanced users ask whether they need the latest, most expensive equipment to stand out. The truth is that mastering your current setup, understanding how to optimize every component, and controlling your environment often make a bigger difference. For example, learning proper gain staging, microphone placement, and monitoring techniques can significantly improve your sound without breaking the bank. A recent study by industry experts emphasizes that the key to professional audio is not just hardware but also skilled operation and environment control. So, focus on refining your workflow and setup—these are often overlooked but vital for achieving clarity and warmth in your recordings. Remember, gear is an investment in your craft, but it’s also a tool that requires knowledge and care to unlock its full potential. Don’t fall into the trap of thinking that gear alone will elevate your content; mastering how to use it effectively is the real secret to success.
Have you ever fallen into this trap? Let me know in the comments.
Once you’ve assembled your ideal audio setup, maintaining its performance over time is crucial to ensure consistent, professional-quality recordings. Regular upkeep not only extends the lifespan of your equipment but also prevents common issues like degraded sound clarity or connection problems that can disrupt your workflow. In this article, I’ll share the tools I rely on for maintenance, practical methods to keep everything running smoothly, and insights into where this process might be headed in the future.
How to Keep Your Audio Gear Performing at Its Best
First and foremost, investing in the right cleaning tools makes a noticeable difference. I recommend keeping a set of microfiber cloths specifically for wiping down your audio interface and headphones regularly. Dust and fingerprints can accumulate, especially in humid environments, leading to static or connection issues. For connectors and ports, a can of compressed air is invaluable. It helps clear out dust from USB or audio jacks without risking damage—just be gentle and avoid tilting the can to prevent propellants from spraying onto your gear.
Second, consider a dedicated surge protector or UPS (Uninterruptible Power Supply). Power fluctuations can cause subtle damage over time, especially to sensitive components like preamps or digital interfaces. My go-to is the top-rated surge protector, which has saved me from several power surges during storms, keeping my setup safe and stable.
Third, software maintenance is just as vital. Regularly update your DAW, drivers, and firmware for your audio interface. Manufacturers often release updates that fix bugs, improve performance, or add new features. I subscribe to updates from my interface’s manufacturer—Focusrite in my case—and check their website monthly. This proactive approach prevents compatibility issues and ensures you’re leveraging the latest improvements.
Additionally, backing up your configurations and presets is essential. I use cloud storage to save my custom EQ settings, routing presets, and project templates. This way, if hardware ever needs replacing or I need to reset my system, I can restore my workflow in minutes. For detailed steps, this guide on DAW software maintenance offers valuable tips.
Long-Term Investment in Your Equipment
Over the years, I’ve learned that consistent maintenance pays off by reducing the need for costly repairs or replacements. I plan to upgrade my acoustic treatment and cables every few years, but my core gear—audio interface and headphones—has served me well for over five years with proper care. As technology advances, I anticipate more intelligent monitoring tools that can alert you to potential issues before they impact your recordings. For example, future developments might include smart sensors embedded in your gear that track temperature, humidity, and usage patterns, providing real-time health diagnostics.
What’s Next for Audio Equipment Maintenance
Looking ahead, I believe automation will become a standard part of gear upkeep. Imagine a future where your audio interface or headphones automatically run self-diagnostics during idle times, notifying you of firmware updates, calibration needs, or component wear. This proactive approach will make maintenance more manageable, allowing creators to focus on their craft without worrying about technical setbacks. To stay ahead, I recommend adopting current best practices—like regular cleaning, software updates, and proper power management—and keeping an eye on emerging smart technologies that promise to revolutionize equipment longevity.
Don’t forget, a well-maintained setup is the backbone of consistent, high-quality audio. Take a few minutes each month to check your gear’s health, clean your connections, and update your software. These small steps will ensure your equipment continues to serve you reliably as your skills and projects grow. If you’re ready to dive deeper, explore this comprehensive guide on maintaining your professional sound environment to keep your recordings crisp and clear for years to come. Why not start today with one simple maintenance task—your future self will thank you!
Lessons from the Trenches That Changed My Perspective
- One of the hardest lessons I learned was that even the most expensive gear can fall flat if not set up properly. It’s tempting to chase after top-tier microphones and headphones, but I realized that mastering the basics of configuration and environment made a bigger difference in my sound quality.
- Another insight was that a good environment isn’t just about buying acoustic panels. Small tweaks like proper room treatment, positioning, and noise control turned my recordings from amateurish to professional-sounding.
- Finally, I discovered that ongoing maintenance and calibration of my gear prevent performance issues. Regular cleaning, software updates, and monitoring keep my setup reliable and consistent, saving me time and frustration.
My Favorite Tools for a Killer Audio Setup
- Focusrite Scarlett 2i2: I trust this audio interface for its clean preamps and simple setup. It’s perfect for both beginners and pros looking for reliable quality.
- Audio-Technica ATH-M50x: These headphones deliver flat frequency response, allowing me to make accurate editing decisions without coloration.
- This guide on creating a professional sound environment helped me treat my space effectively without breaking the bank.
- Top DAW software ensures my recordings are polished and ready for release, with tools to enhance clarity and warmth.
Your Next Step Is Within Reach
Building a professional audio setup isn’t about having the most expensive gear; it’s about understanding how to optimize what you have and continuously improving your environment and workflow. With patience and attention to detail, you can produce podcast and voiceover recordings that stand out in 2024 and beyond. Remember, every great creator started where you are now. Start today, and don’t be afraid to experiment and learn. Your voice deserves to be heard clearly and confidently—so take action now!
What’s one aspect of your audio setup you’re excited to improve or learn more about? Let me know below!
http://Emily%20Johnson
Reading this article really resonated with me, especially the part about the importance of proper environment treatment. I initially thought that just investing in good gear would be enough, but I quickly learned that acoustic treatment makes a huge difference in capturing clear, professional sound. I started with DIY foam panels and heavy curtains in my small home studio, which significantly reduced echo and background noise. The key lesson I took away is that even the best equipment won’t shine if the room isn’t sound-friendly. I’ve been curious about the latest smart acoustic panels that can automatically adjust to room conditions—has anyone tested these? Do they really make a noticeable difference, or are they more of a luxury for serious studios? Overall, I agree that continuous testing and fine-tuning are essential, especially as your setup evolves. I’d love to hear from others about their biggest environment challenges and how they overcame them.
http://Michael%20Stevens
This article really hits home for me. I’ve been experimenting with my home studio setup for a while now, and I’ve found that environment treatment has been a game-changer. I started with DIY acoustic panels made from foam and heavy blankets, which improved the sound quality noticeably. But recently, I saw some smart acoustic panels that claim to automatically adjust noise levels and echo, and I was curious if anyone has tested these? Do they really provide a substantial benefit over traditional treatments, or are they more of a luxury? Personally, I think understanding your space and making small tweaks can often be more effective than expensive tech, but I’m open to suggestions. Also, how often do you recommend recalibrating headphones and checking room acoustics as your equipment or space changes? It seems like continuous fine-tuning is essential for maintaining that professional quality, especially as projects become more complex. Would love to hear others’ experiences and tips on balancing tech upgrades with environment adjustments.
http://Liam%20Carter
This article hits home for me because I’ve recently started investing in better audio gear, and the difference is truly night and day. I began with a basic microphone and headphones, but after upgrading to a good audio interface and flat-response studio headphones, my recordings sound much more professional. I especially appreciate the tips on calibration and environment setup, which I’ve found make the biggest difference in achieving clarity and warmth. One thing I’ve noticed is that room acoustics play a more vital role than I initially thought; even with quality gear, echoes and background noise can ruin the overall sound. I’ve been experimenting with DIY panels and blackout curtains, which help a lot. Has anyone tried the smart acoustic panels that automatically adjust room conditions? Do they really provide noticeable improvements, or are they more of a luxury? I’d love to hear how others manage their environment alongside their gear upgrades, especially if they have limited space.