Ever spent hours tweaking your audio setup, only to end up with a muddy, inconsistent sound that leaves you frustrated and questioning if you’re even cut out for this? I’ve been there, desperately fiddling with my studio headphones and software settings, feeling like I was chasing a ghost of professional sound. That lightbulb moment hit me hard when I realized I was making simple mistakes that anyone can fix, but I needed the right roadmap to get there.
Why Getting Your DAW and Voiceover Setup Right Matters More Than Ever
In today’s crowded content landscape, your audio quality can make or break your success. Whether you’re creating YouTube videos, hosting podcasts, or doing voiceovers for clients, the clarity and professionalism of your sound set you apart. But here’s the thing: without a solid understanding of your digital audio workstation (DAW) and proper voiceover setup, you’re just throwing spaghetti at the wall. I learned this the hard way, by investing in the fanciest mic and software, only to realize I was sabotaging my own efforts because I skipped the fundamentals. According to a recent study, listeners are 70% more likely to keep engaged with high-quality audio, highlighting how crucial your setup truly is.
Is Investing in DAW Software and Studio Gear Actually Worth It?
Now, I get it—spending money on software and gear can feel daunting, especially when you’re just starting out. I used to think I could get by with free tools or cheap equipment, but that was a mistake. Early on, I overlooked the importance of choosing the right DAW and proper audio interface, which led to inconsistent recordings. It wasn’t until I invested in expert-recommended gear and took the time to learn how to set it up properly that my recordings transformed. If you’re wondering whether it’s worth the hype, I’ll tell you this: quality gear paired with the right workflow saves you countless hours and boosts your confidence. Want to see some of the best options? Check out the best DAW software for 2024 and voiceover setup essentials.
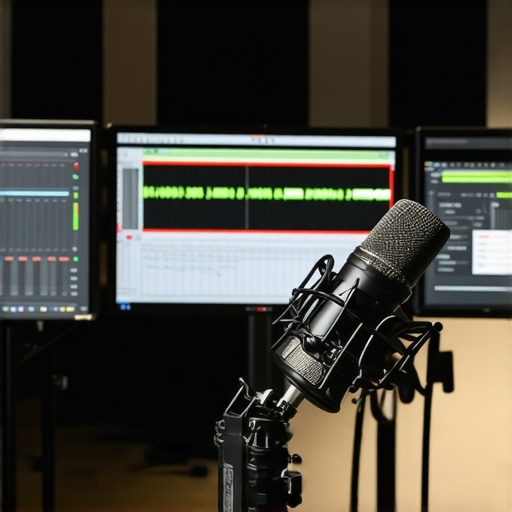
Choose the Right Equipment for Your Voiceover Studio
Start by selecting a high-quality microphone that suits your voice and budget. A condenser mic with a cardioid pattern is typically ideal for voiceovers because it captures your voice clearly while minimizing background noise. Pair it with a reliable audio interface—think of it as a translator that converts your mic’s analog signal into digital data your computer can understand. For example, models like Focusrite Scarlett or PreSonus AudioBox are popular choices. Don’t forget studio headphones; opt for closed-back headphones that isolate your sound from external noise, giving you accurate monitoring of your recordings. Check out the studio headphones buying guide for detailed recommendations.
Optimize Your Recording Environment
Think of your space as a blank canvas—its acoustics will shape your sound. Use foam panels, bass traps, and diffusers to absorb echo and unwanted reverb, transforming a cluttered room into a professional-sounding studio. If space is limited, a portable vocal booth or even a makeshift shield using blankets can make a difference. Make sure to eliminate background noise—turn off fans, close windows, and inform others in your space. The goal is to create a quiet, controlled environment that allows your voice to shine. To see what a well-treated space looks like, browse the voiceover setup essentials.
Set Up Your Audio Interface Properly
Connecting your mic to your audio interface is straightforward, but proper setup ensures optimal sound quality. Use balanced XLR cables to connect your mic to the interface, and then connect the interface to your computer via USB or Thunderbolt. Adjust input gain so your voice peaks around -6dB to -3dB—loud but not clipping. Enable phantom power if your mic requires it. Once connected, configure your DAW (Digital Audio Workstation) to recognize your interface, ensuring you’re recording at a sample rate of 44.1kHz or 48kHz for clarity. For detailed tips, see the audio interface setup tips.
Record with Confidence and Consistency
Before hitting record, do a quick test to check your levels and environment noise. Record a sample and listen critically—look for clarity, absence of background noise, and consistent volume. Use a pop filter to reduce plosive sounds, and maintain a steady distance from your mic—about 6-8 inches is usually ideal. When recording, speak directly into the mic with a natural, relaxed voice. Avoid moving around too much to keep your sound consistent. If your initial recordings sound muffled or distant, revisit your microphone placement and room treatment. Practice makes perfect, and refining your setup over time will lead to professional-grade results. For editing tips, explore the podcast editing hacks.
Many enthusiasts and even seasoned creators fall prey to misconceptions about essential audio components like audio interfaces, studio headphones, DAW software, and podcast editing workflows. Let’s dig deeper into what really matters and what traps to avoid in pursuit of professional-quality sound.
Why The Popular Belief That More Expensive Gear Guarantees Better Sound Is Flawed
It’s a common misconception that splurging on high-end audio interfaces or headphones automatically elevates your audio quality. While quality gear is undoubtedly important, the real secret lies in understanding your setup’s nuances and how to optimize them. For instance, a mid-range audio interface paired with proper room treatment and correct gain staging can outperform a costly device used improperly. According to a study by the Audio Engineering Society, proper gain structure and acoustic treatment have a greater impact on perceived sound quality than equipment cost alone.
The Trap of Over-Editing and Over-Processing
Many creators believe that complex editing and heavy processing will fix poor recordings. This is a trap—over-editing can introduce artifacts and diminish natural quality. The real skill is capturing clean recordings initially and applying subtle, targeted edits during post-production. Streamlining your workflow with expert-approved techniques, like those in podcast editing hacks, helps maintain clarity without overdoing it.
How Advanced Users Should Approach DAW and Plugin Choices
Many believe that owning a multitude of plugins or the latest DAW features will automatically produce superior results. Instead, focus on mastering a few high-quality tools. An overly cluttered DAW workspace can hinder rather than help your creativity. Invest time in learning the ins and outs of your primary software—whether it’s the best DAW for 2024 or other options—and develop a consistent workflow that enhances efficiency and quality.
How to Avoid the Biggest Voiceover Setup Mistakes
Common pitfalls include neglecting proper microphone placement and room acoustics. Many assume that a good mic alone will do the trick, but even the most expensive condenser mic can produce subpar results if positioned incorrectly or if the environment is uncontrolled. Use a combination of proper mic distance, acoustic treatment, and monitoring with quality studio headphones—see the headphone and interface guides—to get consistent, professional sound. Remember, small adjustments can lead to big improvements.
Have you ever fallen into this trap? Let me know in the comments. The key to mastering your audio setup is understanding these nuances and avoiding common pitfalls. With a focused approach, your sound can reach new heights of clarity and professionalism.
Keeping your audio setup running smoothly over time requires more than just initial investment; it demands regular maintenance and strategic tool choices. Whether you’re a podcaster, voiceover artist, or music producer, understanding how to maintain your gear and optimize your workflow ensures consistent, professional results that stand the test of time.
Prioritize Routine Checks and Calibration
Regularly inspecting your equipment is vital. For audio interfaces, clean the contacts and check for firmware updates—most manufacturers, like Focusrite or PreSonus, release updates that improve stability and performance. Microphones should be stored properly to prevent damage; using a dedicated case or stand minimizes exposure to dust and moisture. Headphones benefit from periodic cleaning of ear pads and checking for cable integrity. Calibration of your monitors and headphones ensures your listening environment remains accurate. Simple tools like a calibration microphone (e.g., Dayton Audio iMM-6) can help you verify your studio’s sound profile, maintaining a balanced mix environment.
The Software You Need to Keep It Fresh
Stick with a reliable DAW like the best DAW for 2024. Regular updates from your software provider fix bugs, introduce new features, and enhance compatibility. For plugins, avoid cluttering your workflow with unnecessary effects; instead, focus on mastering a few high-quality tools. Keep your plugin library organized and periodically review which ones you actually use—obsolete plugins can introduce stability issues or slow down your system.
Tools I Recommend for Long-Term Success
In my experience, a dedicated screen cleaner like the **iKlear** helps keep your gear free of dust and fingerprints, preventing performance hiccups. For cable management, Velcro straps and labeled ties make troubleshooting easier and reduce wear. I also swear by a portable SSD with regular backups of your projects—losing work due to a drive failure is a nightmare that can be avoided.
How do I maintain my setup over time?
Establish a routine schedule: monthly checks for firmware and software updates, quarterly cleaning of hardware, and annual calibration of your monitors or headphones. Invest in quality cables and replace them at signs of wear—cheap cables can introduce noise or fail unexpectedly. Keeping your environment stable, with controlled humidity and minimal dust, extends the lifespan of your gear. Additionally, documenting your setup with photos and notes can save time during troubleshooting or upgrades. As technology advances, staying informed through reputable sources like industry updates helps you adapt proactively, ensuring your studio remains reliable and ready for future projects. To get started, try implementing a monthly firmware check for your audio interface—it’s a simple step that pays off in consistent performance.
Lessons I Had to Learn the Hard Way About Audio Setup
- One of my biggest lightbulb moments was realizing that even high-end gear won’t help if I don’t understand gain staging and room acoustics. It’s tempting to focus on buying the latest mic or plugin, but mastering the fundamentals made a real difference in my results.
- Over-processing is a trap. I used to think I could fix everything in post, but I learned that capturing a clean, well-placed recording saves so much time and preserves natural sound quality. Less is often more.
- Consistent workflow beats having the most expensive tools. Learning my DAW inside out and developing a routine helped me get professional results without constantly chasing new plugins or gear.
- Room treatment isn’t optional. Small changes like adding foam panels or reducing background noise transformed my recordings from muddy to clear. Environment truly shapes your sound.
- Regular maintenance and calibration keep my studio reliable. Simple steps like firmware updates, cable checks, and monitor calibration prevent headaches and ensure quality every time.
Tools That Changed My Voiceover and Podcast Game
- Focusrite Scarlett Audio Interface — Reliable, easy to use, and perfect for beginners and pros alike. It’s helped me achieve clean, noise-free recordings.
- Audio-Technica AT2035 Microphone — A versatile condenser mic that captures natural voice tone and minimizes background noise, making my voice stand out.
- Sonarworks Reference Studio Calibration Software — Essential for maintaining accurate monitoring and ensuring my mixes translate well on different systems.
- Reaper DAW — Affordable, powerful, and with a user-friendly interface that speeds up my editing workflow.
Keep Moving Forward with Confidence
Getting your audio setup right isn’t just about gear — it’s about understanding your tools, environment, and workflow. Every small improvement adds up to a more professional, engaging sound that stands out in today’s crowded content space. Don’t be afraid to experiment, learn from your mistakes, and invest in what truly makes a difference for your voiceover or podcasting journey. Want to learn more? Check out the best DAW software for 2024 and voiceover setup essentials to elevate your studio today. What’s the biggest challenge you’ve faced in setting up your studio? Share below!”} ,