Ever sat in front of your microphone, ready to record that perfect voiceover or podcast episode, only to be met with a terrible echo or muffled sound? I remember those frustrating moments when no matter how much I tweaked my settings or adjusted my headphones, the audio just didn’t sound right. It was like trying to hear through a foggy window—disappointing and downright demoralizing. That lightbulb moment hit me when I realized that the secret wasn’t just in buying fancy gear but in setting it up correctly. And let me tell you, understanding how your audio interface and studio headphones work together can make all the difference.
Most creators overlook a crucial aspect: a proper setup. We tend to focus on microphones or DAW software, but the backbone of good audio is right there in your hardware configuration. A poor setup can lead to distorted recordings, fatigue from listening to bad sound, or worse—your work not sounding professional enough to attract or retain an audience. The good news? This isn’t as complex as it seems. With a few practical tweaks, you can elevate your home studio into a professional-sounding workspace that fuels creativity rather than hinder it.
Why a Proper Audio Setup Matters for Creators
Think about the last time you did a long recording session, only to find your ears tired or your voice sounding off. Sound quality isn’t just about clarity; it’s about consistency and confidence. When your setup is optimized, you stop worrying about technical issues and start focusing on your content. Plus, a good setup reduces the need for extensive post-editing, saving you time and frustration. It’s not just about having high-end gear; it’s about knowing how to use it effectively. That’s where I saw the biggest leap in my projects—when I finally learned how to properly connect, calibrate, and configure my audio interface and headphones. Did you face a similar battle trying to get your sound just right?
Research supports this: a study by Sound on Sound emphasizes the critical nature of proper studio monitoring setup, highlighting how even small adjustments can markedly improve sound quality. It’s a game-changer once you understand the nuances—like the importance of controlling acoustic environments and choosing the right headphones for your workflow.
Is Investing in High-End Gear Really Worth It?
This is the skepticism I hear most often. Honestly, I made the mistake early on of believing that the most expensive equipment automatically translated into professional results. Spoiler: it doesn’t. I wasted money on fancy headphones that looked great but sounded terrible in my room. The real key lies in pairing quality gear with proper setup techniques. So, before you splash out on the latest gear, I recommend understanding the fundamentals. Check out my ultimate guide to acoustic setup for a comprehensive overview.
This post will walk you through the essential steps to make your studio setup work for you—whether you’re recording vocals, crafting podcasts, or fine-tuning your mixes. Ready to unlock your sound potential? Let’s dive into what really makes a difference, starting with the heart of your studio—the audio interface and headphones that set the stage for great recordings.
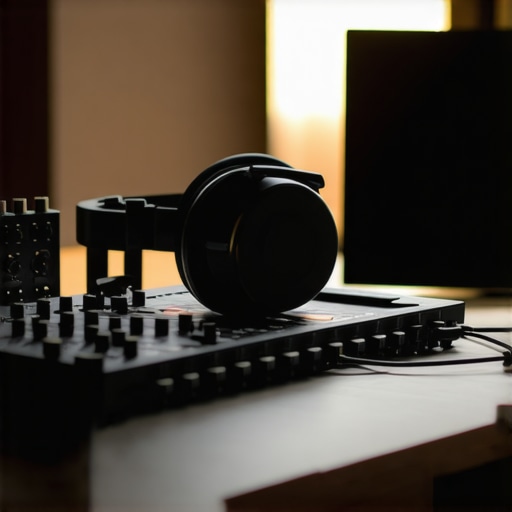
Secure Your Audio Interface
Begin by connecting your audio interface to your computer via USB or Thunderbolt. Ensure it’s powered on and recognized by your system. To avoid latency issues, choose a reliable interface like the best audio interface for professional voiceovers. When I first set mine up, I struggled with driver compatibility. Installing the latest drivers from the manufacturer’s website resolved my issues and improved sound quality significantly.
Configure Your Audio Settings Correctly
Next, set your system’s input and output devices to your interface. On Windows, go to Sound Settings, select your interface as the default device, and set the sample rate to 24-bit/48kHz for professional clarity. On Mac, do this through System Preferences > Sound. During my initial setup, neglecting this led to echoing and poor sound quality until I adjusted these settings, which made an immediate difference.
Choose the Right Studio Headphones
Your headphones are your critical reference. Opt for closed-back, flat-response studio headphones to avoid sound bleed and get an accurate picture of your recordings. Check out the studio headphones buying guide for recommendations. When I upgraded my old headphones to a pair designed for voiceover work, my editing accuracy soared, revealing nuances I’d previously missed.
Calibrate Your Headphones and Interface
Most interfaces have a gain knob; adjust this so your microphone signal peaks around -12dB to -6dB without clipping. Use a software like the free advanced guide to calibration to set levels. I once recorded a full project, only to realize my gain was too high, causing distortion. Proper calibration avoided this all.
Test Your Setup with Recordings
Before diving into real recordings, do test runs. Speak naturally into your mic at your typical volume and review the waveforms and audio quality. Make sure there’s no distortion or unusual background noise. I recommend recording a short clip and listening critically—look for clipping and adjust accordingly. This process saved me from redoing hours of work once I caught issues early.
Optimize Your Acoustic Environment
Eliminate unwanted reflections and background noise. Use foam panels or even blankets in your recording space. Keep your headphones on during tests to catch any ambient sounds. During my setup, I temporarily placed blankets around my room, which significantly reduced echo and made my voice sound clearer.
Integrate with Your DAW Software
Finally, connect everything to your DAW, like the best DAW for voiceover and podcast editing. Set your input and output devices to your interface. Enable monitoring so you can hear yourself in real-time, ensuring your levels stay consistent. My first few recordings had inconsistent volume until I adjusted the monitoring buffer size, which improved my workflow and sound consistency.
 Many creators assume that simply owning high-end microphones or headphones guarantees studio-quality sound, but in my experience, this is a dangerous misconception that can lead you astray. One prevalent myth is that expensive gear alone will compensate for poor setup techniques, overlooking critical calibration and environment factors. Another frequent mistake is neglecting the importance of proper gain staging on your audio interface, which, if misconfigured, introduces distortion regardless of your equipment quality. Overlooking acoustic treatment in your recording space is also a common oversight that hampers clarity and creates unwanted reflections, undermining even the best equipment. Moreover, misjudging the role of your DAW settings—such as buffer size and sample rate—can cause latency issues or unstable performance, hampering your workflow and output quality. Advanced users know that understanding the nuances of these configurations, as outlined in expert guides like the ultimate guide to audio interface setup, can elevate your recordings from mediocre to professional. Additionally, many underestimate the impact of proper headphone calibration—ensuring your reference monitors are accurate so you make better mixing decisions. The hidden nuance is realizing that equipment is just one piece of the puzzle; mastering setup intricacies, like proper room acoustic treatment and detailed calibrations, truly differentiates amateur from pro. Don’t fall into the trap of thinking gear alone suffices; instead, invest your time in understanding these subtleties. According to a study by Sound on Sound, even minor adjustments in your environment and configuration can lead to substantial improvements in sound quality. Have you ever fallen into this trap? Let me know in the comments.
Keep Your Gear in Peak Condition
Investing in quality equipment is only half the battle; maintaining it ensures your studio remains reliable over time. For your audio interface, regular firmware updates are crucial. Manufacturers often release updates that optimize performance, fix bugs, or enhance compatibility with new software. Set a quarterly reminder to check for updates on the manufacturer’s website or through dedicated control panels. Personally, I stick to this routine, and it’s prevented countless technical hiccups during critical recording sessions.
Studio headphones require more attentive care. Clean the ear pads regularly with a gentle alcohol wipe to remove sweat oils and debris. Use a soft brush to remove dust from the ear cups and drivers. If your headphones have removable pads, consider replacing them after prolonged use to maintain sound fidelity. This simple upkeep preserves the transparency and accuracy you rely on during editing, as highlighted in the studio headphones buying guide.
Tools to Streamline Your Workflow
Automation software can dramatically reduce editing time. I recommend using macro templates within your DAW, which automatically set levels, apply specific EQ curves, or insert common effects like noise reduction. This consistency not only saves time but also ensures your sound remains uniform across episodes. During podcast production, I rely on custom macros that prepare my tracks instantly, allowing me to focus more on creative content rather than technical tweaks.
Consider using a dedicated plugin for noise suppression, such as iZotope RX or Waves NS1. These tools can identify and reduce background noise or hiss with minimal effort. Applying such plugins as a final step after recording can elevate the clarity of your audio, making your content sound more professional. Regularly updating plugin licenses and settings keeps your workflow smooth and bug-free, aligning with best practices from industry-leading audio engineers.
What’s Next for Your Setup
As technology advances, expect more intelligent hardware integrations. Some modern audio interfaces now feature built-in DSP processing, allowing you to apply effects or noise reduction directly on the device, freeing up system resources. VoiceAI and machine learning tools are beginning to offer real-time voice enhancement, which could revolutionize remote recordings. Staying current with these innovations can give you a competitive edge, and I suggest following resources like the ultimate guide to audio interface setup to keep informed.
How do I maintain my equipment over time?
Developing a regular maintenance schedule is key. This includes cleaning gear, updating firmware and software, checking cable connections, and calibrating your monitors and headphones periodically. Label cables and store equipment properly to avoid physical damage. For example, unplugging your interface when not in use and storing headphones in a dedicated case prevent unnecessary wear. Implementing these simple habits ensures longevity and consistent performance. Remember, a small investment of time in maintenance today can save you costly repairs or replacements in the future. In fact, expert insights from iZotope’s technical documentation emphasize routine checks to sustain audio quality. Try scheduling weekly or monthly reviews of your setup, and you’ll notice a reduction in technical issues over time.
What I Didn’t Know About Room Acoustics Until It Was Too Late
One of my biggest revelations was realizing that even the priciest headphones can’t save poor room acoustics. I used to think that a fancy pair of studio headphones would instantly solve my echo issues, but I was mistaken. The moment I invested in simple acoustic treatments like foam panels, my recordings transformed. This taught me that environment plays a pivotal role, and neglecting it can undo the best gear.
Why Rushing Your Calibration Can Sabotage Your Sound
Blood, sweat, and tears went into my early recordings, only to discover they sounded muffled or distorted. The culprit? I skipped meticulous gain staging and calibration of my interface. Spending extra minutes calibrating levels prevented peak clipping and preserved audio clarity. Patience at this stage saves you hours in post-production and headaches during editing.
Secrets Only Pros Keep to Themselves About Headphone Choice
I used to believe all studio headphones were the same—until I tried a pair that responded flat and revealed every nuance. The choice of headphones directly affects your ability to produce and edit sound precisely. I trust the recommendations in the studio headphones buying guide because it emphasizes flat response and comfort—crucial for long editing sessions.
Why Making Noise Is Sometimes the Best Practice
I learned that recording test clips at different gain settings and listening critically can expose issues invisible in real-time. Using software like advanced calibration guides helps fine-tune your levels. These little experiments form the backbone of professional-quality recordings, preventing surprises when it matters most.
Resources That Have Transformed My Setup Approach
Over time, I found tools that boost my workflow and sound quality. The best audio interfaces ensure clean input, while plugins like iZotope RX help eliminate background noise effortlessly. Additionally, the top DAWs for voiceover work unlock creative possibilities I never imagined, making my production more intuitive and satisfying.
Find Your Voice and Make a Difference Today
Every setback in my journey revealed a new layer of understanding about creating professional voiceover content. If I could share one piece of advice, it’s this: never underestimate the power of setup, calibration, and environment — they form your foundation. Equip yourself with knowledge, practice patience, and watch your recordings elevate beyond simple hobbyist level. Remember, the path to mastering your voiceover craft starts with small, deliberate steps. Are you ready to refine your setup and unlock your full potential as a creator? Let’s discuss your experiences and questions below.
,
http://Jonathan%20Reed
Reading this reminded me of my initial challenges with setting up my home recording space. Like many, I started with decent gear but didn’t realize how much environment and proper calibration could impact the overall sound quality. It’s interesting how small adjustments—like matching the sample rate or proper gain staging—can make such a noticeable difference. I’ve also learned that investing time in acoustic treatment, even with simple foam panels, can significantly reduce echoes and reflections, which my high-end headphones alone couldn’t fix. It’s often overlooked how crucial environment tweaking is, especially for those working in rooms not specifically designed as studios. Have others found effective ways to soundproof or reduce echo in small, shared spaces without major renovations? I’d love to hear some practical tips from fellow creators who’ve navigated similar space constraints.
http://Emily%20Carter
This post really hits home for me, especially the part about calibration and acoustic treatment. I used to think investing in premium headphones alone would elevate my recordings, but I quickly realized that environment and settings matter just as much. When I introduced simple foam panels into my small home studio, the difference was immediate. Echoes and background noise diminished sharply, making my mixes clearer and more professional. I believe many creators overlook the importance of these basic treatments, thinking high-end gear compensates for poor room acoustics. Has anyone experimented with DIY soundproofing or budget-friendly acoustic solutions that worked well in compact or shared spaces? I’d love to hear what’s been effective for others—sometimes small tweaks can make a big difference in our #home studio setups.