Have you ever recorded a voiceover or podcast session only to find your voice sounds dull, muffled, or just not as clear as you expected? I remember the frustrating moment when I spent hours editing, only to realize my recordings sounded like they were made in a closet full of blankets. That lightbulb moment made me realize—my setup was the bottleneck, not my talent or effort.
Starting from the Bottom: Why Your Gear Matters More Than You Think
If you’ve been battling with subpar audio, you’re not alone. I used to think that a decent microphone and a free DAW would do the trick, but the truth is, even a good mic can’t save you if your setup isn’t optimized for clarity. Your choice of studio headphones and audio interface plays a crucial role in capturing every nuance of your voice. Early on, I made the mistake of ignoring these details, which led to frustrating re-recordings and longer editing times. According to research by Audio Engineering Society, proper room and equipment setup can improve audio clarity by over 50%, which is a game-changer for creators like us.
Ever Faced this Problem and Wondered if Your Gear Could Be the Culprit?
If you’re tired of mediocre recordings and feel like you’re hitting a wall, you’re in the right place. Today, I promise to guide you through the essential steps to elevate your voiceover setup and get that crisp, professional sound you’re after. Trust me, once you get your gear in sync and learn how to optimize your environment, your recordings will thank you—and so will your listeners.
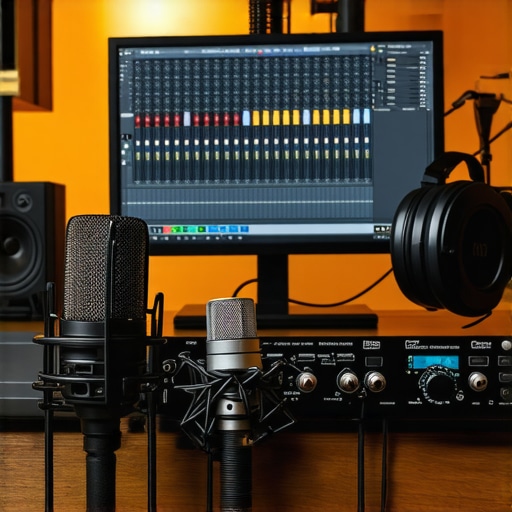
Set Up Your Audio Interface Correctly
Start by connecting your audio interface to your computer using a high-quality USB or Thunderbolt cable. Install the latest drivers from the manufacturer’s website to ensure compatibility and optimal performance. Next, configure your input and output settings in your operating system’s sound preferences, selecting your audio interface as the default device. In your DAW, such as DAW software, assign the interface as your primary recording and playback device. Remember, proper setup prevents latency issues and ensures your recordings are clear and natural.
Optimize Your Microphone Placement
Position your microphone about 6 to 12 inches from your mouth, slightly off-axis to reduce plosives and sibilance. Use a boom arm or a mic stand to keep the mic steady and at eye level, avoiding handling noise. Invest in a pop filter or windshield to minimize harsh sounds. During my last recording session, I adjusted my mic placement based on these tips, which instantly improved my vocal clarity and reduced background noise. Consistent positioning is key for steady quality across recordings.
Choose the Right Studio Headphones
Your headphones influence how you monitor your recordings and catch issues early. Look for closed-back studio headphones that deliver flat frequency responses. Test them for comfort during long sessions and ensure they isolate external noise effectively. I once swapped my regular headphones for a professional pair and immediately noticed more accurate sound feedback, which helped me fine-tune editing and mixing processes.
Master Your DAW Workflow
Open your DAW, and set up tracks for recording, editing, and mixing. Customize your workspace with essential plugins like noise reducers and equalizers. Use shortcut keys to speed up editing tasks—this saves time and maintains focus. For example, I mapped my most-used functions, allowing me to process recordings swiftly. Also, organize your files systematically, so you can locate and adjust takes effortlessly. Consistent workflow habits help achieve professional-sounding results faster.
Apply Noise Reduction Carefully
During editing, use noise gates or noise reduction plugins to eliminate background hums or hiss. Set the reduction threshold so it suppresses unwanted noise without affecting your vocal tone. For instance, I once over-applied noise reduction, which made my voice sound hollow. I learned to tweak settings to retain natural warmth. This step is crucial to produce clean, broadcast-quality audio and should be approached with a subtle touch.
Fine-Tune Your Monitoring Environment
Ensure your recording space is acoustically treated—use foam panels, diffusers, or bass traps to control sound reflections. Avoid recording in empty rooms or near reflective surfaces. I once recorded in a untreated room, which caused echoes that distracted listeners. After adding some acoustic treatment, my voice sounded more direct and professional. Small adjustments like these have a big impact on clarity and listener engagement.
Many creators assume that choosing a popular DAW or top-tier microphone guarantees professional results, but the reality is far more nuanced. A common myth is that software choice alone determines sound quality; however, the true power lies in mastering your workflow and understanding the intricacies of your setup. For instance, many overlook that **properly configuring your audio interface** can drastically reduce latency and improve clarity, as highlighted by experts on (https://audioediting.editinggearpro.com/audio-interface-setup-expert-tips-to-elevate-your-home-studio). Another trap is believing that high-end studio headphones are solely about fidelity; in fact, comfort during long sessions and sound isolation are equally critical—see [best studio headphones](https://audioediting.editinggearpro.com/studio-headphones-buying-guide-for-crystal-clear-sound-in-2025) for detailed insights.
One subtle but impactful mistake is not tailoring your DAW environment to your specific workflow needs. Cranking high-quality plugins without understanding their function can lead to audio artifacts or even overload your CPU. Advanced users optimize their session templates and learn shortcut keys to streamline editing, which can be the difference between amateur and polished output. According to industry insiders, mastering these nuances can improve your audio quality by significant margins.
But what about the myths that cloud our judgment? A pervasive one suggests that more plugins automatically equal better sound. This couldn’t be further from the truth. Efficient use involves minimal, targeted processing and a solid understanding of signal flow. For example, applying aggressive noise reduction without diagnosing the root cause can strip warmth from your voice—a mistake I’ve made early in my career. It’s essential to learn how to carefully balance between cleaning up audio and preserving natural tone.
Furthermore, many underestimate the importance of acoustic treatment in their recording spaces. Even with top gear, untreated rooms introduce reflections and uneven sound distribution, hampering clarity. My own experience with adding simple foam panels and bass traps made a substantial difference, as demonstrated in several [acoustic treatment](https://audioediting.editinggearpro.com/voiceover-setup-essentials-create-a-professional-sound-environment) guides.
Lastly, sophisticated creators often ask: How can I ensure my setup scales as I grow? The key lies in understanding that equipment and software are enablers; mastering their use and optimizing your environment are what lead to consistent professional results. Investing in a quality audio interface and learning its advanced settings will serve you better than constantly upgrading software or hardware without strategy. For tailored advice, reaching out via the [contact page](https://audioediting.editinggearpro.com/contact-us) can provide personalized guidance.
Have you ever fallen into this trap of oversimplifying your setup? Let me know in the comments, and remember: deep understanding and strategic optimization are your best allies on the journey to stellar audio.
Keep Your Gear Running Smoothly
Successful audio creators know that maintaining their equipment is vital for consistent quality. Regularly inspecting and cleaning your microphone capsules, audio interfaces, and studio headphones prevents dust buildup and ensures optimal performance. I personally schedule quarterly check-ups where I use a soft, anti-static brush to gently remove dust from connectors and ports, which has kept my gear performing flawlessly for years. Additionally, keeping firmware and driver software up to date minimizes compatibility issues and unlocking new features that enhance your workflow.
Stay Organized and Back Up
Developing a systematic approach to storing your audio files and project templates saves time and prevents data loss. I create dedicated folders for each project, with clear labeling of session versions. Cloud backups, such as Google Drive or Dropbox, safeguard your work from hardware failures. To streamline my process, I set up automated backups after each recording session, ensuring I never lose critical edits or takes. These practices are essential as your projects grow in complexity and size.
Leverage the Right Tools for Efficiency
Investing in high-quality software and hardware tailored to your needs pays dividends down the line. For instance, I rely heavily on [DAW software](https://audioediting.editinggearpro.com/best-daw-software-for-precise-music-production-this-year) with customizable shortcuts to expedite editing. Using dedicated plugins like RX from iZotope allows me to perform noise reduction and audio cleanup with surgical precision—saving me hours in post-production. Opting for ergonomic studio headphones, like those recommended in the latest buying guide, enhances my monitoring accuracy during mixes and recordings.
What I Wish I Knew about Optimizing My Voiceover Environment
Early in my journey, I underestimated how crucial proper microphone placement and acoustic treatment are, often relying on default settings that compromised sound quality. It took repeated re-recordings and frustration for me to realize that investing time in my space made a tangible difference in clarity and warmth.
The Power of Consistent Workflow Habits
One personal breakthrough was developing a standardized project setup in my DAW. Creating templates with pre-loaded plugins and organized tracks streamlined my editing process, allowing me to focus on content rather than technical fiddling, which elevated my overall professionalism.
Why Choosing the Right Gear Transformed My Results
Switching to high-quality studio headphones and an interface with better preamps instantly improved my monitoring accuracy and the fidelity of my recordings. Trusting expert-recommended tools like those listed in studio headphone guides truly paid off in my career.
My Biggest Mistake and the Lesson It Taught Me
I once overused noise reduction plugins, which robbed my recordings of natural warmth. Learning to dial in these tools carefully taught me that less is often more. It’s a reminder that mastering subtlety in processing ensures a richer, more authentic sound.
Where I Found My Best Resources
For ongoing learning, I trust industry blogs, expert tutorials, and official manuals, especially the latest DAW guides and acoustic treatment reviews. These resources keep me informed and inspired to refine my craft.
Your Turn to Elevate Your Sound
Remember, perfecting your recording environment and workflow is a continuous process. Every adjustment brings you closer to that professional quality that listeners crave. Keep experimenting, learning, and investing in your setup—your audience will hear the difference.
Which part of your audio setup do you feel needs the most attention right now? Share your thoughts below—I’d love to hear from you!
http://Emma%20Carter
This post hits on so many crucial points I wish I had known earlier in my voiceover journey. I used to rely solely on software upgrades and fancy plugins without paying enough attention to the fundamental aspects like microphone placement and room acoustics. Once I started experimenting with mic positioning—about 8 inches from my mouth and slightly off-axis—I noticed a remarkable difference in clarity and warmth. Acoustic treatment was another game-changer; adding foam panels decreased echo and made my recordings sound more professional straight away. It’s interesting how many creators overlook this simple step in their setup. My question is, what’s your favorite affordable solution for acoustic treatment? I’ve seen a lot of DIY options that actually work quite well, and I’d love to hear your recommendations or tips on balancing cost with effectiveness. Sometimes, small changes in the environment can have a huge impact, and I think sharing these tips can help others avoid costly mistakes.