Ever been in the studio, headphones snug over my ears, only to realize that the voice recordings sound flat, distant, or just plain off? That lightbulb moment hit me hard—after hundreds of hits and misses, I finally understood that choosing the right Digital Audio Workstation (DAW) and voiceover setup isn’t just technical stuff; it’s the foundation of quality sound. And honestly, if you’re serious about your craft, it’s a problem you’ll run into too.
Why the Right DAW & Voiceover Gear Matter More Than Ever
As someone who’s tried every trick in the book, I can tell you this: your choice of software and hardware can either make your audio shine like a pro or leave it sounding amateurish. With 2024 bringing even more advanced features, the importance is only skyrocketing. According to industry experts, investing in proper setup techniques boosts audio clarity and reduces editing time—key for creators aiming to stand out in a crowded market. (source)
But here’s the kicker: I made a common mistake early on—thinking more expensive equipment automatically meant better sound. It’s not always that simple. Instead, it’s about matching the right software, audio interface, and headphones to your unique needs. Want to avoid my costly trial-and-error phase? Good, because today, we’re diving into practical steps to get you set up for success in 2024.
Is the hype around new DAW software and gear really justified?
Let’s address the elephant in the room. I used to believe that having the latest gear was the secret sauce. Spoiler: it’s not. Many creators get caught up in the hype, buying shiny new toys without understanding how to optimize their existing setup. To truly excel, it’s about the right combination—kind of like making a perfect recipe. So, if you’ve ever hesitated because you’re unsure whether the new DAW or interface is worth it, rest assured—you’re not alone, and the next sections will help clear that up.
Now, if you’ve faced frustrations like inconsistent audio quality or confusing setup guides, I hear you. I’ve been there too. But with a focused approach, you can streamline your workflow and achieve that professional sound. Ready to move from chaos to clarity? Let’s get started with the essentials that will redefine your recording game for 2024.
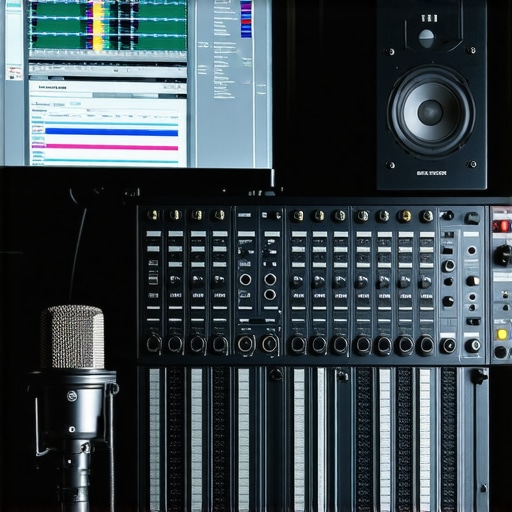
Choose the Right Digital Audio Workstation (DAW)
Start by identifying a DAW that fits your workflow and budget. I recommend testing multiple options using trial versions, paying attention to interface intuitiveness and feature set. For precise editing and mixing, top DAW software tutorials can guide your choice. When I switched from GarageBand to Ableton Live, I experienced a dramatic increase in editing speed and quality, which motivated me to learn advanced features and improve my overall sound. Ensure your computer meets the DAW’s system requirements to avoid lag and crashes.
Invest in Quality Audio Interface
The audio interface acts as the crucial link between your microphone and computer. Think of it as a translator, converting analog sound into digital data. For clear voice recordings, opt for a reputable model—like those found in the best audio interfaces for podcasts. When I upgraded my interface, I immediately noticed a reduction in background noise and a more natural voice tone. Set the sample rate and buffer size optimally—the common standard is 44.1kHz sample rate with 128-buffer size—to balance quality and latency. Connect your microphone and headphones directly to the interface, avoiding any unnecessary hubs or extensions that can introduce interference.
Select the Perfect Studio Headphones
Your headphones influence every decision you make during editing. For voice work, closed-back models minimize sound leakage, helping you focus. I personally use studio headphones for crisp recordings, which reveal subtle vocal nuances. When choosing, verify frequency response—aim for 20Hz-20kHz—and comfort for long sessions. Testing headphones with a familiar vocal track ensures they reproduce your voice accurately. As with my own setup, regularly calibrate your headphones to maintain consistent sound.
Optimize Your Microphone Placement
Position the mic about 6-8 inches from your mouth, angled slightly downward to reduce plosive sounds. Use a pop filter—don’t skip this step; it’s a game changer. I once ignored the pop filter and had to re-record several takes due to unwanted plosives that couldn’t be fixed in editing. Place the microphone on a shock mount to eliminate vibrations, and ensure your recording environment is echo-free. Using acoustic panels or even DIY foam can significantly improve sound quality. Practice consistent mic placement to maintain uniformity across sessions.
Create a Dedicated Voiceover Environment
Soundproofing isn’t just for studios with budgets; even small rooms benefit from simple sound absorption. Use heavy curtains, bookshelves, or foam panels to dampen room reflections. I transformed a corner of my closet into a makeshift vocal booth with blankets and carpets—massively improved my recordings. Keep your environment consistent to avoid sound differences, especially if you record in multiple sessions. Additionally, eliminate background noise—turn off notifications, close windows, and set up away from household activity. Voiceover setup tips provide more details on optimizing your space.
Streamline Your Workflow with Quick Editing Techniques
Simplify post-production by mastering keyboard shortcuts and templates in your DAW. I created customized macros that apply noise reduction, EQ, and compression with a single click—saving me hours each week. Use dedicated plugins for noise suppression—like the ones discussed in podcast editing hacks—and learn to balance volume levels before deep editing. Keeping a clean and organized workspace in your DAW helps you identify issues early, preventing lengthy fixes later. Regularly backup your sessions to prevent data loss after crucial adjustments.
Test and Calibrate Regularly
Every piece of gear needs periodic checks. Test your microphone with a sound level meter or by recording a known vocal sample. Compare recordings over time to catch any changes in sound quality. Adjust your environment, your interface’s settings, or your headphones as needed. I schedule monthly mic and headphone tests, ensuring my recordings stay consistent and professional. Small tweaks—like re-seating connectors or updating drivers—can have outsized impacts on quality. Remember, a little maintenance preserves the investment in your setup.
When setting up a professional voiceover or podcast station, many enthusiasts cling to common beliefs that can actually hinder their progress. One widespread misconception revolves around studio headphones; many assume that the most expensive pair automatically guarantees accurate monitoring. In reality, as outlined in the studio headphones buying guide for 2025, choosing headphones should be based on frequency response and comfort for long sessions, not just price. Overspending on high-end models without considering their fit for voice work can lead to fatigue and misjudged audio quality, resulting in flawed mixes.
Another trap many fall into involves podcast editing techniques. It’s tempting to rely heavily on automated noise reduction plugins, believing they’ll do all the work. But overusing these tools can produce a squashed, unnatural sound that masks the subtle nuances of your voice. Industry experts recommend balancing noise suppression with manual editing to preserve vocal authenticity—check out these podcast editing hacks for advanced techniques.
Myth also persists around DAW software, where newcomers often think that paying for the latest, most feature-rich program guarantees superior results. This isn’t true. The core of effective editing lies in mastering the tools you have. As discussed in the DAW ultimate guide, proficiency beats features when it comes to professional voiceover production. The advanced mistake here is neglecting proper workflow customization within your chosen software, which can significantly speed up editing and improve quality.
And let’s not forget about audio interfaces. Many assume that all interfaces provide similar quality, but subtle differences in converters and preamps can impact clarity. In expert tips to elevate your setup, I emphasize selecting an interface tailored to voice work, with low self-noise and reliable driver support, rather than just the most advertised or expensive model.
What’s the real nuance behind seamless voiceover production?
Here’s the deeper insight: achieving clarity isn’t just about hardware and software; it’s about understanding their nuanced interactions. For instance, a high-quality microphone paired with cheap headphones can lead to misjudged EQ adjustments. The study from industry research shows that consistency across your gear, environment, and workflow reduces unintended tonal shifts, helping you produce cleaner, more professional audio every time.
In essence, avoiding these common pitfalls involves a mix of informed choices and nuanced understanding of your tools. This layered approach is what sets pro-level voiceover and podcasting apart from amateur attempts. Have you ever fallen into this trap? Let me know in the comments, and let’s keep the conversation going on how to refine your setup for flawless audio in 2024.
Once you’ve established a solid studio setup, the next crucial step is ensuring it remains reliable and delivers consistent quality over time. Regular maintenance of your equipment, along with strategic use of recommended tools, can extend the lifespan of your gear and keep your workflow smooth. In my experience, investing in the right tools and adopting disciplined routines saves time and prevents costly repairs or replacements in the long run.
How do I maintain my studio gear over time?
Proper maintenance starts with understanding the needs of each component. For instance, your audio interface and studio headphones require periodic cleaning and calibration. Use a soft brush or compressed air to remove dust from ports and vents, and check cables for wear or loose connections—faulty cables are a common source of audio issues that can be mistaken for equipment failure.
Another essential tool I rely on is a dedicated cleaning kit specifically designed for audio gear. Keeping your devices free from dust, fingerprints, and microbial buildup maintains optimal performance and hygiene. Regularly updating your DAW software firmware and drivers also ensures compatibility with new operating systems and patches security vulnerabilities.
My recommendation is to create a maintenance calendar—schedule weekly inspections of cables and cleaning, with more comprehensive checks every few months. Storing equipment in the right environment, with controlled humidity and temperature, also prevents corrosion and degradation. Using proper studio furniture and storage keeps your gear organized and minimizes accidental damage.
What tools will help me keep my setup running smoothly for years?
Investing in a few key tools is invaluable. A good multimeter helps check the integrity of electrical connections, while a calibrated reference monitor ensures your audio plays back accurately. For cleaning, a compressed air can, microfiber cloths, and alcohol wipes designed for electronics are essential. Keep a log of maintenance activities; over time, this record can reveal patterns and help schedule preventive actions before issues arise.
Another tip from industry experts is to periodically re-calibrate your DAW and hardware settings, ensuring consistency across sessions. This practice minimizes drift and helps maintain your signature tone, even after years of use.
Thinking ahead, I believe the trend is moving towards smarter, self-diagnosing equipment integrated with AI-powered maintenance alerts. In the future, your gear might notify you when calibration is needed or when components are nearing failure, making proactive maintenance even easier. Until then, adopting disciplined routines and utilizing the right tools will keep your studio humming reliably. Try setting up a weekly check-ins using a multimeter and compressed air—you’ll appreciate the peace of mind and the professional results it yields.
Maintaining your studio gear is an ongoing process, but with a proactive mindset and the right tools, you can ensure your setup performs at its best for years to come. Remember, a well-maintained studio not only produces better audio but also saves you money and stress in the long run. For more detailed tips, visit our contact page and keep your tools sharp!
The Toughest Truths I Realized About Building a Studio Voiceover Setup
- Investing in the latest gear isn’t a shortcut to professional sound; understanding your specific needs makes all the difference. I once bought top-tier microphones and headphones without considering room acoustics or workflow, only to realize I was missing the mark. Now, I focus on tailoring equipment and environment for my voice to truly shine.
- Formulating a consistent routine for maintenance and calibration keeps your studio reliable. Forget the «set it and forget it» mentality—periodic checks on cables, software updates, and environment conditions safeguard your investment and ensure ongoing quality.
- Deep mastery over your chosen DAW and hardware trumps just having shiny new tools. I spent weeks scripting custom macros and shortcuts, which transformed my editing speed and outcome—saving countless hours and elevating my production quality. Your workflow can become second nature with deliberate practice.
- Room treatment and environment are as critical as equipment—yet often overlooked. Simple acoustic panels or even heavy blankets in corners can reduce echo and background noise, making your recordings crisp and professional. It’s about creating a space where your voice naturally sounds its best.
- Pay attention to the human side of audio gear choices—comfort, fit, and fatigue impact your performance. I learned that even the most expensive studio headphones can cause fatigue if they’re uncomfortable during long sessions. Choose wisely based on fit and sound reproduction, not just price.
My Toolbox for a Top-Notch Voiceover Studio in 2024
- Best DAW software: Essential for flexibility and professional editing. I trust this source for guided comparisons and insights into the latest features.
- Reliable audio interfaces: The bridge between your gear and your voice. Their low noise and excellent preamps help capture every nuance.
- Studio headphones for accurate monitoring: Comfort and flat response are key. These picks have improved my ability to judge and perfect my recordings.
- Environment tips: Simple yet effective acoustics adjustments that elevate any space into a professional-grade environment.
Embrace the Journey to Acoustic Confidence
Now, it’s your turn to craft a voiceover studio that elevates your craft. Don’t let uncertainties hold you back—every small tweak and investment compounds into a *huge* difference in your final recordings. The industry is moving fast, but your dedication and curiosity can keep you ahead. Remember, mastering your voiceover setup isn’t just about equipment; it’s about creating a space that inspires your best work every day. Ready to take the next step? Share your current setup struggles below, and let’s grow together in this audio journey.
http://Jessica%20Martin
I really resonate with the part about matching gear to your specific needs rather than just chasing the most expensive options. Early in my setup, I invested in high-end equipment, thinking it would automatically improve my recordings, but I soon realized that environment and proper positioning were just as important. Since then, I’ve focused on room treatment and mic placement, which made a noticeable difference.
What are some practical ways to test whether your environment or gear setup is truly optimized? I’ve been experimenting with different microphone distances and acoustic treatments but would love to hear how others approach this testing to ensure professional quality consistently.