I remember the exact moment I realized my recordings sounded amateurish despite owning high-end gear—my voice sounded distant, and the edits felt clunky. It was frustrating, and I thought I just needed better equipment. But after months of trial and error, I discovered the real issue wasn’t gear; it was my approach to digital audio. That lightbulb moment transformed my workflow, and now I want to share these insights with you.
In 2024, with so many options for [digital audio workstation (DAW) software](https://audioediting.editinggearpro.com/best-daw-software-for-precise-music-production-this-year) and podcast editing tools, choosing the right setup can feel overwhelming. Worse, common mistakes like underestimating the importance of a quality (https://audioediting.editinggearpro.com/audio-interface-setup-expert-tips-to-elevate-your-home-studio) or neglecting proper headphone calibration can sabotage your sound quality before you even start editing.
Have you ever faced a frustrating session where your recordings just didn’t capture the clarity you wanted? Does your current workflow leave you overwhelmed or second-guessing whether your gear is the real problem? Trust me, I’ve been there. The good news is, with a few strategic tweaks, you can vastly improve your audio quality—and it all starts with understanding the core tools and techniques.
Today, we’ll dive into some game-changing tips on setting up your DAW, optimizing your podcast workflow, and choosing the right hardware, so your recordings sound professional without breaking the bank. Want to avoid the pitfalls I stumbled into? Stick around, because mastering this can make all the difference in your creative journey.
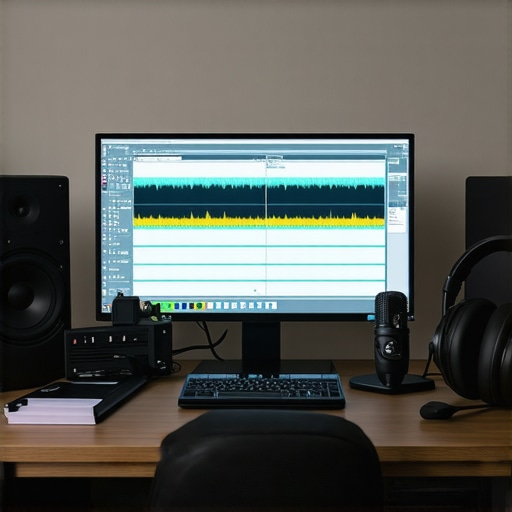
The Critical Role of the Right DAW and Hardware Setup
Choose Your Digital Audio Workstation Wisely
Start by selecting the right digital audio workstation (DAW) tailored to your needs. I once jumped between multiple options without settling, which led to inconsistent results. I finally committed to a system and mastered its features—learning shortcuts, organizing my tracks, and customizing settings for efficiency. This clarity in workflow allowed me to focus on creativity rather than technical hurdles.
Optimize Your Hardware Setup
Investing time in configuring your audio interface and headphones can significantly improve your sound. I remember struggling with latency and audio bleed until I followed expert setup tips, adjusting buffer sizes and selecting high-quality cables. Properly calibrated studio headphones, as described in the buying guide, deliver accurate monitoring essential for editing details. Take the time to set your hardware correctly; the difference in clarity is astonishing.
Cultivate a Clean and Organized Workspace
A cluttered environment hampers focus and increases editing errors. I cleared my desk of unnecessary gear and organized cables and storage. Using labeled folders for project files streamlined my workflow, reducing time searching for assets. You can further improve efficiency by creating dedicated recording zones, minimizing environmental noise, and ensuring your setup is ergonomic, which helps maintain focus during long editing sessions.
Develop a Consistent Recording Technique
Stable mic placement and proper voice technique are fundamental. I once recorded a series where inconsistent distance caused volume fluctuations—listeners noticed. I adopted a fixed microphone setup using adjustable boom arms and practiced speaking at a consistent distance. Additionally, I used a pop filter to prevent plosives and enhanced my recording space with acoustic treatments for clarity. These steps ensure each takes are reliable, saving time during editing.
Streamline Editing with Templates and Presets
Create project templates with predefined tracks, effect chains, and marker placements. I saved my favorite EQ, compression, and noise reduction presets, which I applied to new projects with a click. This approach, detailed in workflow hacks, reduces repetitive tasks and maintains consistency across episodes. Spend time initially setting up your templates to pay off with faster, more uniform editing sessions.
Regularly Back Up Your Work
Data loss can undo hours of effort. I transitioned from manual backups to automated cloud syncing, ensuring my projects are protected. Setting up automatic backups within your DAW or using dedicated backup software keeps your progress safe from crashes or hardware failure. Remember, it’s better to be safe and have multiple copies, than to lose everything unexpectedly.
Many enthusiasts settle for common wisdom about studio headphones and audio setup, but the truth is that a lot of what you hear is misleading or oversimplified. For example, a widespread myth is that expensive headphones automatically guarantee accurate sound; however, as emphasized in the studio headphones buying guide, accuracy depends more on the headphone’s calibration and frequency response, not just price. An advanced mistake is relying solely on subjective listening—many overlook measuring tools like frequency analyzers, which provide objective insights into how your headphones reproduce sound. This oversight can cause you to compensate ineffectively during mixing or voiceover work.
How can I ensure my headphones are truly accurate for critical editing?
Professional studios often use calibration microphones and acoustic treatment to verify their monitoring setup, ensuring the sound you’re adjusting is genuinely what your audience hears. Neglecting to calibrate your headphones or misunderstanding their limitations leads to a false sense of confidence; you might think your audio is clean when, in reality, it’s colored or imbalanced. It’s worth noting that even the most reputed headphones require calibration and proper room acoustics to reach their full potential, as highlighted in expert reviews. Additionally, many overlook Advanced audio interfaces’ role in granting clean, low-latency recordings which directly influence your voiceover quality. Using subpar interfaces or neglecting proper setup could introduce noise or latency, complicating your workflow. Don’t fall into the trap of thinking high-end gear alone can fix fundamental setup issues. Instead, visualize your environment as a system—each component, from the audio interface to the acoustics—to achieve professional results. Remember, a well-organized workflow and understanding of your equipment’s nuances often outperform expensive hardware used improperly. For voiceover artists, a common mistake is neglecting a dedicated setup—rushing into recording without proper acoustic treatment or microphone placement can compromise clarity. Check out voiceover setup tips to optimize your environment effectively. Invest in calibration, stay skeptical of oversimplified myths, and always test your gear objectively to enhance your audio quality. Have you ever fallen into this trap? Let me know in the comments.Maintaining your studio gear and software is crucial for consistent, professional-quality recordings. I recommend investing in a dedicated hardware maintenance kit that includes compressed air, contact cleaner, and microfiber cloths. Regularly cleaning ports, connectors, and your microphone capsules prevents dust buildup that can degrade sound quality over time. Additionally, keep your software up to date—not just for new features but to patch security vulnerabilities, ensure compatibility, and optimize performance, as highlighted in the latest [Digital Audio Workstation](https://audioediting.editinggearpro.com/ultimate-guide-to-digital-audio-workstation-daw-software-for-music-production) updates.
Automate backups of your projects using reliable cloud storage or dedicated backup drives. An example I personally use is Backblaze, which runs silently in the background, safeguarding all my recordings and edits without any hassle. For hardware, routinely check your cables and connectors for wear and replace any that show signs of corrosion or fraying. Paired with good ergonomic practices—like using a shock mount and acoustic treatment—this routine prevents costly repairs and ensures longevity.
Predicting the future of studio technology, I believe AI-driven audio editing tools will become standard, making maintenance and initial setups even more seamless. Keeping your system optimized now means you’re prepared for these advancements.

How do I maintain my voiceover setup over time? The key lies in consistent cleaning routines, software updates, and hardware checks. For example, regularly calibrating your audio interface and headphones is essential, as improper calibration can lead to misjudged sound levels or tonal imbalances. According to industry expert advice, using a calibration microphone with your audio interface allows you to verify and adjust your monitoring setup for accuracy—something I highly recommend. Additionally, staying organized with labeled cables, spare parts, and documentation helps prevent unexpected downtime. Try incorporating a weekly checklist that covers hardware cleanliness, software updates, and project backups; it will save you headaches down the line. Ready to streamline your maintenance routine? Implement these tips today for more reliable and high-quality recordings.
The Hardest Lesson I Learned About studio headphones,voiceover setup,daw software,audio interface,podcast editing
It wasn’t about buying the latest microphone or the most expensive headphones; it was realizing that calibration and understanding your equipment’s limitations are what truly make the difference. My biggest breakthrough came when I started measuring my headphones’ frequency response rather than relying solely on my ears, which often led me astray with misjudged mixes.
Three Myths About studio headphones,voiceover setup,daw software,audio interface,podcast editing That Held Me Back
First, that high price equals accuracy—most studio-grade headphones need calibration regardless of cost. Second, that expensive gear instantly guarantees professional sound; in reality, setup and room acoustics have a bigger impact. Third, that more plugins mean better quality—focusing on essential effects and proper hardware fosters more natural sound clarity.
What Experts Won’t Tell You About studio headphones,voiceover setup,daw software,audio interface,podcast editing
Often, the real secret is in your workflow, not just your equipment. For instance, creating and customizing templates in your DAW can save hours and ensure consistency. Additionally, understanding the intricacies of your audio interface’s settings can drastically reduce background noise and latency, which are invisible hurdles often overlooked by beginners.
Curated Tools That Made a Difference
My go-to plugin for noise reduction is iZotope RX; its transparent processing keeps my edits natural rather than over-processed. I also rely heavily on Reaper because of its flexibility and customization, which suits my evolving workflow. For hardware, the Focusrite Scarlett series remains my trusted choice for stable, high-quality recordings. These tools, combined with ongoing learning, elevate my studio quality beyond initial expectations.
Fuel Your Passion and Keep Improving
Remember, mastering studio headphones, your voiceover setup, and DAW isn’t just about equipment—it’s about developing an ear for detail and a workflow that adapts to you. Every tweak, every calibration, and every new tool embraced is a step toward more confident, professional sound. Don’t hesitate to experiment and refine your setup—progress often starts where comfort meets challenge. Are you ready to take your studio to the next level? Share your biggest obstacle below, and let’s tackle it together!