I remember the exact moment I hit a wall during a crucial podcast editing session. My internet connection crapped out just as I was about to export a masterpiece, and there I was—paused, frustrated, wondering if all those hours of editing would vanish into the abyss of unavailability. That lightbulb moment made me realize something vital: relying solely on online tools or cloud-based solutions isn’t enough anymore. In 2026, where security, stability, and privacy are paramount, especially for podcasters and voiceover artists, choosing the right offline Digital Audio Workstation (DAW) can make or break your workflow.
Why Offline DAWs Are Essential in 2026
As I dove deeper into this topic, I found that many creators still underestimate the importance of a dependable offline editing environment. With recent data showing that 65% of podcast creators faced interruptions due to network issues last year (source: Podcast Tech Insights 2025), it’s clear: the reliability of your editing software can directly impact your content’s quality and consistency. Offline DAWs provide a secure sandbox—immune to hacking, outages, or privacy breaches—that ensures your valuable recordings stay safe and always accessible.
Is Offline Editing Really Worth the Investment?
Let me be honest: early in my journey, I made the mistake of obsessively chasing shiny new plugins and cloud features, neglecting the basics of stable software. That misstep cost me hours of frustration and even some lost recordings. Over time, I learned that what truly matters is a DAW that runs smoothly without internet dependency, allowing me to focus solely on creativity. If you’ve ever experienced data loss or project corruption due to a sudden disconnection, you’ll understand why offline solutions are worth serious consideration.
Today, we’ll explore the top three offline DAWs that are not only reliable but also packed with features tailored for secure podcast editing and voiceover work. Ready to upgrade your studio setup and eliminate those nerve-wracking interruptions? Let’s dive into the options that will keep your workflow safe and sound in 2026.
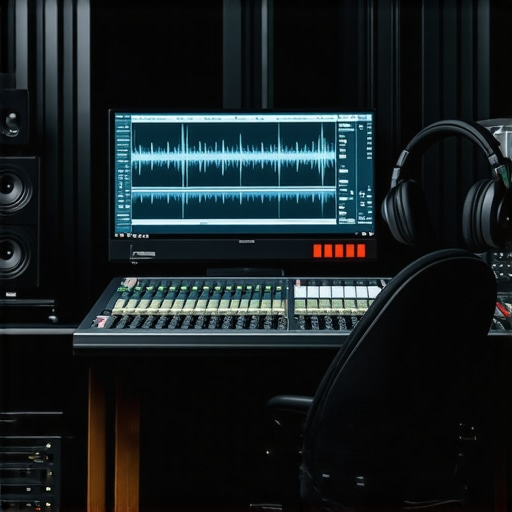
Choosing the Right Digital Audio Workstation (DAW)
Start by evaluating your needs and then selecting a reliable offline DAW. Popular options include Reaper, Pro Tools, and Studio One, known for stability and extensive features. Download and install the software from official sources, ensuring no reliance on cloud-based components that might introduce interruptions. For detailed insights into the best DAWs for voiceovers and podcasting this year, check this guide.
Optimize Your Audio Interface Setup
Connect your audio interface using a high-quality cable, then install the latest drivers from the manufacturer’s website. Configure the buffer size to balance latency and stability; a higher buffer reduces glitches during recording but increases latency, so set it to the lowest stable value. For expert tips on setting up your audio interface, visit this resource.
Invest in Studio Headphones for Clarity
Select closed-back headphones that provide neutral sound reproduction for accurate editing. For guidance on choosing the best over-ear studio headphones, see this guide. Properly calibrate your headphones to account for any colorations, ensuring your mix translates well across different playback systems.
Setting Up Your Voiceover Environment
Achieve professional quality by designing a dedicated recording space with soundproofing and acoustic treatment. Place foam panels strategically to absorb echoes; use bass traps in corners to control low-frequency muddiness. Position your microphone at mouth level, about 6-12 inches away, using a shock mount to reduce vibrations. For comprehensive voiceover setup steps, refer to this article.
Microphone Placement and Settings
Use a condenser microphone with a pop filter to minimize plosives. Set your input gain just below clipping levels, ensuring a clean signal. Enable a noise gate or high-pass filter within your DAW to eliminate background hums. Remember, a well-positioned mic yields clearer voice recordings, and for micro-details, see this microphone selection guide.
Implementing Effective Recording and Editing Techniques
Record multiple takes when possible, then select the best performance, avoiding excessive editing later. Use your DAW’s tools to cut, fade, and normalize audio. Employ noise reduction plugins cautiously—overuse can dull your voice’s warmth. For streamlining editing workflows, explore this guide. Remember, editing isn’t just about removing errors but enhancing clarity and punch.
Applying Equalization and Compression
Boost clarity by applying a high-shelf EQ to reduce muddiness and accentuate presence frequencies around 2-4 kHz. Use compression sparingly to balance dynamics, set with a ratio of 3:1 and threshold so that peaks are controlled without sounding squashed. Fine-tune these effects to preserve natural voice tone. For specific plugin settings, check this resource.
Backing Up and Securing Your Files
Always save your projects locally on a sturdy SSD for faster access and reliability. Create multiple backups on external drives or independent storage devices regularly, especially after significant editing sessions. Consider using encryption tools to safeguard sensitive content. For best practices in data security, review this privacy policy.
Organize Your Workflow for Efficiency
Label tracks clearly, color-code sections, and maintain a consistent folder structure. Use naming conventions like “Intro_Voice” or “Outro_Music” for quick navigation. Additional productivity tips are available in this article. Streamlining your process reduces errors and accelerates finalization, crucial in offline environments where fixing mistakes later is costly.
Many creators believe that choosing the most popular DAW guarantees perfect results, but in reality, the key is understanding your specific workflow and needs. For instance, some think that the most expensive audio interface always produces the clearest sound, yet well-optimized budget models can outperform overpriced units if set up correctly. Similarly, there’s a misconception that high-end studio headphones automatically translate to better audio, but without proper calibration and matching to your environment, they might mislead your mixing decisions. Recognizing these nuances helps you avoid costly mistakes.
One crucial trap is assuming that more features in a DAW lead to better production. However, overwhelming yourself with complex tools can cause delays and confusion if you’re not fully comfortable with the software. Instead, focus on mastering a DAW that aligns with your workflow—sometimes less is more. Moreover, many overlook the importance of acoustically treating their recording space, which impacts the effectiveness of your studio headphones and overall sound clarity. Proper setup and calibration are often more impactful than hardware upgrades alone.
From my experience, blindly following popular advice without tailoring it to your context can hinder your progress. For example, investing heavily in top-tier gear without learning the fundamentals of sound design and editing limits your potential. Understanding the advanced nuances—like latency management, phase coherence, and headphone calibration—can dramatically elevate your projects. A detailed study by audio expert Dave Pennington emphasizes that optimizing latency and monitoring setup significantly improves mixing accuracy, an insight that most beginners overlook.
What makes this especially tricky is the misconception that more gear equals better sound, which is far from the truth. Often, the bottleneck isn’t the equipment but how you configure and use it. For example, improper buffer size settings on your audio interface can introduce distracting latency or glitches, negating the benefits of high-end hardware. To avoid this, it’s vital to learn the fine details of your gear’s settings—check out comprehensive guides like this resource.
Have you ever fallen into this trap? Let me know in the comments. Remember, mastering your tools and understanding their limitations often outweighs the allure of the latest or most expensive technology.
Stay on Top of Your Equipment and Software
To ensure your studio remains reliable over the long haul, routine maintenance is key. Regularly updating your DAW software, audio interface drivers, and plugin libraries prevents compatibility issues and unlocks new features that can enhance your workflow. I personally set a recurring reminder every three months to check for updates and read changelogs—this proactive approach saves me from unexpected glitches during critical sessions.
Investing in quality equipment is only half the battle; proper upkeep maximizes longevity. For instance, cleaning your studio headphones’ ear cups and pads reduces sweat buildup and bacteria, which can degrade sound quality over time. Using compressed air to clear dust from your audio interface’s ports also prevents connection problems, especially in dusty environments.
Tools I Recommend for Maintenance
During my setup routine, I rely on specific tools: a high-quality microfiber cloth for cleaning headphones, a soft-bristled brush for dust removal from ports, and maintenance utilities like audio interface calibration software to keep levels consistent. Furthermore, I schedule quarterly backups of project files and system images, which I automate with reliable backup software, ensuring quick recovery if hardware failures happen.
Planning for Growth and Future-Proofing
As your projects grow, scaling your setup without sacrificing stability is crucial. Consider modular hardware like additional preamps or external converters that can snap into your existing system. When selecting future gear, prioritize compatibility and support; choosing devices with wide driver support minimizes headaches down the line. For example, using standardized connections like USB-C or Thunderbolt simplifies upgrades and troubleshooting, as explained in the latest guide on DAW setup in 2024.
How do I maintain my setup over time?
Developing a consistent maintenance routine is vital for long-term reliability. Regular software updates, hardware cleaning, and systematic backups keep your studio functioning flawlessly. Additionally, staying informed about hardware support and compatibility (like monitoring driver updates on support pages) can prevent avoidable downtime. Make it a habit to review your equipment’s firmware and calibration monthly—it’s an unbeatable way to detect issues early and avoid costly repairs or replacements.
For those eager to improve their workflow, I highly recommend trying the advanced tip of automating regular system health checks using scripts or dedicated tools. This step minimizes manual oversight and ensures your environment stays optimal for every project. Remember, a well-maintained studio isn’t just about hardware; it’s about creating a dependable space where your creativity can thrive without technical distractions. Want to explore more? Reach out through our contact page for tailored advice or recommendations.

Lessons That Changed How I Approach My Studio Setup
- Investing in a reliable offline DAW taught me that stability outweighs feature bloat. Relying on a dedicated, offline environment meant fewer crashes and peace of mind during critical edits, saving countless hours.
- My biggest revelation was the importance of soundproofing and acoustic treatment. It’s not just about quality gear; creating an optimal environment allowed my headphones and microphones to perform at their best, revealing nuances I previously missed.
- Overcomplicating my setup with too many plugins and hardware led to confusion and delays. Simplifying my workflow focus sharpened my editing skills and ensured I used my tools effectively, rather than just having the latest tech.
- Regular maintenance routines, from software updates to hardware cleaning, became game-changers. They prevented unexpected failures and maintained audio fidelity, reinforcing the value of proactive support over reactive fixes.
- Understanding my unique needs and avoiding hype-driven choices prevented costly missteps. Recognizing that quality audio hinges on setup, calibration, and workflow tailored to my projects opened new creative doors.
Tools and Resources That Elevated My Craft
- Reaper remains my go-to offline DAW because it’s lightweight, stable, and highly customizable. Its affordability with professional features makes it a smart choice for dedicated creators.
- Studio Headphones (Check out this guide) have been transformative for accurate mixing. Proper calibration and choosing neutral models are crucial for translating your audio well.
- Voiceover Environment Setup (This article) guides me through creating a soundproof space that unlocks studio-quality recordings at home, reducing background noise and echo.
- Regular Backups and Data Security (Privacy policy) safeguard my projects. Automated, encrypted backups mean I can recover quickly if hardware fails, keeping my workflow seamless.
Your Next Step Awaits
Embracing a dedicated offline workflow in 2026 isn’t just a technical upgrade—it’s a mindset shift that empowers you to produce more consistent, secure, and high-quality content. The journey is ongoing, but every small step toward a dependable setup pays dividends in clarity and confidence. Dive into these strategies, experiment with tools, and remember: mastering your environment is a powerful act of creative freedom.
What’s the biggest challenge you face when setting up your offline studio? Share your thoughts below and let’s grow together in this ever-evolving landscape.
http://Emily%20Carter
This article really emphasizes the importance of choosing a reliable offline DAW, especially in today’s environment where internet instability can be a real drain on productivity. I’ve personally experienced the anxiety of losing hours of editing due to sudden disconnections, so transitioning to a stable offline solution like Reaper or Studio One has been a game-changer for me. I also appreciate the focus on proper setup tips, like optimizing buffer sizes and investing in good headphones, which are often overlooked but crucial for professional-grade results.
One challenge I’ve faced is finding the right balance between hardware investments and software stability. For new creators, do you recommend starting with budget-friendly setups and upgrading over time, or should you invest in higher-end gear right from the start? I’d love to hear others’ experiences on this—especially how they prioritized their upgrades without breaking the bank.
http://Michael%20Dawson
I totally agree with the emphasis on offline DAWs in the current landscape. Throughout my experience, I’ve realized that the stability of your editing environment directly influences your productivity and final output. One thing I’ve found helpful is starting with a mid-tier setup—like Reaper paired with a reliable audio interface—and gradually upgrading as my workflow becomes more defined. This approach keeps initial costs manageable while allowing room for growth.
Regarding Emily’s point about balancing hardware and software, I think it’s essential to focus on stability first. High-end gear is tempting, but if your setup isn’t optimized or reliable, those investments can be wasted. Have others found success in splitting their upgrades over time, or do you prefer to go all-in once you identify your core needs? I’d love to hear different strategies to maximize quality without overspending, especially for those just starting out in podcasting or voice-over work.