My Journey into Perfect Voiceover Setup: From Guesswork to Precision
When I first started my voiceover journey, I was overwhelmed by the sheer number of equipment options and technical jargon. I vividly remember spending countless hours experimenting with different microphones and audio interfaces, trying to find that perfect combination. It was only after I invested in quality gear and really understood the nuances of sound production that I started to see real progress. Today, I want to share some of my personal insights on choosing the best voiceover setup and audio interface tips for 2024, so you can avoid some of the pitfalls I faced.
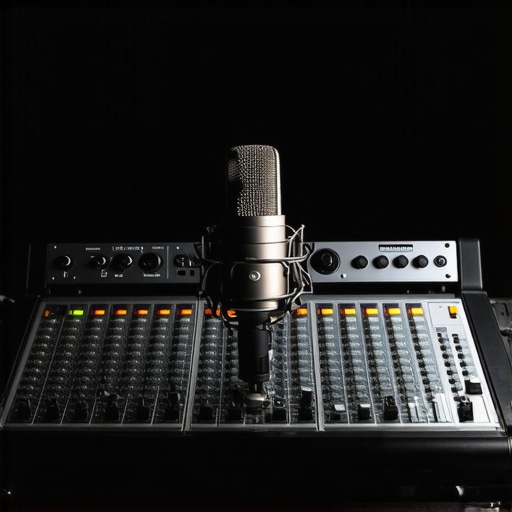
Why Your Audio Interface Can Make or Break Your Voiceover Quality
In my experience, the audio interface is the backbone of a professional voiceover setup. It’s not just about connecting your microphone; it’s about ensuring pristine sound quality and minimal latency. I’ve tested various models, and I can confidently say that a good audio interface, like those recommended in expert tips for setting up your home studio, can significantly elevate your recordings. When I upgraded to a high-quality interface, the clarity and warmth of my voice improved remarkably, making post-production much easier and more effective.
How to Choose the Perfect Microphone and Interface Combo
Choosing the right microphone is just as critical as selecting the interface. During my research, I found that condenser microphones often deliver the best vocal richness for voiceovers, especially models like the Rode NT1 or Audio-Technica AT4040. Pairing these with a reliable audio interface, such as Focusrite Scarlett or Universal Audio Apollo, results in a professional-grade setup. I learned that considering factors like preamp quality, bit-depth, and sample rate is vital. For a comprehensive guide, I highly recommend visiting best voiceover setup tips & audio interface picks for 2024.
Is My Soundproofing and Environment Making a Difference?
Absolutely. Even with the best gear, ambient noise can sabotage your recordings. I realized that investing in soundproofing and acoustic treatment made a huge difference in my voice clarity. Simple measures like foam panels and a dedicated recording booth transformed my home studio into a professional environment. For more detailed tips, check out voiceover setup essentials.
What are the key factors I should consider when setting up my audio interface for voiceover work?
Great question! From my experience, focus on the preamp quality, connectivity options, and compatibility with your computer system. Also, ensure that the interface supports high sample rates (at least 96kHz) and bit depth (24-bit) to capture every nuance of your voice. Reading reviews and user feedback helps, but testing the gear personally is the best way to ensure it fits your specific needs. Keep in mind that a good interface should also be durable and easy to operate during long recording sessions.
If you’re just starting or looking to upgrade your setup, I encourage you to explore more in-depth guides like the best DAW software for voiceover and podcast editing in 2024. And don’t forget, sharing your progress and experiences helps others in the community—feel free to leave a comment below or reach out via our contact page.
Optimizing Your Audio Interface Settings for Professional Voiceovers
Once you’ve chosen the right audio interface, fine-tuning its settings becomes crucial. In my experience, adjusting buffer size and clock source can dramatically impact your recording quality and latency. A lower buffer size reduces delay during recording sessions, but can strain your computer if set too low. Balancing this setting is essential for smooth workflow. Additionally, ensuring your interface’s clock source is locked to a high-quality external clock prevents jitter, which can cause subtle phase issues and degrade sound clarity.
How Can Advanced Features of Modern Audio Interfaces Enhance Your Voiceover Quality?
Many of today’s top-tier interfaces come with onboard DSP processing, offering real-time noise reduction, compression, and EQ. These features allow you to shape your sound before it hits your DAW, saving time in post-production. For instance, interfaces like the Universal Audio Apollo series include real-time UAD plugins, providing studio-grade processing power at your fingertips. Leveraging these tools can help you achieve a polished, broadcast-ready voice without extensive editing afterward. Carefully exploring your interface’s advanced features can unlock a new level of professionalism in your recordings.
What Are the Practical Considerations When Integrating Your Audio Interface into a Home Studio?
Integration goes beyond just plugging in gear. Cable management, power supply stability, and ergonomic placement all influence your workflow. I recommend using high-quality, shielded cables to prevent electromagnetic interference, especially if your environment has many electronic devices. Proper placement of your interface—ideally close to your microphone and headphones—reduces cable clutter and minimizes signal degradation. Additionally, ensuring your computer’s drivers are up-to-date and compatible with your OS prevents connectivity issues that can interrupt your recording sessions.
Am I Overlooking Any Hidden Aspects That Could Impact My Voiceover Sound Quality?
Absolutely. Beyond the obvious gear choices, room acoustics and monitoring setup play a pivotal role. Even with the best interface, poor room treatment can introduce unwanted reflections or background noise, undermining your efforts. Consider investing in acoustic panels, bass traps, and quality studio headphones, like those recommended in studio headphones buying guide for 2025. Properly calibrated monitors and headphones ensure you make accurate mixing decisions, translating your voice recordings into a professional sound.
For more detailed insights into configuring your gear, check out the best DAW software for precise music production, which complements your hardware setup. Remember, the key to stellar voiceover quality lies in meticulous attention to detail across all aspects of your setup. Feel free to share your experiences or ask questions in the comments—your journey to professional voice recordings starts with mastering your gear!
Mastering the Art of Audio Interface Tweaks: Personal Insights and Hidden Gems
One of the most overlooked yet crucial aspects of my journey to professional-grade voiceovers has been the meticulous adjustment of my audio interface settings. While many focus on selecting the right mic or acoustic treatment, I found that understanding the subtleties of buffer size, sample rate, and clock source can dramatically elevate your sound quality. I remember experimenting late into the night, tuning my interface to find that sweet spot where latency disappears and clarity peaks. It’s almost like discovering a secret language between your hardware and software—once you crack it, your recordings become more natural and effortless.
The Deep Dive: Why Do Buffer Size and Sample Rate Make Such a Difference?
Buffer size, in particular, became my obsession. A lower buffer size reduces latency, making real-time monitoring more responsive—crucial when capturing subtle vocal nuances. However, setting it too low strained my computer, causing glitches. Conversely, a higher buffer size eased the load but introduced noticeable delay, disrupting my flow. Finding that balance was key. As I explored further, I learned that the sample rate, ideally set at 96kHz or higher, captures more detail, especially when combined with a high-quality preamp. This combination makes a tangible difference in how natural and rich my voice sounds in recordings. For those interested in precise settings, I highly recommend reviewing the expert tips in this comprehensive guide.
Is External Clocking the Unsung Hero in Audio Quality?
Absolutely. I used to overlook the importance of the clock source, but once I locked my interface to an external high-quality clock, the phase coherence and clarity improved significantly. Jitter—a subtle timing error—can introduce phase issues and muddy your sound. External clocking ensures your digital audio signals stay perfectly synchronized, especially when recording multiple sources or using complex plugins. It’s like giving your gear a steady heartbeat, and I can attest that this upgrade brought a noticeable professional polish to my recordings.
How Do Advanced Interface Features Like DSP Processing Impact Your Workflow?
Modern audio interfaces often come with onboard DSP—digital signal processing—that can do wonders. For example, real-time noise reduction and EQ help me shape my voice before it hits the DAW, saving hours in post-production. I’ve experimented with interfaces like the Universal Audio Apollo, which offer UAD plugins for compression and de-essing in real time. These tools give your voice a broadcast-ready sheen, making your recordings sound polished straight out of the box. The key is mastering these features without becoming overly dependent, preserving the natural warmth and character of your voice while eliminating distractions.
Integrating Your Interface Into a Cohesive Home Studio Environment
Beyond settings, the physical environment matters just as much. Cable quality, power stability, and ergonomic placement can influence your results. I learned to invest in shielded cables and keep my interface close to my mic and headphones—minimizing signal loss and interference. Additionally, I’ve found that dedicated power supplies reduce noise floor and prevent unwanted hums. It’s a holistic process—your gear, environment, and settings must work seamlessly to achieve that professional sound. For a deep dive on optimal setup, explore this essential guide.
Are There Any Less Obvious Factors That Could Be Sabotaging Your Sound?
Indeed. Room acoustics and monitoring setup often fly under the radar. I once thought my gear was perfect, only to realize that my untreated room introduced reflections and muddiness. Upgrading my acoustic panels and investing in high-quality studio headphones from this buying guide transformed my ability to hear the tiniest details and make precise adjustments. Proper calibration of monitors and headphones ensures your mix translates perfectly across different playback systems. Remember, high-fidelity gear is only effective if your environment complements it—so don’t neglect this crucial piece of the puzzle.
If you’re eager to refine your hardware setup further, I recommend exploring the best DAW software for voiceover. Sharing your experiences and challenges can also spark valuable discussions—feel free to connect through our contact page. Your journey to pristine, professional voice recordings begins with understanding and mastering these nuanced settings—trust me, it’s a game-changer.
Refining Your Digital Heartbeat: The Art of External Clocking and Its Impact on Sound Precision
One of the most subtle yet transformative enhancements I implemented was external clocking for my audio interface. By synchronizing my hardware with a high-precision external clock, I noticed a significant reduction in phase discrepancies and jitter—those sneaky timing errors that can subtly muddy your recordings. This upgrade was akin to giving my digital audio a steady heartbeat, resulting in cleaner, more cohesive sound. According to renowned audio engineer Bob Katz, external clocking is essential for maintaining the integrity of high-resolution recordings, especially when multiple devices are involved (Digido). For those serious about professional-grade output, exploring external clocking options can be a game-changer, ensuring your recordings are not just good but exceptional.
Harnessing Embedded DSP: Elevating Your Voice with Real-Time Processing Power
Modern audio interfaces equipped with onboard DSP open a realm of possibilities for real-time vocal enhancement. I vividly recall experimenting with my interface’s onboard noise reduction, compression, and EQ—features that traditionally demanded extensive post-production. Using these tools during recording allowed me to sculpt a polished, broadcast-ready voice instantly. Interfaces like the Universal Audio Apollo series exemplify this capability, offering UAD plugins that deliver studio-quality processing in real time (top studio headphones guide). Mastering these advanced features requires a nuanced understanding; overuse can strip away natural warmth, while strategic application enhances clarity and presence. I encourage you to delve into your interface’s DSP capabilities and experiment—this can significantly streamline your workflow and elevate your recordings to new heights.
Beyond the Gear: Crafting an Acoustic Environment That Works in Tandem with Your Hardware
While technical settings are crucial, the acoustic environment remains an often-overlooked pillar of professional voiceover quality. I found that even the most sophisticated gear cannot compensate for a reflective, untreated room. Investing in acoustic treatments—foam panels, bass traps, and diffusers—transformed my space into a controlled environment that complements my gear perfectly (sound environment guide). Proper placement of monitors and headphones, coupled with strategic room treatment, ensures accurate monitoring, which is vital for making precise adjustments. Remember, your gear is only as effective as the environment allows; a harmonious setup ensures your hard work translates into pristine recordings every time.
Are There Lesser-Known Yet Crucial Settings That Could Elevate Your Recordings?
Absolutely. In my experience, phenomena like clock jitter, buffer size, and sample rate are often misunderstood or overlooked. Tweaking buffer size to find a sweet spot between latency and stability can dramatically improve recording sessions—especially when capturing subtle vocal nuances. Higher sample rates, such as 96kHz or above, provide richer detail and better translatability across playback systems. An insightful resource I recommend is this comprehensive guide. It emphasizes that mastery of these settings, combined with understanding your specific hardware, can unlock a level of clarity and professionalism that sets your work apart. I invite you to share your experiences or ask questions—sometimes, the smallest adjustments can make the biggest difference in your sound.
Embracing the Nuances: The Personal Journey Toward Sonic Perfection
Through years of trial, error, and relentless curiosity, I learned that the pursuit of perfect voiceover recordings is as much an art as it is a science. Each component—be it your interface, environment, or settings—interacts in a complex ecosystem that demands attention to detail. I encourage you to approach your setup as a dynamic process, continuously refining and experimenting. The rewards are profound: recordings that resonate with warmth, clarity, and professionalism. Dive into advanced topics, explore new tools, and don’t hesitate to push the boundaries of your current knowledge. Your dedication and curiosity are the true drivers of excellence in voiceover artistry. For more insights and personalized advice, feel free to connect through our contact page. Remember, mastering your gear is a journey—embrace it with passion and precision, and your voice will always stand out in the crowd.
Things I Wish I Knew Earlier (or You Might Find Surprising)
1. The Power of Room Acoustics
Early in my journey, I underestimated how much room acoustics impacted my recordings. Investing in acoustic panels and bass traps transformed my sound, making my voice clearer and more professional. It’s a reminder that gear alone isn’t enough—your environment plays a crucial role.
2. The Subtle Art of Buffer Size
Adjusting the buffer size on my audio interface felt technical and daunting at first, but mastering it reduced latency and improved my workflow. Finding the right balance between low latency and system stability was a game-changer for capturing nuanced voice details.
3. External Clocking as a Quality Boost
Locking my interface to an external high-quality clock significantly improved sound clarity. It’s one of those hidden settings that can elevate your recordings from good to professional, especially when working with high-resolution audio.
4. Onboard DSP: Your Real-Time Secret Weapon
Modern interfaces with onboard DSP, like the Universal Audio Apollo, allow real-time noise reduction and EQ. Using these features during recording saved me hours in post-production and gave my voice a polished, broadcast-ready quality.
5. The Role of Monitoring & Headphones
High-quality studio headphones and well-calibrated monitors are often overlooked but essential. They help me make accurate mixing decisions, ensuring my recordings translate well across different playback systems.
6. Continuous Learning & Experimentation
The most valuable insight has been that mastering your voiceover setup is an ongoing process. Regularly experimenting with new settings, gear, and acoustic treatments keeps your sound fresh and professional.
Resources I’ve Come to Trust Over Time
- https://audioediting.editinggearpro.com/best-daw-software-for-precise-music-production-this-year — This guide deepened my understanding of DAW options optimized for voiceover work, helping me choose the right software.
- https://audioediting.editinggearpro.com/studio-headphones-buying-guide-for-crystal-clear-sound-in-2025 — A comprehensive headphone buying guide that’s been invaluable for selecting monitors that reveal every vocal nuance.
- https://audioediting.editinggearpro.com/voiceover-setup-essentials-create-a-professional-sound-environment — This resource provided practical advice on acoustic treatment, which truly transformed my home studio environment.
Parting Thoughts from My Perspective
Embarking on the journey to perfect voiceover recordings is as much about understanding the nuances of your gear as it is about creating an optimal environment. The hidden truths—like the importance of room acoustics, external clocking, and onboard DSP—are often overlooked but can make all the difference in your sound quality. My advice is to stay curious, keep experimenting, and leverage trusted resources to guide your upgrades. Remember, every small tweak brings you closer to that professional, polished voice that stands out. If this resonated with you, I’d love to hear your thoughts—share your experiences or ask questions below. Your voice deserves to be heard at its best, and the journey starts now.
http://Amanda%20Lee
Reading through this comprehensive guide truly resonated with my own experience when I was just starting out in voiceover work. I remember feeling overwhelmed by all the technical details, especially when it came to selecting the right audio interface and optimizing settings like buffer size and sample rate. What struck me most was the emphasis on understanding the deeper nuances such as external clocking and onboard DSP features—these are often overlooked but can make a huge difference in achieving that professional sound. I’ve personally found that the room environment and monitoring setup are equally crucial, as even top-tier gear can be rendered ineffective if acoustics aren’t addressed properly. Has anyone here experimented with different external clock sources or tried onboard DSP for voice recordings? I’d love to hear how these choices impacted your workflow and final results, as I’m considering upgrades myself.
http://Benjamin%20Carter
This post really hits close to home for me because I’ve spent months tweaking my setup, especially focusing on the importance of external clocking and onboard DSP features. One thing I found crucial was experimenting with different onboard DSP plugins directly on my interface, like noise reduction and subtle EQ, which helped me achieve a broadcast-quality sound in real time. It’s fascinating how these features can reduce the need for extensive post-production, saving time and maintaining the natural warmth of my voice. However, I also learned that these onboard features need to be used judiciously—overprocessing can sometimes strip away your vocal character. I’m curious, has anyone balanced using onboard DSP during recording with the need for natural sound? Also, I’ve been exploring external clock sources but would love to hear real-world experiences about how different clocks have affected your recordings. Sharing insights can really help us refine our approach and get even closer to that professional, polished sound.
http://Megan%20Elizabeth
Reading this post really resonated with my own early experiences in voiceover work. I remember feeling overwhelmed by the array of gear options and technical settings like buffer size and sample rate. What I found most impactful was understanding the importance of audio interface features like jitter reduction and onboard DSP. I’ve experimented with locking my interface to an external clock, and it definitely improved the coherence of my recordings, especially when layering multiple sources. One challenge I faced was balancing the use of onboard DSP—overprocessing can sometimes take away the natural warmth of your voice. Have others found a sweet spot for using real-time effects, or do you prefer to treat your recordings more minimally during capture? This journey to mastering my setup has truly emphasized the value of continuous learning and experimentation. It made me wonder, how do you all approach integrating advanced interface features without losing the authentic character of your voice? Would love to hear your insights and tips!
http://Ethan%20Miller
This post really resonated with my own learning curve when I was trying to understand the importance of every component in my voiceover setup, especially the role of the interface. I’ve found that investing in a reliable external clock source has surprisingly made a big difference, especially in multi-source recordings. It’s like giving your entire system a steady rhythm, which enhances clarity and reduces phase issues. Have others here experimented with different clock sources, and if so, which ones worked best for you? I also started exploring onboard DSP features on my interface, such as real-time noise suppression, but I agree with Megan’s point that overprocessing can sometimes strip away that natural warmth we’re striving to capture. It’s all about finding that balance. For me, testing multiple configurations and listening critically has been the key. Would love to hear more about how others have fine-tuned their setups for that professional sound that still feels natural.
http://Lila%20Morgan
This article really struck a chord with me because I’ve also been exploring the nuances of interface settings lately. I recently tried experimenting with different sample rates and found that going higher than 48kHz truly enhances the clarity of my recordings. However, I’m curious about how others here balance high sample rates with CPU load and latency issues. Have any of you experienced a noticeable difference when upgrading your clock source or enabling onboard DSP features? I’ve been considering adding a high-quality external clock but would love to hear real-world experiences. Also, I’ve noticed that room acoustics drastically affect the final sound—no amount of gear tweaks can compensate for poor treatment, which ties back to the importance of holistic setup. What strategies have you all used to fine-tune your environment just as much as your gear? Would appreciate any tips or lessons learned!
http://Sophia%20Grant
This post really hits the mark for me because I’ve been diving into optimizing my voiceover setup recently, especially focusing on external clocking and DSP features. I totally agree that these often-overlooked elements can make a huge difference in sound clarity and warmth. One thing I found fascinating is how locking your interface to an external clock can drastically reduce jitter, leading to more cohesive recordings—especially when layering multiple vocal takes or using complex plugins. I’ve experimented with different clocks, and the results are inspiring. My question is, how do others balance the use of onboard DSP to enhance your sound without overprocessing? I find that a subtle application works best, but I’d love to hear tips from folks who have mastered this. Also, I’m curious—has anyone upgraded their environment with acoustic treatment while fine-tuning these technical settings? The synergy between room acoustics and gear seems like the secret sauce for that professional quality. Would love to hear your insights and experiences!