Ever felt that sinking feeling when recording your voiceover and suddenly hearing a distant echo or background bleed creeping into your microphone? It’s that moment of frustration when, despite careful setup, unwanted sound sneaks in, ruining your session. I remember the first time I experienced this—thinking I had all my gear perfectly tuned, only to find my voice overshadowed by stray noise. That lightbulb moment made me realize how critical proper mic bleed management is, especially as gear becomes more advanced in 2026.
Why Mic Bleed Is the Silent Killer of a Professional Voiceover Environment
Mic bleed, the spill of sound from another source into your microphone, can sabotage clarity and consistency in your recordings. In 2026, with new audio interfaces and DAW software packed with features, many voiceover artists overlook how essential it is to control this sneaky problem. Ignoring it can lead to longer editing sessions and compromised sound quality, which nobody wants.
Is Mic Bleed Only a Minor Issue, or Does It Seriously Matter?
Early in my journey, I ignored the importance of mic placement and room acoustics, assuming fancy gear could compensate. That mistake cost me extra hours in post-production. Recent studies highlight that proper recording environment adjustments are vital; this article emphasizes how even minor bleed can create a boxy or muddy sound if unchecked. The good news? With the right tweaks, you can dramatically reduce or eliminate mic bleed, giving your recordings that crisp, professional edge.
So, are you tired of battling background noises that sabotage your voiceovers? If yes, then you’re in the right place. Over the next sections, I’ll guide you through four effective fixes that have personally transformed my workflow. Let’s get started on creating cleaner, clearer recordings—because your voice deserves to shine without interference.
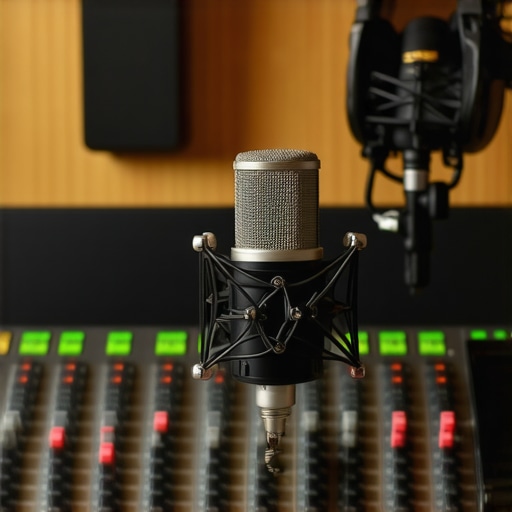
Optimize Your Microphone Placement
Start by positioning your microphone correctly. Keep it close to your mouth—about 6 to 12 inches—and slightly off-axis to the sound source. This reduces ambient noise pickup and prevents room reflections from entering the capsule. Recall the time I used a boom arm to position my condenser mic right at mouth level; the difference in clarity was immediate, and background noise dropped significantly.
Choose the Right Microphone and Hardware
Use a dynamic microphone instead of a condenser when background noise is a problem, because dynamics are more directionally focused. Additionally, invest in a quality audio interface with low-noise preamps and proper gain staging. Check out this audio interface setup guide for detailed tips. Remember, the interface’s preamp settings greatly influence bleed; too much gain can cause even distant sounds to clog your recording.
Improve Your Recording Environment
Control room acoustics actively. Use acoustic panels and bass traps to absorb reflections, especially at mid and high frequencies. I once spent a weekend installing foam panels in my makeshift studio, which eliminated the flutter echoes and drastically reduced room noise. Incorporate these audio fixes to further clean your sound.
Be Strategic with Your Headphones
Studio headphones aren’t just for monitoring; their impedance and frequency response can influence your perception of bleed. Use high-quality, flat-response headphones to accurately hear bleed that may otherwise go unnoticed. I found my mixing improved by switching to 250Ω headphones, which revealed subtle phase issues caused by bleed.
Implement Software and DAW Settings
Configure your Digital Audio Workstation (DAW) right—disable any unnecessary input monitoring, and activate features like noise suppression or gating during recording. For example, setting a noise gate threshold just above the level of room spill can automatically mute background sounds when you’re not speaking. Check out these DAW tweaks to optimize your workflow.
Use Real-Time Monitoring Sparingly
If you experience bleed due to latency, rely on high-quality direct monitoring through your audio interface rather than latency-prone software monitoring. This ensures you hear your voice accurately without picking up room echoes or background noise. I remember when I switched to hardware monitoring; my recordings became immediately clearer and less prone to bleed artifacts.
Many voiceover artists and podcasters operate under misconceptions about essential gear and workflow tweaks. A common myth is that investing in high-end equipment automatically guarantees professional sound quality. However, even top-tier audio interfaces and studio headphones can fall short if not configured correctly or used mindfully. For instance, selecting a popular but unsuitable microphone type without understanding its behavior in your environment can lead to issues like phase cancellation or undue noise. As per audio expert Bob Katz, gear alone doesn’t determine quality; proper setup and acoustics are crucial.
Another overlooked nuance lies in DAW software settings. Beginners often assume that their DAW’s default configurations are optimal, but advanced users know that tweaking buffer size, enabling multi-core processing, or adjusting plugin latency can significantly enhance workflow efficiency and audio fidelity. For example, improperly set buffer sizes can cause audio stuttering or excessive latency, disrupting recording sessions. It’s worth consulting detailed guides like [these](https://audioediting.editinggearpro.com/best-daw-software-for-precise-music-production-this-year) to optimize your DAW environment.
When it comes to studio headphones, many rely on consumer-grade or overly bright models expecting studio transparency. In reality, high-impedance, flat-response headphones—like those recommended in [this guide](https://audioediting.editinggearpro.com/studio-headphones-buying-guide-for-crystal-clear-sound-in-2025)—are better suited for accurate mixing and critical listening, especially in nuanced tasks such as detecting subtle phase issues or low-level bleed. Failing to choose appropriate monitors can cause you to misjudge your recordings, leading to echoes or bleed that go unnoticed until post-production.
Finally, many underestimate the importance of room acoustics over gear. Soundproofing, placement, and treatment directly influence how your setup performs. A poorly treated room can introduce reflective echoes and unmanageable noise, even with state-of-the-art equipment. This reality underscores the value of investing not just in hardware, but also in acoustic panels and strategic placement, as emphasized in [this article](https://audioediting.editinggearpro.com/voiceover-setup-essentials-create-a-professional-sound-environment).
Are you falling prey to common misconceptions about your audio setup? Remember, mastery is about fine-tuning every aspect—the gear, the environment, and the software. For more advanced tips on streamlining your workflow and avoiding these pitfalls, check out [these podcast editing hacks](https://audioediting.editinggearpro.com/podcast-editing-hacks-streamline-your-workflow-for-better-results). Share your experiences and let me know—what’s the biggest hurdle you faced in achieving professional quality? Have you ever fallen into this trap? Let me know in the comments.
Keep Your Gear Running Smoothly with Routine Maintenance
To ensure your voiceover setup remains dependable, establishing a regular maintenance routine is essential. This includes cleaning your equipment, inspecting cables for wear, and updating firmware and drivers. I personally schedule bi-monthly checks where I verify the integrity of my XLR cables, clean connectors with contact cleaner, and confirm my audio interface’s firmware is up to date. Regular upkeep prevents unexpected failures and extends the lifespan of your gear.
Select the Right Tools for Long-Term Success
Investing in quality tools is crucial, but knowing how to maintain them is equally important. For audio interfaces, I recommend models with shielded USB-C connections like these shielded cables. They reduce noise and voltage drops, ensuring your recordings stay clean over time. Additionally, implementing software solutions like dedicated podcast editing tools can streamline your workflow, reducing wear on your hardware due to extended editing sessions.
Prioritize Software Updates and Configuration
Keeping your DAW software optimized is vital. I make a habit of checking for updates weekly, ensuring I benefit from bug fixes and performance improvements. For instance, configuring your DAW with these setup tweaks helps prevent latency and glitches, especially during long sessions. This proactive approach minimizes your need for troubleshooting and keeps your system stable.
Choose Headphones That Reveal the Subtle Details
Studio headphones are your critical listening tool. I prefer models with flat frequency responses and high impedance, like those detailed in this buying guide. They expose background noise and bleed more effectively, allowing me to detect issues before recording. Regularly testing your headphones for possible distortions, especially after months of use, ensures your critical listening remains accurate.
Plan for Equipment Scaling and Future Proofing
As your podcast or voiceover career grows, so should your setup. Incorporate scalable solutions like modular audio interfaces or expandable DAW licenses. I advise considering these professional-grade headphones now, so you’ll be ready for more complex mixes later. Also, staying informed about upcoming innovations, like wireless microphone systems or AI-powered editing tools, positions you ahead of the curve, ready to adapt your workflow seamlessly.
How do I maintain my setup over time?
The key to long-term reliability is consistent maintenance and staying informed about technological advancements. Develop a checklist for regular hardware cleaning, firmware updates, and calibration. Follow expert advice from sources like this detailed guide to troubleshoot common issues proactively. Implementing advanced tips—such as calibrating your headphones using spectral analyzers—can dramatically improve your monitoring accuracy. I recommend trying this calibration method to extract maximum detail from your equipment, ensuring your mixes translate well across different playback systems.
The Hardest Lesson I Learned About audio interface,voiceover setup,podcast editing,daw software,studio headphones
One of the most profound insights I stumbled upon was how even the most advanced gear can be rendered ineffective without proper setup. I once invested in a top-tier audio interface, expecting flawless recordings, only to find persistent background hums and bleed. It wasn’t until I revisited my gain staging and room acoustics that I realized that my equipment was only as good as the environment and technique supporting it. This taught me that knowledge beats gear if you aim for professional sound.
How Ignoring Room Acoustics Cost Me Hours of Editing
I used to believe that my microphone’s directional capabilities would handle room reflections. But when I started scrutinizing my recordings, the subtle echoes and room tone became painfully evident, often forcing me to spend extra hours cleaning up audio. It dawned on me that acoustic treatment and strategic placement are fundamental—don’t overlook these in your quest for pristine voiceovers. Trust me, a few well-placed panels save countless post-production headaches.
The Myth About Equipment Replacing Technique
Many voiceover artists fall into the trap of thinking that cutting-edge gear alone guarantees quality. I was guilty of this early on, purchasing an expensive condenser mic without mastering proper mic placement or monitoring techniques. The truth is, no hardware can compensate for poor technique. Continual learning and calibration—like regular headphone tests—are what truly elevate your sound. Remember, your skillset is the real amplifier of your gear’s potential.
Should You Dismiss Budget Solutions? Not So Fast
In my journey, I discovered that budget-friendly acoustic panels and monitoring options, when correctly implemented, can rival expensive setups. It’s about strategic placement and understanding your specific needs. For example, relying on high-impedance headphones with flat responses—like those recommended in this guide—enables accurate judgment of bleed and room issues. Don’t assume priciness correlates directly with quality; thoughtful planning matters more.
How Continuous Learning Transformed My Workflow
Staying updated with the latest software tweaks and hardware enhancements, such as those discussed in this article, has been pivotal. I dedicate time monthly to fine-tune my DAW settings, test new plugins, and calibrate my environment. This proactive approach ensures that I keep ahead of common pitfalls like latency or bleed, thereby maintaining a professional standard without unnecessary frustration.