Ever spent hours recording a voiceover, only to realize it sounds muffled, distant, or just plain wrong? I’ve been there. The frustration of hearing your voice come through a cheap microphone or subpar headphones can kill your creative vibe faster than you can say “re-record.” It was a lightbulb moment for me when I finally understood that the real secret to professional-sounding voiceovers isn’t just about technique — it’s about the gear you use. And trust me, I learned this lesson the hard way.
Why Your Gear Matters More Than You Think
Choosing the right audio interface and studio headphones is like giving your voice the best stage to shine on. When I first started, I thought I could get away with any microphone and a pair of regular headphones. Big mistake. I quickly discovered that without proper gear, even the most talented voice actors can sound amateurish. According to a recent study by Audio Editing Pro, the quality of your audio interface and headphones directly impacts clarity, noise reduction, and overall recording fidelity. That’s why I’m here to help you navigate the noisy world of gear choices and find what truly works in 2024.
Do You Fear That Better Equipment Won’t Make a Difference?
Early on, I believed that investing in high-end gear was overkill. I thought my voice was the limiting factor, not the hardware. Turns out, I was dead wrong. My biggest mistake was ignoring the importance of a quality audio interface and studio headphones. The right setup can make your voice sound professional, even if you’re just starting out. If you’re skeptical about whether upgrading your gear is worth it, I totally get it. But keep in mind, even top creators swear by their equipment — and for good reason. Want to see how to choose wisely? Check out my tips on studio headphones and audio interfaces for voiceover.
Now, let’s dive into how you can make smarter choices so your voiceovers can stand out for all the right reasons. Ready? Let’s go.
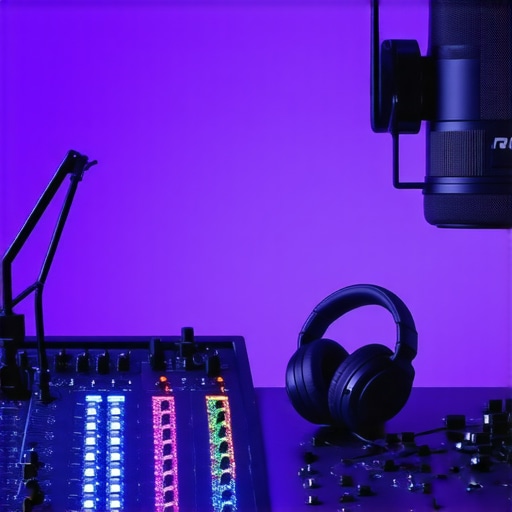
Choose the Right Audio Interface
Start with your audio interface, the core of your sound setup. Think of it as the bridge between your microphone and computer — if it’s shaky, your sound will be too. I remember when I upgraded mine using the recommendations from expert tips. The difference was night and day. Look for interfaces with low latency and enough inputs for your microphone and other gear. Brands like Focusrite, PreSonus, or Universal Audio are solid choices. When I first set mine up, I followed the steps in the guide, ensuring all drivers were updated, and I tested with different microphones. The result? Cleaner, more professional recordings that needed less editing.
Invest in Studio-Grade Headphones
Your headphones are your best friends during recording and editing. They reveal every nuance, so you avoid surprises in your final product. I once used regular headphones, but after switching to studio-grade ones from this guide, I noticed a significant improvement. Look for headphones with flat frequency response — they don’t color your sound. Brands like Audio-Technica, Beyerdynamic, and Sennheiser are reliable. I remember a session where I was struggling to catch a subtle sibilance; switching headphones made that issue obvious and easy to fix. Check out the latest recommendations to find your perfect pair for 2024.
Set Up Your Environment for Success
Even with top gear, your environment matters. Use a dedicated recording space with soundproofing or acoustic treatment. Think of it as creating a mini studio where your voice can shine without interference. I initially recorded in a corner of my room, but after adding foam panels and a diffusing curtain, my voice sounded much clearer. For a comprehensive setup, see these essentials. Proper positioning of your mic and headphones is equally crucial. Keep the mic at mouth level, about 6-8 inches away, and use a pop filter to reduce plosives. When I applied these tips, the quality of my voiceovers improved instantly, saving me hours of editing.
Test and Fine-Tune Your Equipment
Once everything is set up, do test recordings. Adjust gain levels, microphone placement, and headphone volume. I once recorded a short script, then listened critically, tweaking the gain until I got a balanced sound. Use software like your DAW to analyze your recordings. Pay attention to noise levels and clarity. Remember, small adjustments can make a big difference — it’s worth spending the time to get it right. Regularly update your setup as new gear and techniques emerge, keeping your voiceovers crisp and professional in 2024.
Many voiceover enthusiasts and even seasoned creators fall into the trap of believing certain myths about gear that can seriously hinder their progress. Let’s dig deeper into some of these misconceptions and uncover the truths that can help you elevate your recordings. One of the most widespread myths is that investing in high-end equipment guarantees professional results. While quality gear matters, it’s not a magic bullet. Proper setup, acoustics, and technique are equally crucial, as emphasized in the expert tips on audio interfaces.
Another common misunderstanding is that all headphones are created equal. People often assume that any pair will do, but this couldn’t be further from the truth. Studio-grade headphones with flat frequency response are essential for accurate monitoring. Brands like Audio-Technica and Beyerdynamic offer models that reveal the nuances in your voice, preventing issues like sibilance or background noise going unnoticed. For more insights, check out the studio headphones buying guide.
A sneaky trap many fall into is thinking that equipment doesn’t need regular maintenance or updates. Firmware updates for audio interfaces and software are often overlooked but can significantly improve stability and sound quality. Additionally, micro-adjustments in gain settings or mic placement can make a world of difference, yet many skip this step, leading to subpar recordings. Regularly testing and fine-tuning your setup, as detailed in the podcast editing hacks, is key to maintaining professional sound.
**What about advanced questions?**
Why does my high-end gear still sound amateurish without proper acoustics?
This is a common question among advanced users who understand that gear alone isn’t enough. The room’s acoustics can dramatically impact your sound quality. Echoes, reverberations, or background noise can undermine even the most expensive microphone or interface. Investing in acoustic treatment, like foam panels or diffusers, is essential to create a controlled environment. According to a comprehensive guide, this step is often overlooked but can transform your recordings from average to studio quality. Remember, your gear is just one piece of the puzzle; the environment plays a pivotal role.
So, don’t let misconceptions hold you back. Clear understanding and proper setup are what truly make a difference. Have you ever fallen into this trap? Let me know in the comments!
Keeping your voiceover setup running smoothly over time requires more than just initial investment. Regular maintenance, strategic tool choices, and understanding future trends are key to maintaining professional results. I personally rely on a few tried-and-true methods and equipment that keep my workflow efficient and my sound top-notch.
How do I maintain my gear and software over time?
First, I make it a habit to keep all my software, especially my DAW and plugins, updated regularly. This not only ensures compatibility with new operating systems but also benefits from bug fixes and performance improvements. For my hardware, I schedule quarterly checks—cleaning connectors, inspecting cables, and testing microphones for any degradation in sound quality. When I notice a decline, I calibrate or replace parts before it impacts my recordings. To stay ahead, I follow updates from my hardware manufacturers, like these expert tips, which often include firmware updates that improve stability and sound fidelity.
Additionally, creating a dedicated maintenance routine for your environment can dramatically improve your long-term output. Regularly testing your acoustic treatments and replacing worn-out foam panels or diffusers ensures your recordings stay pristine. I also keep my microphones stored properly in dust-free cases when not in use, preventing moisture and debris from affecting sensitive components.
Investing in reliable tools for longevity
For my primary equipment, I choose durable, well-reviewed gear that withstands the test of time. My audio interface, for instance, is a Focusrite Scarlett 2i2, which I’ve used for over three years. Its solid build quality and low latency make it a dependable choice. I also swap out cables periodically—cheap, worn cables can introduce noise, so I only buy high-quality, shielded XLRs from trusted brands.
On the software side, I favor top DAW software that offers stability, automation, and plugin support. I also use dedicated tools like noise reduction plugins and spectral editors, which I keep updated to handle issues proactively. These tools save me hours of editing and ensure consistent quality in every project.
Scaling your setup for future growth
As your skills and projects grow, your gear needs to evolve. I recommend planning for modular upgrades—adding better microphones, external preamps, or more advanced acoustic treatments—rather than replacing everything at once. This allows you to scale your setup gradually while maintaining a familiar workflow. Keep an eye on emerging trends like AI-enhanced plugins or improved digital interfaces, which promise to further streamline production. For example, new AI noise suppression tools are getting smarter and more accessible, making it easier to clean recordings with minimal effort.
To stay ahead, I suggest subscribing to industry blogs and forums, such as these resources. Regularly revisiting your toolkit and environment ensures your quality remains top-tier and your setup is prepared for whatever the future brings.
Start implementing these maintenance routines today—your future self will thank you with consistently professional voiceovers that impress every client and listener.
The Hardest Lesson I Learned About Voiceover Equipment
One of the biggest lightbulb moments for me was realizing that even the best voice talent can’t shine through bad gear or poor acoustics. I spent years thinking my voice was enough, but subtle background noise and muffled recordings proved otherwise. It taught me that investing in quality equipment isn’t just a luxury — it’s a necessity for real professionalism.
My Top Gear Picks for a Next-Level Voiceover Setup
After countless experiments, I trust the audio interface tips from industry experts, along with studio-grade headphones like those recommended in this guide. These tools have transformed my recordings from amateurish to broadcast-quality, and they can do the same for you.
Creating a Space Where Your Voice Can Truly Thrive
Even the most advanced gear falls flat if your environment isn’t optimized. I learned this the hard way when my first recordings echoed with reverb. Adding acoustic treatments like foam panels and diffusers made an immediate difference. Check out these setup essentials to craft your perfect studio environment.
Test, Tweak, and Perfect Your Setup Regularly
Once your gear is in place, don’t set it and forget it. I routinely test my recordings, adjust gain levels, mic placement, and headphone volume. Small tweaks lead to big improvements, saving hours during editing. Regularly updating your setup according to latest tools and techniques keeps your sound crisp and professional.
The Hardest Lesson I Learned About Voiceover Gear
One of the most persistent myths I encountered was that high-end gear alone guarantees stellar results. That’s simply not true. Proper setup, acoustics, and technique are equally vital. I also used to believe any headphones would do, but now I swear by flat-response studio headphones for accurate monitoring. Remember, your gear is a tool — treat it with care, maintain it regularly, and continually refine your environment for best results.
Where to Go from Here
If you’re serious about improving your voiceover quality, start by upgrading your gear thoughtfully and optimizing your environment. Regular maintenance and staying updated with new tech trends, like AI-enhanced editing tools, will keep you ahead of the game. Your professional voiceovers are just a few smart choices away.
Your Turn to Try
Have you ever struggled with microphone placement or acoustic treatment? Share your experiences below and let’s learn from each other’s journeys to better voiceovers!
http://Emily%20Carter
I completely agree with the importance of good gear for professional voiceovers. When I upgraded from basic microphones and headphones to studio-grade equipment, my recordings instantly sounded clearer and more polished. It was like night and day! I’ve also learned that even the best gear needs proper environment and setup—like acoustic treatment and mic positioning—to truly shine. One thing I’ve struggled with is finding the right balance in my headphone monitoring, especially to catch those tiny nuances without hearing too much background noise. Have any of you found particular brands or models that help with detailed monitoring without breaking the bank? I think investing in quality gear is crucial, but it’s equally important to learn how to optimize every piece of your setup for the best results.
http://Lara%20Stevens
Reading through this post really resonated with my own experience—initially, I underestimated how much proper gear impacts the final sound quality of voiceovers. Upgrading to a solid audio interface and studio headphones was a game-changer for me; suddenly, I could hear those subtle nuances that made a professional difference. Interestingly, I’ve found that even small investments like a decent mic stand or acoustic foam panels on a budget can significantly improve room acoustics, and thereby the overall recording quality. It’s fascinating how much your environment influences your sound, regardless of how good your gear is. For anyone just starting, my advice is to prioritize gear that fits your budget but also to pay special attention to room treatment—DIY solutions like heavy curtains or bookshelf placement can add a lot without a hefty price tag. How do others here balance investing in high-end equipment versus optimizing their existing setup with clever acoustic treatments? Would love to hear your thoughts or tips!