I remember the exact moment I realized my audio setup was holding me back. I was recording a voiceover for a client, microphone in hand, headphones on, and yet, something sounded off—cloudy, unfocused, like I was talking into a tunnel. Frustration sank in. No matter how much I tweaked my settings, the sound just didn’t sit right. It was a lightbulb moment that pushed me to re-evaluate my entire studio setup.
A Common Frustration Among Creators
When I started out, I was convinced that investing in a high-end microphone was the key. Turns out, the headphones and audio interface play just as crucial a role in achieving that professional sound. Without the right equipment, I was chasing perfect audio, only to realize I was overlooking fundamental issues—like using headphones with poor accuracy or a mismatch between my interface and my mic.
Fortunately, over time, I discovered that selecting the best studio headphones and audio interface for my needs could transform my workflow. And trust me, this isn’t just about shiny gear; it’s about making strategic choices that directly impact your audio quality and productivity.
So today, I promise to share the insights and tips that helped me finally stabilize my setup. Whether you’re a podcaster, voiceover artist, or content creator, understanding how to pair your studio headphones with the right audio interface can be a game-changer.
Is Overhyped Gear Really Worth It?
One mistake I made early on was believing that expensive gear automatically meant better sound—boughttime can be tempting, but it’s not always the smart move. For instance, I once bought a top-tier interface expecting flawless clarity, only to realize I hadn’t set it up correctly because I skipped reading [this guide](https://audioediting.editinggearpro.com/audio-interface-setup-expert-tips-to-elevate-your-home-studio). Just like I learned, many creators overlook essential setup steps, which hampers their results.
If you’ve ever felt overwhelmed by all the gear options or unsure whether your current setup is holding you back, you’re not alone. But don’t worry—next, we’ll explore practical steps to optimize your headphones and interface, ensuring your studio is designed for quality and efficiency, not just flashy equipment. Ready to elevate your audio? Let’s get started.
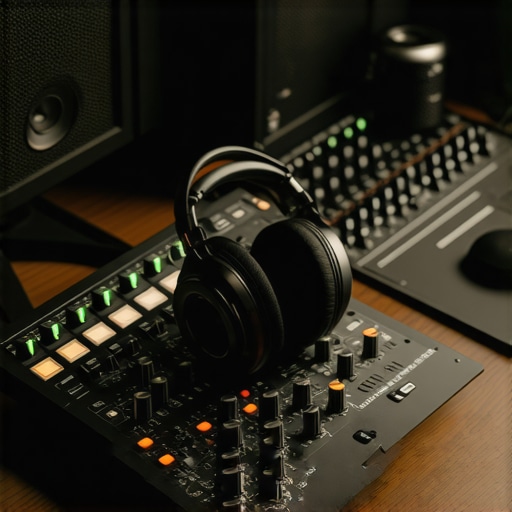
Select the Right Studio Headphones
Start by choosing headphones that offer accurate sound reproduction—flat frequency response is key. I once messaged a fellow creator about my new headphones, and after trying his recommended pair from our studio headphones buying guide, I immediately noticed the difference in my recordings. Ensure the fit is comfortable for long sessions and that they isolate sound well to prevent bleed. This setup prevents unwanted noise from leaking into your microphone, maintaining clarity.
Configure Your Audio Interface Properly
Think of your audio interface as the bridge between your microphone and DAW—like the translator enabling clear communication. When I first set up mine, I skipped the setup tips for creators, resulting in distorted recordings. To get it right, connect the interface to your computer, install drivers, and calibrate input and output levels. Use your DAW’s monitoring features to confirm levels are balanced. Remember, improper gain staging is a common pitfall that diminishes quality—so adjust gain carefully until the levels are robust without distortion.
Optimize Your DAW Environment
Your digital audio workstation (DAW) is the command center. I once recorded a voiceover that sounded dull until I adjusted sample rates and buffer sizes—a quick process explained in the Daw setup guide. Set your DAW’s sample rate to match your interface, typically 44.1kHz or 48kHz. Lower buffer sizes decrease latency but may strain your CPU; find a balance that allows smooth playback and recording. Use high-quality plugins and EQs judiciously to enhance clarity without introducing noise. Regularly clean your plugin chain to avoid processing lag and instability.
Lock Down the Acoustic Environment
Even top gear can’t compensate for a noisy room. I hung blankets and foam panels after realizing reflections muddy my recordings—see voiceover setup tips. Create a quiet space by sealing windows and doors, and use a dedicated microphone stand to minimize vibrations. Consider using a reflection filter to prevent sound bouncing from walls, making your voice sound as close to studio quality as possible.
Test and Fine-Tune Regularly
Set aside time after each session to critically listen and identify issues. I once recorded multiple takes without testing levels; the result was inconsistent quality. Now, I always probe recordings with a critical ear and adjust levels accordingly. Use reference tracks and software meters to compare your sound with industry standards. Consistent testing ensures your setup is not drifting away from optimal recording conditions and helps catch problems early before they compound.
Many creators believe that investing in the latest gear automatically guarantees professional-quality audio, but as I’ve discovered through years of practical experience, this isn’t always the case. A frequent misconception is that superior equipment alone will resolve all issues—yet, in reality, mastering the subtle nuances of your setup makes the real difference. For example, novice podcasters often overlook the importance of proper gain staging in their audio interfaces, leading to distorted or noisy recordings. Adjusting levels correctly isn’t just a minor step; it’s crucial to avoid common pitfalls that degrade audio clarity. According to audio expert Ethan Winer, improper gain control can introduce unwanted noise and clipping, which is difficult to fix later in post-production. Therefore, understanding how to fine-tune your interface and monitoring levels can elevate your overall sound quality significantly. Moreover, many assume that high-end studio headphones are a universal solution, but not all headphones are created equal for audio accuracy. Open-back headphones provide a more natural and precise sound, which is essential for editing and critical listening—yet, they may leak sound and disturb others in shared spaces. Closed-back headphones, while isolating, can color the sound, hiding imperfections. The key is knowing your specific needs and choosing accordingly. Additionally, the myth that DAW software alone can compensate for improper mic placement often leads creators astray. Even the best editing software can’t fix a poorly positioned microphone—accuracy in microphone technique remains fundamental. Advanced voiceover artists pay close attention to mic placement, acoustics, and their environment, recognizing that hardware choices must complement their technique. This aligns with findings from research published in the Journal of Audio Engineering Society, which emphasizes the synergy between hardware setup and technique for achieving high-quality recordings. So, if you’re striving for clarity and professionalism, focusing solely on software or gear won’t suffice; instead, dedicating time to understanding these nuanced details will give you a competitive edge. For those interested in optimizing their environment, I highly recommend reviewing my guide on setting up a professional voiceover environment, which includes tips on acoustic treatment and consistent testing. Remember, the devil is in the details—tuning these small but impactful aspects of your setup can make all the difference. Have you ever fallen into this trap? Let me know in the comments. Want to dive deeper? Check out our comprehensive articles on [voiceover setup essentials](https://audioediting.editinggearpro.com/voiceover-setup-essentials-create-a-professional-sound-environment) and [best audio interface and headphones](https://audioediting.editinggearpro.com/best-audio-interface-studio-headphones-for-voiceover-podcast-clarity-2024).Ensuring your audio setup keeps performing at peak levels isn’t just about buying high-end gear; it’s about implementing effective maintenance routines and choosing the right tools to support your workflow. Regularly cleaning and updating your DAW software, like the latest releases of DAW programs, helps prevent bugs and ensures compatibility with new plugins and hardware. I personally schedule monthly check-ins to update drivers for my audio interface, which reduces latency issues and improves stability. Also, maintaining proper cable management reduces wear and tear, preventing unexpected malfunctions that can throw off your recordings.
When it comes to tools, investing in quality studio headphones, such as those recommended in the studio headphones guide, ensures consistent monitoring—crucial for catching small issues that could worsen over time. Additionally, keeping your voiceover setup clean and acoustically treated, as discussed in voiceover setup tips, promotes longevity of your gear and sound fidelity.
Predicting future trends, I believe integrated maintenance software for audio hardware, combined with AI-powered diagnostics, could streamline the process even further, alerting creators to potential issues before they impact recordings. To get ahead, I recommend regularly scheduling maintenance checks—think of it as preventative healthcare for your studio.
How do I keep my podcast setup running smoothly over time?
Regular software updates, diligent hardware maintenance, and the right tool investments are your best bets. For example, I use a dedicated cable tester from contact us to identify faulty connections early, saving me time and costly repairs. Also, routine calibration of your audio interface, following expert guides like setup tips, ensures your system remains aligned with industry standards.
Implementing these routines can be game-changing, preventing issues from snowballing and keeping your workflow seamless. Remember, even cutting-edge tools like audio interfaces require regular checkups to perform at their best. So, why not set a bi-weekly reminder to validate your connections and software versions? This small step can drastically reduce downtime.
Don’t forget to explore podcast editing hacks that automate parts of this process, freeing you to focus on content creation. Want to ensure your setup remains flawless? Try one advanced tip—like scheduling quarterly deep cleans of your hardware—to preserve performance and prevent buildup of dust and debris that can cause overheating or connectivity issues. Steady upkeep is key to long-term excellence, so take action today and make maintenance part of your routine.
Lessons I Wish Someone Had Shared About Crafting Professional Audio
- Dreamt of perfect recordings but overlooked the importance of proper gain staging—learning this the hard way taught me to always double-check levels before hitting record.
- Assumed that expensive gear would automatically elevate my sound—turns out, knowledge of setup and calibration is what truly makes a difference in audio quality.
- Thought high-end headphones were a one-size-fits-all solution—discovering the right type for your workflow, like open or closed-back, can significantly improve critical listening and editing.
- Felt overwhelmed by complex DAW configurations—breaking down the setup into manageable steps and using dedicated guides simplified my process and boosted my confidence.
Tools and Resources That Changed My Approach
- Studio headphones buying guide—a curated list that helped me choose headphones with flat response for accurate editing and monitoring.
- Setup tips for audio interface and headphones—practical advice that demystified how to calibrate my equipment for seamless workflow.
- DAW setup guide—an essential resource for configuring my workstation properly, ensuring low latency and pristine sound quality.
- Voiceover setup essentials—helped me understand the importance of acoustic treatment and environment optimization for consistent results.
Taking Action and Creating Your Best Sound Yet
Remember, elevating your audio quality isn’t solely dependent on gear; it’s about intentional setup, continuous learning, and regular maintenance. Keep experimenting, stay curious, and give yourself permission to refine your process. The future of your podcast or voiceover career depends on the sound you craft today. So, what’s the first step you’re excited to take towards improving your studio setup? Let me know below!