Ever spent hours recording a podcast only to realize it sounds flat, muffled, or just plain off? I’ve been there. That frustrating moment when you think, “Maybe my mic is bad,” or “My room isn’t ideal,” only to discover the real culprit is your gear. It’s like trying to paint a masterpiece with the wrong brushes—no matter how talented you are, the results won’t shine. That was my lightbulb moment—getting the right audio interface and studio headphones transformed my recordings from amateurish to professional-grade, and it can do the same for you.
Why Your Podcast Deserves Better Sound Quality
In the world of podcasting, audio quality isn’t just a detail—it’s the foundation of your credibility. Listeners will forgive a shaky video, but poor sound? They click away faster than you can say “editing.” That’s why I’m here to share what I’ve learned from my own journey and countless hours of trial, error, and finally, success. Today, I’ll guide you through the essential gear and setup tips that turn your home studio into a professional-sounding space. Whether you’re just starting or looking to upgrade, this guide will help you avoid costly mistakes and get the clarity your audience craves.
Is Expensive Gear Really Necessary for Great Podcast Sound?
When I first started, I thought I needed the priciest equipment to sound good. Turns out, I wasted money on flashy gear that didn’t deliver. A mistake many rookies make is assuming bigger price tags mean better quality—spoiler alert, that’s not always true. Instead, focus on the right gear for your needs and room, like the best (https://audioediting.editinggearpro.com/best-daw-software-for-precise-music-production-this-year) and [studio headphones](https://audioediting.editinggearpro.com/studio-headphones-buying-guide-for-crystal-clear-sound-in-2025). These are investments that pay off when you understand how to set them up properly. I’ll show you how to avoid this costly mistake and get your gear working for you, not against you.
So, have you ever bought equipment that looked fancy but didn’t improve your sound? If yes, you’re not alone. Many podcasters face this challenge, but with the right guidance, you can skip the frustration and jump straight to professional results. Ready to transform your podcast’s audio quality? Let’s dive into the nuts and bolts of creating a setup that makes your voice sound clear, warm, and engaging—every single time.
Getting Started with the Right Equipment
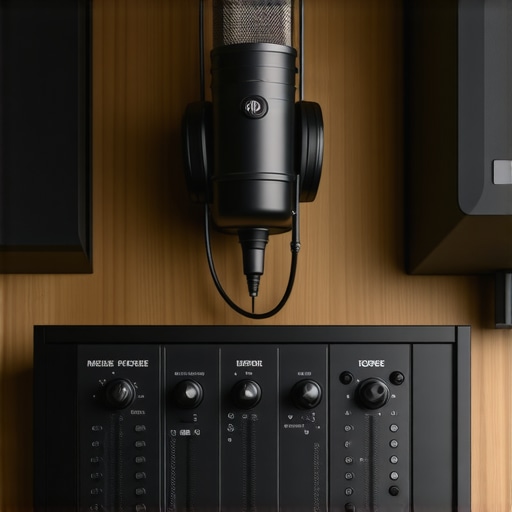
Before we jump into setup tips, it’s crucial to understand what gear truly makes a difference. The right (https://audioediting.editinggearpro.com/audio-interface-setup-expert-tips-to-elevate-your-home-studio) ensures your voice is captured accurately, free of noise and distortion. Pair it with a good set of [studio headphones](https://audioediting.editinggearpro.com/studio-headphones-buying-guide-for-crystal-clear-sound-in-2025) to monitor your recordings in real time. This combo is the backbone of any professional podcast. Once you have these essentials, the rest is about placement, settings, and speaking habits—details I’ll cover in the next sections. Trust me, once you get this right, your audience will notice the difference immediately.
Choose the Right Audio Interface for Your Space
Think of your audio interface as the bridge between your microphone and your computer. Selecting one with the right features ensures your voice is captured with clarity and minimal noise. I remember when I first bought a budget interface, and after some trial and error, I realized it lacked sufficient gain control and added unwanted hiss. Upgrading to a model like the Focusrite Scarlett 2i2 made a significant difference. When shopping, look for interfaces with enough inputs for your setup and good preamps, which amplify your microphone signal cleanly. For detailed guidance, check out this audio interface setup guide that walks you through step-by-step setup and calibration.
Picking Studio Headphones That Make a Difference
Your headphones are your critical tool for monitoring your recordings. Choosing the right pair can prevent issues like clipping, distortion, or overly harsh sounds. I once used cheap earbuds, which made it impossible to notice subtle problems, leading to hours of re-editing. After switching to a pair of closed-back studio headphones like the Audio-Technica ATH-M50x, my editing process improved dramatically. Look for headphones with flat frequency response for the most accurate sound. They should be comfortable for long sessions and provide good isolation. A comprehensive studio headphones buying guide helps you find the best fit for your budget and needs.
Set Up Your Equipment for Optimal Sound
Proper placement and settings are crucial. Position your microphone about 6-12 inches from your mouth, slightly off-axis to reduce plosives. Use a pop filter to minimize harsh sounds and a boom arm or stand to keep your mic stable. When I first set up my mic, I played around with the gain knob, gradually increasing until I found a clear level without distortion. Always monitor your input levels with your headphones—aim for around -12 to -6 dB on your interface’s meter. Adjust your room acoustics by adding foam panels or soft furnishings to dampen reflections. This step is often overlooked, but it makes a huge difference in clarity. For detailed tips, explore this voiceover setup essentials guide.
Fine-Tune Your Setup for Consistency
Once your gear is in place, consistency is key. Use a dedicated recording space free from background noise. Record in a quiet room, turn off fans, and inform others to minimize interruptions. Conduct test recordings to check your levels and sound quality before each session. I keep a checklist to ensure my microphone, gain, and room acoustics are optimal every time. Over time, you’ll develop a feel for your setup, making your recordings more professional with less effort. For more expert advice on editing and optimizing your recordings, see this workflow hack.
Many aspiring podcasters fall into the trap of oversimplifying their setup, assuming that buying the most expensive gear guarantees professional sound. However, the real nuance lies in understanding how gear interacts with your environment and workflow. For instance, a high-end microphone paired with a poor room setup can still produce subpar audio. The key is to focus on the synergy between your equipment and your space, rather than just chasing the latest or most expensive tools. An often overlooked mistake is ignoring the importance of proper calibration and placement. Even the best gear won’t perform optimally if your microphone is too close or too far, or if your gain settings are off. This is why I always emphasize the importance of fine-tuning your setup—small adjustments make a huge difference in audio clarity and consistency.
Another common myth is that better gear compensates for poor technique. While quality equipment helps, mastering proper mic technique and room acoustics has a more profound impact. For example, reducing echo by adding soft furnishings can dramatically improve sound quality—sometimes more than upgrading your microphone. Additionally, many podcasters neglect the importance of monitoring. Using reliable [studio headphones](https://audioediting.editinggearpro.com/studio-headphones-buying-guide-for-crystal-clear-sound-in-2025) to listen in real-time ensures you catch issues like clipping or background noise early, preventing time-consuming re-records.
A hidden nuance that advanced users understand is the importance of signal chain order. Placing a pop filter before your microphone and ensuring your audio interface’s gain is correctly set prevents unwanted noise and distortion. Also, investing time in learning how to properly configure your DAW (Digital Audio Workstation) can elevate your recordings. I recommend checking out this best DAW software guide for voiceover and podcast editing, which covers setup tips crucial for professional results.
Lastly, don’t fall for the trap of thinking that more gear equals better audio. Instead, focus on mastering the tools you already have. Regularly reviewing your setup and making incremental improvements will yield better results than constantly chasing new equipment. Remember, even the most sophisticated setup won’t save a lack of technique or poor room acoustics. So, before you rush to upgrade, take a step back and analyze your current environment and workflow. It’s often these overlooked details that make the biggest difference in achieving studio-quality sound.
Have you ever fallen into this trap? Let me know in the comments.
Keep Your Gear Running Smoothly and Sounding Fresh
Once you’ve invested in the right equipment and set up your home studio, the next step is ensuring everything stays in top shape over time. Regular maintenance is crucial for consistent, professional-quality recordings. I personally check my audio interface connections and clean my studio headphones regularly to prevent dust buildup that can impact sound clarity. These small but vital routines help avoid unexpected malfunctions and ensure your setup performs reliably for years to come.
For those serious about long-term quality, I recommend using compressed air to clean ports and connectors, and soft microfiber cloths for wiping down surfaces. Keeping your environment dust-free and organized not only extends the lifespan of your gear but also preserves sound fidelity. Additionally, periodically updating your DAW software ensures compatibility with new plugins and stability improvements, preventing crashes during critical editing sessions.
How do I maintain my setup over time?
Developing a regular maintenance routine is key. Schedule monthly checks to inspect cables, clean equipment, and update software. Label your cables and connectors to streamline troubleshooting and prevent accidental disconnections. Keep a detailed log of your equipment’s age and performance issues; this helps determine when it’s time for upgrades or repairs. For example, swapping out a worn-out XLR cable or upgrading to a newer audio interface can significantly improve your sound quality without replacing entire setups.
Another tip is to create backup copies of your audio projects regularly. Using reliable cloud storage or external drives protects your work from hardware failures. Staying proactive about maintenance not only saves money but also ensures your recordings remain crisp, clear, and professional—no matter how long you’ve been at it. In the future, I believe integrated smart maintenance tools will become standard, alerting creators to potential issues before they affect your recordings. Until then, a disciplined routine is your best defense.
Try setting a monthly reminder to clean, update, and review your gear. It might seem simple, but this small habit can prevent many headaches and keep your podcast sounding its best season after season.
As you embark on your podcasting journey, discovering the nuanced lessons behind gear setup can save you countless hours and headaches. My own experience taught me that the most costly equipment isn’t always the best—it’s the understanding of how to optimize what you have. Here are some insider lessons that changed my approach:
- The Power of Room Acoustics: Even a high-end microphone can sound muddy if your room isn’t treated. Soft furnishings, foam panels, and strategic placement can turn a dull space into a professional studio environment.
- Microphone Technique Matters: Positioning your mic correctly—about 6-12 inches from your mouth—can dramatically improve clarity. A tiny adjustment in angle or distance often solves 80% of sound issues.
- Monitoring with Purpose: Relying on quality studio headphones isn’t just for editing; it’s essential for catching issues during recording. Discovering subtle distortions early saves time later.
- Gain Staging Is Key: Properly setting your interface’s gain prevents clipping and background noise. It’s tempting to crank the gain, but mastering this step is a game-changer.
- Consistency Over Cool Gear: Regularly testing and calibrating your setup ensures each episode sounds as good as the last. A simple checklist can keep your workflow tight and professional.
My Essential Toolkit for Podcast Clarity
Over the years, I’ve found a few tools invaluable for maintaining top-notch sound quality. The audio interface I use ensures my voice is captured without noise, while the studio headphones allow me to monitor every nuance. For editing, a reliable DAW software streamlines my workflow and guarantees professional results. These tools aren’t just gadgets—they’re the foundation of a sound you can trust.
Keep Pushing Your Audio Boundaries
Now that you’re equipped with the right mindset and tools, your next step is consistent refinement. Don’t settle for good enough—continually experiment with placement, settings, and room acoustics. Remember, even small improvements compound over time. Your voice, combined with your gear, has the power to captivate audiences—so keep learning, adjusting, and improving. Your future listeners will thank you for it.
http://James%20Anderson
I really resonated with the emphasis on understanding your room acoustics and mic technique. When I first started podcasting, I thought that buying high-end gear was enough to produce good sound. However, I quickly learned that my untreated room and improper mic placement created a lot of echo and background noise, negating much of the gear’s benefits. Since I added soft furnishings and adjusted my mic distance and angle, my recordings sound much clearer, even with more modest equipment. It made me wonder, how do others find the balance between room treatment and gear upgrades? Do you focus more on acoustic treatment first, or do you prioritize upgrading your gear? I’d love to hear other’s strategies to optimize their audio quality on a budget.
http://Michael%20Lawrence
This post really hits home about the importance of balancing quality gear with proper room treatment and technique. I’ve learned that even budget-friendly microphones can produce excellent sound if I pay attention to placement and environmental acoustics. When I started, I invested more in a large room with lots of hard surfaces, which caused a lot of echo, making audio sound dull and harsh. After adding some foam panels and softer furnishings, I noticed a huge difference in clarity—without upgrading my mic. It made me think about how many podcasters overlook room setup because they assume gear is the only thing that counts. I wonder, do most creators find it more effective to upgrade their gear first, or to focus on acoustic treatment? I’ve found that small tweaks in both areas, combined with refined mic technique, can elevate audio quality significantly. What tools or tricks have others found useful for quick improvements without breaking the bank? Would love to hear more strategies that work for tight budgets.
http://Sarah%20Mitchell
I totally agree with the idea that gear isn’t everything. I started out just like many others, thinking that buying expensive microphones would somehow instantly improve my audio. However, it was only after I made some room treatments and learned proper mic positioning that I saw real progress. What struck me was how much acoustic environment influences sound quality — even the best mic can sound muddy in a reflective room. I’ve found that adding some soft furnishings and acoustic panels, along with proper mic technique, really made a noticeable difference.
One challenge I faced was balancing budget-friendly solutions with effective treatment. Has anyone found affordable DIY methods or products that deliver good results without breaking the bank? Also, how do you prioritize between investing in gear versus improving room acoustics? I’d love to hear about other’s experiences or tips for maximizing sound quality on a budget.