Ever spent hours trying to record a simple voiceover, only to be met with dreadful echoes, background noise, or awkward latency? I’ve been there, fumbling through countless settings, convinced I was missing some secret trick. That lightbulb moment hit me hard: the right combination of software and hardware isn’t just a luxury—it’s the foundation of truly professional-sounding voiceovers. If you’re tired of feeling stuck or overwhelmed, don’t worry. Today, I’ll share my proven strategies to set up your studio for success in 2024, so you can finally get the crisp, clear audio your content deserves.
Why Your Voiceover Setup Matters More Than Ever
With the rise of podcasts, audiobooks, and remote voice work, your sound quality isn’t just a detail—it’s your first impression. Poor audio can turn off listeners faster than a bad cover song. Yet, many creators overlook the importance of choosing the right DAW (Digital Audio Workstation) software and the perfect setup. I used to think a decent microphone was enough. Turns out, I was making some classic mistakes early on, like neglecting proper acoustics or ignoring the significance of an audio interface. These slip-ups cost me time, frustration, and lost credibility until I finally understood the value of a holistic approach. Want to avoid my pitfalls? Stick around. We’ll go through the essentials to elevate your voiceover game.
Is Top DAW Software and Hardware Setup Overhyped?
Honestly, I once believed that as long as I had a good mic, I could wing it. But that was a rookie mistake. The truth is, the right tools and setup can make a world of difference—improving clarity, reducing noise, and streamlining your workflow. For example, choosing the best DAW for voiceover editing can save you hours of frustration. Plus, investing in quality audio interfaces and studio headphones ensures your recordings are accurate and consistent. If you’re skeptical, I get it. I was too, until I experienced the transformation firsthand. For more tips on creating a professional environment right at home, check out this guide on creating a professional sound environment.
So, are you ready to stop wasting time and start making professional-quality recordings? Let’s dive into the practical steps that will turn your home studio into a voiceover powerhouse for 2024.
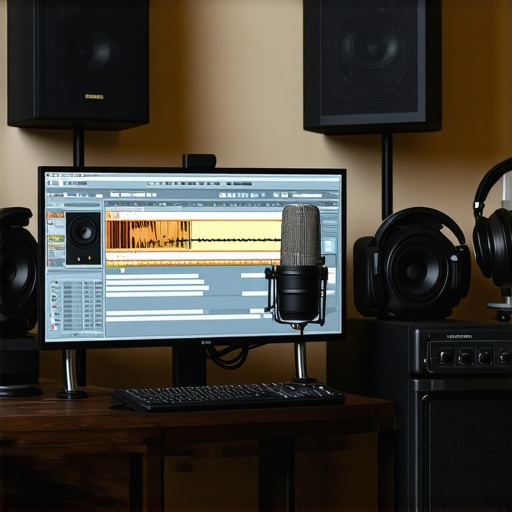
Select the Right Digital Audio Workstation for Voiceovers
Think of your DAW (Digital Audio Workstation) as the command center for your recordings. I remember when I switched from a basic free app to top DAW software for voiceovers. The difference was night and day. Choose a DAW that suits your workflow, not just the most popular. Look for features like multi-track editing, noise reduction plugins, and intuitive interface. I recommend trying out a few demos before committing—this saves hours in the long run.
Optimize Your Workspace for Seamless Editing
Imagine walking into a cluttered, noisy room versus a sleek, soundproof studio. Your environment impacts your work quality. Set up your workspace so that your DAW can run smoothly without lag. Use high-performance plugins, organize your tracks clearly, and customize shortcuts to speed up editing. During my early days, I spent hours hunting through menus. Now, I can focus on perfecting my delivery because I’ve tailored my setup for efficiency.
Invest in a Quality Audio Interface
Your microphone captures sound, but your audio interface transmits it cleanly to your computer. I once used a cheap interface, and my recordings sounded dull and noisy. Upgrading to a dedicated audio interface for voiceover transformed my presence in the mix. Look for one with low latency, multiple inputs, and good preamps. Connect your mic directly to this device for crisp, clear audio.
Set Up Your Studio Headphones Correctly
Good headphones are your window into your audio quality. I used to record with regular earbuds, which led to inaccurate edits. Now, I use studio headphones designed for voiceover. Position them properly, and always monitor at a consistent volume. This ensures you catch every nuance and avoid over-boosting or cutting frequencies that aren’t really there.
Perfect Your Acoustic Environment
Think of your room as the stage for your voice. I once tried recording in a room with echo and hard surfaces, which made my voice sound hollow. Adding foam panels, rugs, and curtains can make a huge difference. For detailed tips, check out creating a professional sound environment. Proper acoustics reduce background noise and prevent sound reflections, giving your voice clarity and warmth.
Configure Your Microphone and Gain Settings
Getting your mic gain right is crucial. Too high, and you risk clipping; too low, and you’ll pick up background noise. I remember when I first set my gain too high, and every breath was amplified. Use your DAW’s meters to find the sweet spot—usually around -12 dB to -6 dB. Test different distances and angles to find the most natural sound. Also, consider using a pop filter to reduce plosives, which can ruin a clean take.
Many aspiring voiceover artists believe they have to spend a fortune on the latest gear or follow every flashy trend to achieve professional sound. However, some of these beliefs are actually misconceptions that can hinder your progress. Let’s dig deeper into the nuances of what most people get wrong about setting up a voiceover studio and how avoiding these pitfalls can make a real difference.
Why Chasing the Most Expensive Equipment Might Be a Mistake
It’s a common myth that only top-tier microphones and interfaces can produce quality audio. In reality, many mid-range gear combined with proper acoustic treatment can outperform expensive setups. For example, a well-placed foam panel and a decent microphone like the Audio-Technica AT2035 can deliver professional results without breaking the bank. Expert audio engineers emphasize that the environment and technique often matter more than the gear itself. For a comprehensive look at creating an effective environment, check out creating a professional sound environment.
Beware of Over-Processing Your Audio
Another common mistake is over-relying on plugins and filters during editing. Over-processing can introduce artifacts, reduce clarity, and make your voice sound unnatural. Instead, focus on capturing a clean recording and use subtle equalization and compression. A study from the Journal of the Audio Engineering Society suggests that minimal processing preserves the natural warmth and nuance of the voice. Remember, the goal is clarity and authenticity, not perfection at the expense of character.
Advanced Question: How Do You Balance Technical Settings with Artistic Delivery?
It’s tempting to obsess over gain levels, sample rates, and noise floors, but the real secret lies in balancing technical precision with your expressive performance. Technical mastery ensures your audio is clear and consistent, but your delivery makes it compelling. The two must work hand in hand. For example, setting your gain correctly prevents clipping while maintaining dynamics that bring your voice alive. For detailed tips on optimizing your setup, explore DAW setup tips and audio interface guidance. Remember, a technically perfect recording is meaningless if your delivery lacks emotion. So, focus on both aspects to truly excel.
Have you ever fallen into this trap? Let me know in the comments. The key to success is awareness and continuous learning. By avoiding these common myths and understanding the nuances, you can elevate your voiceover game in 2024 and beyond.
Maintaining your voiceover setup is crucial for consistent, professional results. Over time, even the best equipment can face issues like dust buildup, cable wear, or outdated software. Regular checks and smart tools can keep your studio in top shape, saving you time and frustration. One effective approach is establishing a routine maintenance schedule. For example, weekly cleaning of your microphone grille and headphone cushions can prevent buildup that affects sound quality. Additionally, updating your DAW and plugin software ensures compatibility and access to new features, which can significantly enhance your workflow.
If you rely on hardware like your audio interface or microphone, inspecting cables for wear and replacing them when necessary prevents unwanted noise or connection issues. Using cable organizers and labelers can also streamline your setup, making it quicker to troubleshoot or reconfigure for different projects. Personally, I use a USB hub with individual port indicators to monitor device activity, which helps identify faulty connections instantly.
Tools I Recommend for Long-Term Reliability
Investing in reliable cleaning tools like compressed air cans and microfiber cloths is a no-brainer. They keep your equipment dust-free without risking damage. For software, I swear by regular backups with cloud storage solutions—this way, your session data, presets, and custom templates are safe from accidental deletions or hardware failures. A dedicated backup drive, like the Samsung T7, provides quick restore options if something goes wrong.
Keeping your audio drivers up to date is another vital step. Outdated drivers can introduce latency issues or compatibility problems with your DAW. I check for updates every few months via the manufacturer’s website or automatic update tools built into Windows or macOS.
Anticipating Future Trends in Studio Maintenance
Looking ahead, I believe automation will play a bigger role in studio upkeep. AI-driven diagnostic tools might soon alert you to impending hardware failures or software conflicts before they disrupt your workflow. Additionally, wireless and cloud-based setups could enable remote troubleshooting and updates, reducing downtime even further. Staying ahead of these trends means investing in adaptable, forward-thinking gear now, and maintaining it properly to extend its lifespan.
How do I maintain my voiceover studio over time?
The key is routine, proactive care. Schedule regular cleaning, software updates, and backup sessions. Keep cables organized and inspect hardware periodically for signs of wear. Using trusted tools like compressed air and microfiber cloths prevents dust from degrading sound quality. Don’t forget to monitor your drivers and firmware to ensure seamless operation. For detailed guidance on setting up a maintenance routine, check out creating a professional sound environment. Try implementing a monthly checklist, and you’ll notice your studio stays reliable and ready for recording any time. Want personalized advice? Contact us here and let’s keep your setup in perfect shape for 2024 and beyond.
Ever wondered what separates amateur voice recordings from those that sound truly professional? The secret often lies in the details of your setup. Over the years, I’ve learned that small adjustments in hardware, acoustic treatment, and workflow can dramatically elevate your audio quality. In this guide, I’ll share the most impactful lessons I’ve learned about creating a voiceover environment that not only sounds great but is sustainable and easy to maintain. These insights are designed to help you avoid common pitfalls and achieve studio-quality results without breaking the bank.
3 Lessons I Wish I Knew When I Started
- Don’t underestimate room acoustics: Initially, I thought a good mic was enough, but echo and reflections wrecked my recordings. Investing in foam panels and strategic placement transformed my sound instantly.
- Focus on workflow efficiency: Cluttered setups and complex menus slowed me down. Custom shortcuts and organized tracks in my DAW saved hours and reduced frustration, allowing me to focus on delivery.
- Balance technical settings with emotion: Perfect gain and noise reduction are vital, but they shouldn’t mute the personality in your voice. Find that sweet spot where clarity meets character.
- Choose quality, not just expensive gear: Mid-range microphones and interfaces paired with proper acoustic treatment outperform costly gear used poorly. It’s about the combination, not just the price tag.
- Avoid over-processing: Subtle EQ and compression preserve your voice’s natural warmth. Overdoing plugins can make your recordings sound sterile and unnatural.
Tools That Make a Difference
My essential toolkit includes a reliable audio interface with low latency, studio headphones designed for voiceover for accurate monitoring, and acoustic panels that tame reflections. For DAW software, I recommend trying out different options until you find one that feels intuitive—top DAWs for voiceovers are all equipped with features that streamline editing and noise reduction. Lastly, regular backups of your sessions using cloud storage prevent disaster and give peace of mind.
Step Into Your Future Voiceover Success
Building a professional voiceover setup isn’t just about gear—it’s about creating an environment that inspires you and produces consistent, high-quality results. Every small improvement compounds over time, turning your home studio into a true creative sanctuary. Remember, the journey to mastering your voice in 2024 is ongoing, but with the right mindset and tools, you’ll be amazed at what you can achieve. Now, it’s your turn—start implementing these tips today and watch your sound transform.
What’s the biggest challenge you face when setting up your voiceover studio? Let me know below, and let’s troubleshoot together!
http://Samuel%20Rogers
This post hits all the right notes about setting up a professional voiceover studio. I particularly agree with the emphasis on acoustic treatment—early on, I underestimated how much echo could ruin a recording. Installing foam panels and using a reflection filter made an immediate difference. I also found that spending time on organizing my workspace and customizing shortcuts in my DAW significantly increased my efficiency. One thing I’ve struggled with is balancing technical accuracy with expressive delivery; sometimes, I get so caught up in ensuring perfect settings that I forget to connect emotionally with the script. Has anyone experimented with how different gain settings or room acoustics influence their performance’s emotional tone? Would love to hear different approaches to keep the technical and artistic sides in sync.