Ever sat in front of your microphone, voice ready to record, only to be met with a dull, muddy sound that makes you wince? I remember those frustrating days—spending hours tweaking settings, chasing that perfect tone, only to end up with a result that still sounded off. It was like trying to hear yourself through a thick fog. That lightbulb moment hit me hard: the secret wasn’t just in the mic or software, but in the entire setup, especially the audio interface and environment. Since then, my recordings have transformed, sounding crisp, professional, and clear enough to rival studios. If you’re tired of lackluster audio, stick around. Today, I’m going to guide you through the essential steps to elevate your voiceover game in 2024, focusing on the right gear and setup tips that truly make a difference.
Why Your Voiceover Recordings Still Sound Amateur in 2024
It’s a common story—many voiceover artists and podcasters think that owning a good mic is enough. But I learned the hard way that the magic lies in how you connect everything together and the environment you record in. Early on, I made the mistake of skipping the audio interface upgrade, relying solely on a generic soundcard built into my laptop. The result? Unwanted noise, latency issues, and a loss of clarity. That’s when I realized the importance of investing in a quality audio interface. It acts as the bridge between your mic and your computer, providing cleaner sound, better gain control, and reducing background noise. It’s honestly a game-changer. And trust me, this is just the tip of the iceberg. If you want your voice to cut through the mix with studio-quality clarity, nailing your setup is non-negotiable. But how do you choose the right gear? That’s what I’ll help you figure out next.
Is Overthinking Your Setup a Waste of Time?
Early on, I believed I needed the most expensive gear to sound professional. Turns out, that’s not true. My biggest mistake was overcomplicating my setup with gear I didn’t really need, which only added noise and confusion. Instead, focusing on a few key components—like a solid studio headphones for accurate monitoring, a reliable microphone, and a good interface—made all the difference. Remember, it’s about quality over quantity. In the next sections, I’ll walk you through selecting gear that fits your budget and space, so you can achieve that professional sound without the headache. Ready to dive into the practical steps? Let’s get started.
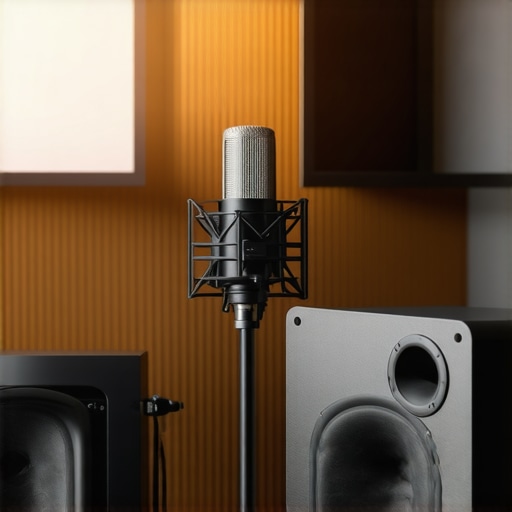
Choose Your Microphone Wisely
Start by selecting a microphone suited for voice recordings. Condenser mics are popular for their sensitivity, capturing rich details, but they also pick up more room noise. Dynamic microphones are more forgiving in untreated spaces, making them ideal for home studios. When I upgraded to a studio-quality microphone, I immediately noticed a warmer, more professional tone in my recordings. This step is crucial because your mic is the foundation of your sound.
Invest in a Quality Audio Interface
The audio interface acts as the bridge between your microphone and computer, converting analog signals into digital with clarity. I once relied solely on a basic soundcard built into my laptop, which introduced unwanted noise and latency. Upgrading to a dedicated audio interface transformed my sound, offering cleaner audio, adjustable gain control, and better overall fidelity. Think of it like a high-quality translator that ensures your voice is heard exactly as you intend.
Set Up Your Interface Properly
Proper setup involves connecting your mic to the interface, then configuring your computer’s audio settings to recognize the device. Use the manufacturer’s software for driver installation and ensure your buffer size is optimized—low enough for real-time monitoring but high enough to avoid glitches. I followed a detailed guide from expert tips which helped me eliminate latency issues that once plagued my recordings. This step is the secret to seamless, professional-sounding results.
Calibrate and Test Your Equipment
Before diving into recording, always calibrate your setup. Adjust the gain on your interface so your voice peaks around -6 dB to -3 dB without clipping. I once recorded a test session and discovered my gain was too high, causing distortion. Fine-tuning this setting made my voice sound clearer and more natural. Use headphones to monitor your audio in real-time, ensuring no unwanted background noise or hums sneak in. For accurate monitoring, I rely on studio headphones that reveal every detail of my voice, making sure each take is studio-quality.
Optimize Your Recording Environment
Even with perfect gear, a noisy or reflective space ruins the clarity. I dedicated time to soundproofing my room, adding foam panels and moving away from reflective surfaces. For more tips, check out this guide. A quiet, controlled environment ensures your microphone captures only what you intend, making post-production much easier.
Test and Tweak Regularly
Your setup isn’t a set-it-and-forget-it deal. Regular testing and tweaking are essential. Record short clips, listen critically, and adjust your gain, mic position, or environment as needed. Over time, I developed a workflow that includes quick tests before every session, saving me hours of editing later. This discipline keeps your sound crisp and professional, no matter how many recordings you do.
While it’s tempting to believe that investing in high-end equipment guarantees studio-quality sound, there’s a nuanced trap many voiceover artists fall into: focusing solely on gear without considering the intricacies of setup and environment. The truth is, even the most expensive microphone or interface can produce muddled or inconsistent results if not paired with proper calibration and understanding of common myths.
One widespread misconception is that a good microphone alone will solve all audio issues. In reality, the microphone is just one piece of a larger puzzle. Many beginners assume that better gear automatically means better sound, but neglecting the importance of correct placement, gain staging, and room acoustics can lead to subpar recordings. For example, improper gain settings on your audio interface can cause distortion or noise, negating the quality of your mic.
Another myth worth busting is that room treatment is optional. Some believe that a small, untreated space is sufficient for professional voice recordings. However, echo, reverb, and background noise are silent killers of clarity. Investing in simple soundproofing or acoustic panels isn’t just about aesthetics; it directly impacts your sound quality. I’ve seen many overlook this step and suffer from inconsistent results. You can learn more about optimizing your space in this guide.
What sophisticated mistakes do most overlook when setting up their gear?
Advanced users often underestimate the importance of calibration and monitoring. Plugging in a mic without adjusting the gain properly on your audio interface can lead to clipping or low-volume recordings. Additionally, monitoring with cheap headphones may deceive you into thinking your audio sounds good when, in fact, subtle background noise or distortion is present. Using high-quality studio headphones ensures you hear every detail and make precise adjustments.
Furthermore, many overlook the importance of consistent mic placement. Small shifts in mic position can dramatically alter tone and clarity. Advanced techniques include using a boom arm and a pop filter, and maintaining the same distance for every take. This consistency saves hours in editing and results in a more polished final product.
In essence, mastering the nuances of your setup—such as gain staging, room acoustics, and monitoring—is what separates amateurs from professionals. Don’t fall into the trap of overspending on gear alone; instead, invest time in understanding and calibrating your equipment for optimal results. Have you ever fallen into this trap? Let me know in the comments and share your experiences!
Keeping Your Gear in Top Shape for Consistent Results
Once you’ve invested in quality equipment, the next step is ensuring it remains reliable over time. Regular maintenance is key. For microphones and audio interfaces, I recommend **cleaning contacts and connectors** with a gentle electronics cleaner once every few months. This prevents corrosion and maintains crisp sound quality. Additionally, **dust and debris** can accumulate on your gear, so a soft, lint-free cloth should be part of your routine. For microphones, avoid exposing them to extreme temperatures or moisture, which can degrade internal components.
How do I maintain my setup over time?
Implement a routine check-in schedule—monthly or quarterly—to verify all connections, test audio fidelity, and reassess your environment. Keep firmware and driver software updated, as manufacturers often release improvements that can enhance stability and performance. For example, regularly visiting the manufacturer’s support page, such as this guide, ensures you’re not missing critical updates that optimize your gear’s longevity.
Using **cable organizers and proper storage** also extends your equipment’s lifespan. Coil cables loosely and avoid sharp bends that can cause internal breaks. When not in use, store your microphone and interface in protective cases or padded drawers to prevent accidental damage.
Tools I Recommend for Long-Term Maintenance
From my experience, **contact cleaner** like DeoxIT is invaluable for keeping connectors and switches working smoothly. I also swear by a **compressed air can** for removing dust from ports and vents—this is especially important for preventing overheating and ensuring stable operation.
For software health, I use dedicated **system cleanup tools** such as CCleaner to remove unnecessary files, which helps prevent slowdowns that could affect real-time monitoring and recording. Regularly updating your **DAW software** and **audio drivers** is equally crucial; I set reminders to check for updates on this site and manufacturer pages.
Future Trends in Maintaining Your Voiceover Setup
Looking ahead, I predict that **smart maintenance tools with AI-driven diagnostics** will become mainstream. These will proactively alert you to potential issues—like a failing cable or outdated firmware—before they cause major disruptions. Adopting such innovations early can save you hours of troubleshooting and keep your recordings consistently professional.
So, make it a habit to perform routine checks, keep your environment clean, and stay updated with the latest firmware and software. Try incorporating a **monthly gear check** and see how much more reliable and high-quality your recordings become over time. Remember, a well-maintained setup is the backbone of professional-grade voiceovers! For more detailed maintenance strategies, visit this comprehensive guide.
The Hardest Lesson I Learned About Voiceover Equipment
One of the biggest surprises I encountered was realizing that even top-tier gear can fall flat if not set up correctly. I used to think that buying fancy microphones or interfaces alone would elevate my recordings, but I discovered that calibration and environment are equally vital. This lightbulb moment taught me to focus on the full picture, not just the gear.
3 Myths About Voiceover Setup That Held Me Back
Myth one was believing that room treatment was optional — turns out, untreated spaces make your audio muddy and unprofessional. Myth two was assuming that simple gain adjustments are enough; precise gain staging is crucial for clarity. Myth three was thinking that monitoring with cheap headphones suffices; real studio-grade monitoring reveals the subtle differences that make your voice stand out.
What Experts Won’t Tell You About Achieving Studio-Quality Voice Recordings
Many seasoned professionals emphasize that consistency in mic placement, regular equipment calibration, and maintaining a clean environment are more important than expensive gear. These behind-the-scenes habits often determine whether your recordings sound polished or amateurish. Learning these hidden truths transformed my approach entirely.
My Essential Toolkit for Voiceover Success
I trust the audio interface to deliver clean, noise-free sound, paired with studio headphones for accurate monitoring. My microphone of choice is a condenser model known for warmth and detail, complemented by acoustic treatment for my space. These tools, combined with disciplined setup routines, keep my recordings professional and consistent.
Your Turn to Try
Now that you know the insider secrets, it’s time to apply them. Start by calibrating your equipment regularly, invest in proper room treatment, and monitor with high-quality headphones. Remember, the key to professional voiceovers isn’t just gear — it’s how you set up and maintain your entire environment. Are you ready to elevate your recordings in 2024? Share your biggest setup challenge below, and let’s troubleshoot together!
http://Rachel%20Montgomery
I completely agree with the importance of a good audio interface. When I first started, I underestimated this component and kept using my laptop’s built-in soundcard, which resulted in background noise and latency, making my recordings sound unprofessional. Upgrading to a dedicated interface was a game-changer—improved clarity, better gain control, and a much cleaner sound. I’ve also found that spending time on proper room treatment makes a significant difference. Even small investments like foam panels and a quiet space can eliminate echo and background noise that ruins otherwise good recordings. I wonder, what are some affordable ways to soundproof a small home studio without breaking the bank? Would love to hear others’ tips for balancing budget and quality!