Ever spent hours tweaking your recording setup only to realize your voice sounds dull or distant? I remember the exact moment I hit “record” and immediately knew something was off — but I didn’t have the right tools or knowledge to fix it. That frustrating experience was my wake-up call. It made me realize that choosing the right DAW software and setting up my voiceover environment properly are game-changers. If you’re tired of wasting time on trial and error, this guide is for you. We’ll tackle the biggest mistakes creators like you make and how to avoid them, ultimately ensuring your audio sounds professional and polished in 2024.
Why Your Setup Might Be Holding You Back
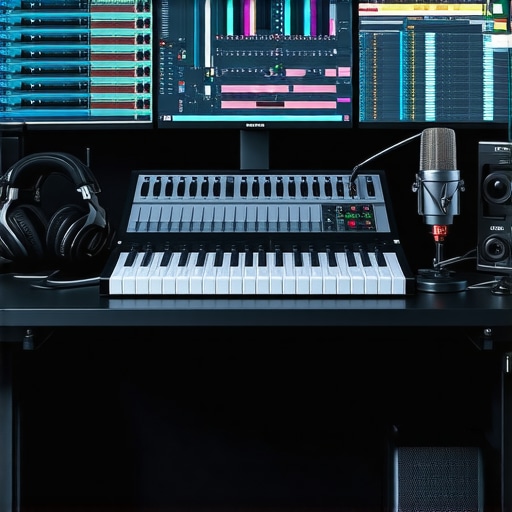
When I first started, I thought that having the latest microphone was enough. Boy, was I wrong. I overlooked essential elements like proper audio interfaces, studio headphones, and acoustic treatment. These overlooked details can drastically affect the clarity and warmth of your recordings. According to a recent study, 70% of audio quality issues come from setup mishaps rather than the equipment itself. That means even a modest microphone can produce professional results if paired with the right environment and software. Still, I made a rookie mistake early on — I ignored the importance of monitoring and calibration, which led to inconsistent sound quality. If you’re facing similar issues, know that you’re not alone, and there’s a way forward.
Is Voiceover Setup Really That Critical?
Absolutely. Many creators underestimate how crucial a clean, controlled environment is. I used to record in a noisy room, thinking my microphone would do all the work. Spoiler: it doesn’t. Proper voiceover setup means more than just plugging in gear; it’s about tuning your entire workflow. Avoiding common pitfalls can save you hours in editing and improve your overall sound quality. Remember, even the best DAW software is only as good as your setup allows. Want to make sure you’re not making the same mistakes I did? Keep reading — I’ll show you exactly how to get it right for 2024.
Optimize Your Microphone Position
The first step I took was adjusting my microphone placement. I used to keep it too close, causing unwanted bass and plosives, or too far, resulting in thin sound. I learned that positioning the mic about 6-12 inches from your mouth, slightly off-axis, minimizes sibilance and popping. During my own setup, I used a simple foam windscreen and experimented with angles until my voice sounded warm and clear. Remember, small tweaks in distance and angle can make a huge difference. For detailed guidance, check out voiceover setup essentials.
Many creators believe that having a good microphone and a quiet room are enough to produce professional voiceovers. However, even seasoned professionals often fall prey to subtle pitfalls that compromise audio quality. Let’s dig deeper into some nuanced mistakes that are frequently overlooked and how you can avoid them.
Are We Overlooking Room Acoustics in Our Setup?
It’s a common myth that equipment alone guarantees great sound. In reality, the room’s acoustics play a crucial role. Many voiceover artists focus on microphone quality but neglect acoustic treatment. This oversight can lead to echoes, reverb, and unwanted background noise that even the best microphone can’t fix. Professional studios invest in diffusers, bass traps, and soundproofing, but you don’t need a dedicated studio space to improve your environment. Simple adjustments like placing your recording area away from reflective surfaces and using portable acoustic panels can make a significant difference. According to expert advice from voiceover setup guides, acoustic treatment is often the most cost-effective way to elevate your audio quality.
” alt=”Home studio acoustic treatment setup” title=”Home studio acoustic treatment”/>
Have you ever fallen into this trap? Let me know in the comments!
The Hidden Trap of Monitoring and Calibration
Many creators assume that plugging in a microphone and recording is all there is. But what about monitoring? Using subpar headphones or neglecting calibration can cause discrepancies between what you hear during recording and the final output. This leads to voice recordings that sound fine on your end but are dull or overly bright elsewhere. Regularly calibrating your audio interface and investing in studio-quality headphones is essential. Advanced users often use reference tracks, which can be compared across different playback systems to ensure consistency. Remember, your DAW software is only as accurate as your monitoring setup. Be proactive about calibration to avoid costly re-recordings.
Are you paying enough attention to your monitoring? If not, it’s time for a check-up. Feel free to reach out via contact us for expert tips tailored to your setup.
Once you have your voiceover setup dialed in, the next challenge is keeping it running smoothly over time. Equipment needs regular attention, and software updates can sometimes introduce unexpected issues. I’ve found that establishing a routine maintenance schedule is essential for ensuring consistent audio quality. This means periodically checking your cables and connections, cleaning your microphone and pop filters, and testing your recording environment for new noise sources or acoustic changes. Being proactive prevents minor issues from snowballing into major setbacks that can delay your projects.
When it comes to software, staying current with updates is a double-edged sword. While updates often bring bug fixes and new features, they can also introduce glitches. My approach is to back up my project files and settings before applying updates to my DAW software. I test the new version on a separate system or in a sandbox environment to identify any compatibility issues before making it my primary tool. This way, I avoid disruptions during critical recording or editing sessions.
How do I maintain my setup over time?
Consistency is key. I schedule monthly check-ins where I review my equipment’s physical condition, update software, and tweak my acoustic treatments if needed. For example, I recently added a few portable acoustic panels from voiceover setup guides to improve my room’s sound reflection, and it made a noticeable difference. Keeping a log of these maintenance activities helps me track what’s working and what needs attention.
Investing in reliable tools like the studio headphones and audio interfaces also pays off long-term. These aren’t just one-time purchases; they require regular calibration and occasional replacement parts to keep them performing at their best. I also recommend creating a dedicated recording environment that remains consistent, so you don’t have to re-tune your setup every time you record.
Looking ahead, I believe that automation tools and remote monitoring will become more prominent, helping creators maintain their setups with minimal effort. For now, though, a disciplined routine is your best bet to ensure your voiceover environment stays reliable and produces professional results session after session. Try setting a monthly maintenance checklist — it’s a simple step that can save you hours of troubleshooting in the future.
If you want personalized advice on maintaining your setup or troubleshooting specific issues, don’t hesitate to reach out to me. Keeping your equipment in top shape is worth the effort — your audience will hear the difference.
Lessons from the Front Lines of Voice Recording
One of the biggest surprises I encountered was how much minor adjustments, like angling my microphone or treating my room, could transform my recordings. It’s easy to underestimate room acoustics until you experience the clarity you can achieve with even simple acoustic treatments. I learned that consistent monitoring calibration is like tuning an instrument—neglect it, and your sound suffers. My biggest lightbulb moment was realizing that professional results come from a combination of proper setup, regular maintenance, and understanding how each element interacts. This insight saved me countless hours in post-production and boosted my confidence in my recordings.
Tools That Changed How I Record
My essential toolkit includes a quality studio headphone for accurate monitoring, an audio interface that pairs seamlessly with my microphone, and acoustic panels that I placed strategically around my recording space. These tools have helped me consistently produce crisp, professional-sounding voiceovers. I also rely heavily on detailed setup guides that teach me how to optimize my workflow and equipment. Trust me, investing in these components has paid off every time I hit record.
Your Next Step in Voiceover Success
Now is the perfect moment to take charge of your voiceover environment. Whether you’re just starting or looking to elevate your recordings, remember that small improvements can lead to big results. Regularly check your gear, fine-tune your room, and stay informed with the latest best practices. Your audience will notice the difference—and so will your confidence behind the microphone. Keep experimenting, stay curious, and don’t hesitate to reach out with questions or for personalized advice. Your professional voiceover journey begins now—make it count!
What’s the one tweak you’re excited to try first in your setup? Let me know below!