It was a typical Tuesday afternoon when I found myself rattling my desk in frustration, trying to edit a simple voiceover. My headphones kept slipping, the audio interface was humming unexpectedly, and the software crashes felt like a personal attack. That moment hit me—how could something so vital be so chaotic? I realized I was drowning in a sea of subpar gear, half-baked setups, and confusing advice. It wasn’t just a mistake; it was a revelation. I knew then that I needed a comprehensive, reliable system to elevate my voiceover game.
That’s why I dedicated myself to mastering the ultimate setup for creators in 2024. And trust me, the journey wasn’t straightforward. I’ve been through the pitfalls of choosing incompatible gear, overlooking crucial connection details, and underestimating the importance of proper software configuration. But after countless trials and a few costly errors—like plugging my microphone into the wrong port or neglecting proper room treatment—I finally pieced together a workflow that’s both efficient and studio-quality. Today, I want to share this knowledge with you, so you won’t have to suffer the same frustrating detours.
Why Your Audio Setup Matters More Than You Think
If you’re serious about voiceovers, podcasts, or any audio project, your setup isn’t just a background detail. It’s the foundation of your sound. The right combination of gear and software can make the difference between a professional-sounding recording and amateur noise. According to a study from Audio Engineering Society, even minor gear mismatches can lead to significant quality loss—like muffled sound, unwanted noise, or inconsistent levels. Investing in quality gear tailored for creators can dramatically reduce post-production time, giving you more energy for creativity.
But let’s be real—choosing the perfect gear can feel overwhelming. Do you go for the most popular microphone? Which audio interface will give you crisp, clear recordings without breaking the bank? How do you set everything up so it works seamlessly in your space? These questions can stall even the most motivated beginner. That’s why I’ll guide you through the essential components, common pitfalls, and setup tricks that have worked wonders for me and countless creators I’ve mentored.
Facing the Fear of Overcomplication
One of my early mistakes was trying to DIY my setup without proper research. I bought a cheap interface, a decent mic, and hoped for the best. But without knowing how to connect these devices properly or set the right levels, my recordings were a disaster—muddy, uneven, and unusable. Over time, I learned that a proper setup isn’t about having the most expensive gear; it’s about making the right choices and understanding how everything works together. If you’ve ever felt overwhelmed just thinking about *where to start*, I promise, it’s completely normal. Let’s clear away the confusion and get you on the path to studio-quality sound with simple, actionable steps.
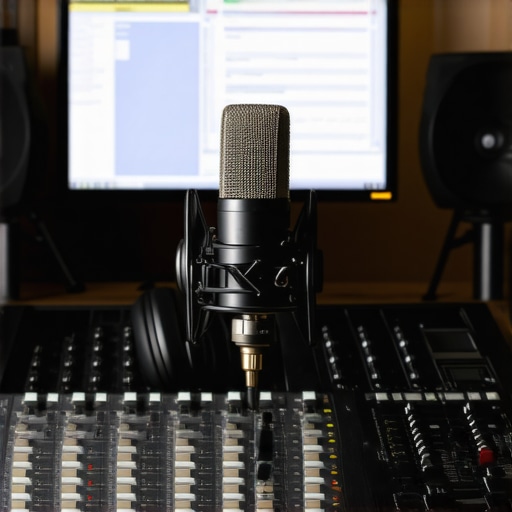
Set Up Your Audio Interface Correctly
Start by connecting your audio interface to your computer via a high-quality USB or Thunderbolt cable, ensuring a secure connection. For example, during my first setup, I mistakenly used a cheap USB cable, which caused intermittent sound drops. Replacing it with a shielded cable instantly stabilized my recordings. Refer to the expert guide on audio interface setup to get it right.
Choose the Right Input and Output Settings
Open your DAW and set your interface as the default input and output device. Adjust sample rate to 48kHz and bit depth to 24-bit; this balances quality and processing load. In my early days, neglecting this caused my recordings to sound muffled. Setting the correct parameters ensures clarity. Use the DAW configuration tips for detailed guidance.
Optimize Your Microphone Placement
Position your microphone about 6-8 inches from your mouth, slightly off-axis to reduce plosive sounds. Use a pop filter—the kind that looks like a windshield for your mic—to minimize unwanted bursts. Once, I ignored this advice, and my recordings were riddled with harsh ‘p’ sounds, making editing a nightmare. Moving the mic and adding a pop filter transformed my audio quality dramatically.
Improve Room Acoustics for Better Sound
Hard surfaces reflect sound, causing echo and muddiness. Incorporate foam panels, blankets, or furniture to absorb excess reflections. I once recorded in a bare room; after adding basic foam, my voice sounded much warmer and professional. Check out the voiceover environment tips for practical room treatment suggestions.
Master Your Software Settings
Choose a DAW suited for voiceovers, like the best DAW for voiceover editing. Configure input levels to avoid clipping—set your gain so your voice peaks around -6dB. During my first recording, I didn’t watch my levels, leading to distortion that took hours to fix. Learning to monitor and adjust levels in real-time saves you editing time later.
Utilize Proper Headphones for Editing
Invest in closed-back studio headphones for accurate monitoring; they block external noise and prevent sound leakage into your mic. I initially used consumer headphones, which led to missing hidden background noises in my recordings. Upgrading to quality studio headphones, as discussed in the headphone buying guide, was a game-changer for my editing precision.
Implement a Consistent Workflow
Record in a quiet environment, monitor levels closely, and save different takes systematically. After recording, use editing hacks from streamlined editing techniques to cut, clean, and normalize your audio efficiently. In my experience, establishing this routine boosts confidence and reduces post-production stress.
Back Up Your Voice Data Regularly
Avoid losing your hard work; save your recordings on external drives or cloud services. I learned this the hard way when my laptop crashed overnight, leaving me with lost sessions. Automate backups to ensure peace of mind, allowing you to focus on perfecting your sound.Many creators assume that investing in premium gear automatically guarantees studio-quality sound, but in reality, it’s a nuanced game of compatibility and technique. For example, choosing a high-end microphone without considering your audio interface’s input impedance can lead to subtle yet impactful frequency response issues, subtly coloring your voice and undermining clarity. According to expert acoustician Ethan Winer, mismatched equipment can introduce phase cancellations and frequency dips, which are often overlooked but crucial for professional sound. Moreover, there’s a common myth that the latest DAW software alone can elevate your recordings; in truth, mastering proper input gain staging and real-time monitoring in your DAW are what make the difference. Failing to calibrate your headphone levels correctly can also cause you to miss background noises or over-boost certain frequencies, leading to less accurate editing decisions.
What Advanced Creator Skills Must You Develop to Stay Ahead?
To truly excel, it’s essential to understand how even subtle variances in room acoustics or cable quality can influence your audio chain. For instance, using unshielded or low-quality cables may introduce electromagnetic interference, producing low-level hums that taint your recordings. Recognizing these nuances requires meticulous attention to detail, often neglected by amateurs. Ensuring your audio interface is configured with the correct sample rate and bit depth within your DAW—such as 48kHz/24-bit—also impacts how faithfully your digital recordings reflect your original voice. Research indicates that improper or inconsistent configuration can result in data loss or distortion during processing. To avoid these hidden pitfalls, regularly consult dedicated setup guides like this expert guide. Remember, optimizing your gear is not a one-time task but an ongoing process of refinement. Are you making these subtle mistakes in your setup? Share your experiences in the comments!
Once you’ve crafted a professional setup, maintaining its performance over time becomes crucial. Regular upkeep of your audio interface, DAW software, and headphones ensures your recordings stay crisp and reliable, avoiding costly disruptions. I personally schedule monthly checks—cleaning plugs, updating software, and inspecting cables—to prevent minor issues from snowballing. Staying proactive here isn’t just about longevity; it directly impacts your sound consistency. For example, applied periodic firmware updates on my audio interface have improved latency and stability, keeping my workflow smooth. Investing time in routine maintenance also helps identify subtle hardware degradation, so you can plan timely upgrades instead of facing sudden failures.
How do I keep my audio gear functioning flawlessly long-term?
Start by establishing a clear maintenance routine tailored to your equipment. Regularly update your DAW and driver software via trusted sources, like the official privacy policy, to address bugs and security patches that affect performance. Clean your studio headphones gently with alcohol wipes to maintain driver integrity—sound quality depends on proper care. Inspect and organize your cables; replace any with visible wear to prevent intermittent noise. As recommended in expert setup guides, keep your hardware clean and dust-free, especially around connectors, to avoid connectivity issues. Over time, lubricate moving parts on adjustable stands or mounts to retain ease of use. If you notice a decline in audio clarity or synchronization delays, it might be time for firmware updates or component replacement. Implementing these habits guarantees your gear performs at its best, session after session. Why not pick one maintenance tip today—such as cleaning your headphone connectors—and see immediate benefits in your recordings? Consistency is the secret to maintaining high-quality sound in the long run.
What I Wish I Knew Before Diving Into Setups
One of the hardest lessons was realizing that gear compatibility is often overlooked but crucial—matching your microphone impedance to your interface can drastically improve sound clarity. I once bought a high-end mic without checking this, and my recordings sounded dull—until I learned about proper matching. Now, I always verify specs before purchasing.
Another truth is that software settings make or break your quality. I used to ignore sample rate and bit depth settings, which caused unexpected distortions. Setting these correctly, like 48kHz and 24-bit, has been a game-changer. Never underestimate the power of proper configuration in your DAW or interface.
And let’s not forget the importance of room treatment—it’s easy to dismiss, but untreated spaces create echoes that ruin clarity. Adding foam panels and diffusers has elevated my recording quality immensely. Good acoustics are an investment that pays off in professionalism and listener engagement.
My Go-To Tools for Seamless Audio Creation
For audio interfaces, I rely on the best audio interfaces and studio headphones recommended for creators; they offer durability and pristine sound. When it comes to DAWs, I swear by top DAW software options that are both user-friendly and packed with features tailored for voiceover work. For headphones, nothing beats the reliability of the best studio headphones guide—they reveal hidden details that make editing straightforward.
Embrace the Uncomfortable to Reach Your Goals
Building the perfect setup initially felt overwhelming, and I faced moments of doubt, questioning whether investing in quality gear was worth it. But those uncomfortable phases taught me patience and attention to detail. Persisting through the learning curve transformed my sound and confidence, and I believe every creator can experience this growth with a little perseverance.
Remember, in the world of audio creation, setbacks are simply stepping stones to mastery. The difference lies in your willingness to learn, adapt, and refine your gear and technique. With dedication, your voiceover setup will become not just a tool but a powerful extension of your creative identity. Why not start small today—every bit of progress counts!
http://Jessica%20Miller
Reading this post really hit home for me because I’ve gone through a similar journey trying to perfect my voiceover setup. The frustration of software crashes and gear mismatch can be overwhelming, especially when you’re just starting out. I agree with the emphasis on understanding how everything works together—sometimes it’s the small details, like cable quality or mic placement, that make a huge difference in the final sound. One thing I found helpful was investing in a good quality foam panel for my room, which truly improved my recording clarity and reduced echoes. I’m curious if others have tried different room treatments that worked well for them? Honestly, the ongoing maintenance tips like updating firmware and inspecting cables are easy to forget but so crucial for consistent quality. Do you have suggestions for budget-friendly upgrades that can make a noticeable difference without breaking the bank? It’s clear that mastering both gear and software details significantly elevates the finished product, so I’d love to hear everyone’s tips on simplifying this process.
http://Mark%20Anderson
This article hits the nail on the head about how critical a well-organized, consistent setup is for voiceover work. I’ve been in the game for quite a few years now, and I can say that no matter how good your gear is, if your workflow isn’t disciplined, you’ll never reach your full potential. I totally agree about regular maintenance—cleaning connectors, updating drivers, and checking levels often get overlooked but are so key to avoiding those annoying glitches mid-recording.
One thing I’d add from my experience is investing in a dedicated space for recording. Even a small, treated corner can drastically improve sound quality and reduce outside noise. It doesn’t have to be fancy—some foam panels, a door seal, and a good microphone stand can work wonders—and it’s more budget-friendly than you might think.
What’s been your go-to setup for maintaining those recordings over time? I’d love to hear other creator tips on keeping gear in top shape without breaking the bank. Also, does anyone have suggestions for portable solutions when you’re on the move but still want good quality recordings? Thanks for sharing such valuable insights! It’s easy to get caught up in gear specs, but the workflow and environment are equally vital for professional results.