I remember the moment clearly. I had just finished recording what I thought was a perfect voiceover—smooth, professional, and crisp. But when I played it back, the sound was muddy, filled with background noise, and just didn’t have that professional shine. I realized my gear was holding me back, and I had no idea where to start. That lightbulb moment pushed me to dive deep into the world of audio gear—specifically, the best audio interfaces and studio headphones for 2024. If you’ve ever faced similar frustrations, you’re not alone. The right equipment can transform your recordings from amateur to professional, but with so many options out there, it’s easy to get overwhelmed.
Why Getting Your Audio Gear Right Is a Game Changer
Let’s be honest—your voice might be fantastic, but if your recordings are plagued with background noise, distortion, or muddiness, nobody will take you seriously. In 2024, the demand for high-quality podcasts and voiceovers has skyrocketed. According to a recent report, over 70% of listeners tune out if the audio quality isn’t up to par (source). That means your gear isn’t just about bragging rights; it’s about meeting audience expectations and standing out in a crowded field. But here’s the thing—choosing the wrong equipment early on can set you back. I made that mistake. I bought a flashy microphone without considering if my audio interface could properly support it, leading to more frustration and wasted money. The key is understanding what really matters—clarity, reliability, and ease of use—and aligning your gear with your goals.
Have You Faced This Problem?
Are you tired of re-recording because your sound isn’t clear enough? Or maybe you’ve spent hours trying to fix audio issues during editing? If yes, then you know how crucial the right setup is. Luckily, I’ve broken down the essentials to help you avoid the pitfalls I fell into, and I’ll guide you through choosing equipment that truly elevates your recordings.
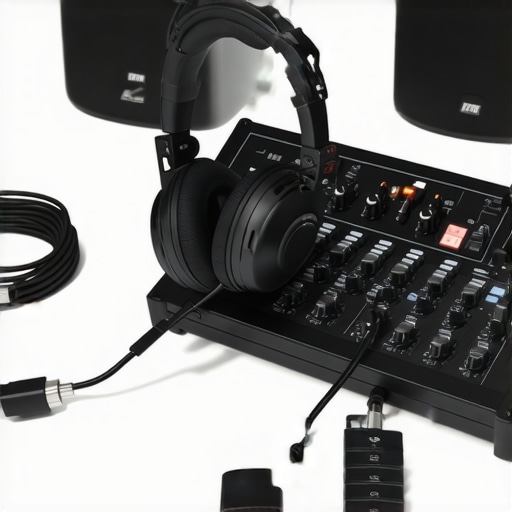
Choose the Right Audio Interface to Boost Clarity
The foundation of professional-quality sound starts with selecting a suitable audio interface. Think of it as the engine that powers your entire setup—if it’s underpowered or incompatible, your recordings will suffer. During my early days, I purchased a popular model without checking its compatibility with my microphone, which resulted in distorted audio. To avoid this, match your microphone’s impedance and input requirements with your interface. For crisp, noise-free recordings, look for features like phantom power, low latency, and durable build quality. Set up your interface according to the expert tips to ensure optimal performance. Once connected, configure your DAW’s audio settings to recognize your interface, which streamlines your workflow and minimizes technical hiccups.
Invest in Quality Studio Headphones for Accurate Monitoring
While your microphone captures your voice, your studio headphones are your window into what’s truly happening in your recording. Cheap or mismatched headphones can mask flaws or give a false sense of perfection. I once used consumer-grade earbuds for editing, and it wasn’t until I switched to professional-grade headphones that I realized my recordings had subtle background noises. When choosing headphones, prioritize accuracy over bass or volume. Look for flat frequency response and comfort, as you’ll be wearing them for hours. For guidance, explore the latest buying guide. Properly calibrated, these headphones help you identify and eliminate audio issues, ensuring clarity in every word.
Optimize Your Recording Environment and Setup
Even the best gear can’t fix a poorly treated space. Soundproof your room by adding acoustic panels, bass traps, or even heavy curtains. I remember trying to record in a noisy apartment, which made post-production a nightmare. Once I moved my setup into a dedicated quiet corner with foam panels, my recordings became immediately cleaner. Position your microphone correctly—typically 6-12 inches from your mouth—and use pop filters to reduce plosive sounds. Additionally, keep your cables tidy and grounded to prevent hums or interference. For detailed instructions, check out the setup essentials guide. These steps drastically improve the quality of your recordings, making editing easier and faster.
Fine-Tune Your Digital Workflow
Once your hardware is in place, configure your DAW software to match your setup. Use the default input/output settings, then customize buffer sizes for low latency during recording and higher buffer rates for mixing. During my first recordings, I ignored this and experienced frustrating delays and crackles. Carefully calibrate your buffer settings and save your preferred configuration. Consider using specialized plugins that help reduce background noise and enhance voice clarity. This ensures every session is smooth and your final product sounds professional and engaging.
Test and Iterate for Consistency
Finally, always run test recordings before your actual session. Listen critically through your calibrated headphones, and make adjustments to mic placement, input levels, or room treatment as needed. I once spent hours perfecting my mic distance, only to discover later that a slight shift improved clarity significantly. Keep notes of your settings and environment for future sessions. Over time, this process becomes second nature, and your recordings will consistently sound polished and professional, even without extensive editing. For more advanced tips, explore the comprehensive guide to fine-tuning your setup. With patience and attention to detail, you’ll master the art of capturing studio-quality audio at home.
Many aspiring creators fall into misconceptions that can hinder their progress in achieving studio-quality recordings. Let’s dig deeper into what most people get wrong about audio gear, especially when it comes to professional-sounding voiceovers and podcasts. Understanding these nuances can save you time, money, and frustration.
Myth of the Perfect Microphone
One of the biggest myths is that buying the most expensive microphone guarantees professional sound. While high-quality mics are beneficial, the environment, setup, and post-processing play equally critical roles. For example, a $1,000 microphone won’t sound great if your room isn’t treated for acoustics. Many beginners assume that microphone choice alone is the magic bullet, but in reality, even budget-friendly options can produce excellent results with proper setup. Check out the latest buying guide for tips on selecting the right mic for your needs.
Why Equalizing Alone Won’t Fix Poor Audio
Another common mistake is relying heavily on post-production EQ to fix recordings that are fundamentally flawed. While EQ can enhance clarity, it can’t compensate for poor microphone placement, noisy environments, or inadequate room treatment. Over-using EQ can lead to unnatural sounds or exaggerated frequencies that distract listeners. Instead, focus on getting a clean recording initially—use proper mic placement and room acoustics—and then fine-tune during editing. For advanced techniques, explore the DAW setup tips.
Beware of the ‘More Gear, Better Sound’ Trap
Many believe that accumulating the latest equipment automatically improves audio quality. In reality, mastering your current gear and understanding your setup yields better results. Upgrading without proper knowledge can lead to mismatched components, such as an incompatible audio interface or headphones that don’t offer flat response. For example, investing in quality studio headphones that suit your workflow is more impactful than a fancy mic you don’t know how to use. Remember, equipment is only part of the equation; skill and environment matter more.
Advanced Question: How Do Impedance and Compatibility Affect Your Setup?
For those looking to elevate their audio quality further, understanding the technical details like impedance and compatibility between microphones, interfaces, and headphones is crucial. Mismatched impedance can lead to signal loss or distortion, undermining your efforts. Consulting expert resources, such as setup guides, helps ensure your gear works harmoniously. In addition, professional-level setups often involve fine-tuning input levels and phantom power to optimize clarity and reduce noise. Don’t overlook these details, as they can make the difference between amateurish and studio-quality sound.
Have you ever fallen into this trap? Let me know in the comments. Remember, mastering the nuances of your gear and setup is what separates good recordings from great ones. For more insights, explore the contact page for personalized advice.
Once you’ve invested in the right equipment for your home studio, the next crucial step is maintaining it to ensure consistent, professional-quality recordings over time. Proper upkeep not only extends the lifespan of your gear but also preserves the sound clarity that sets your content apart. In this article, I’ll share specific tools and methods I personally use to keep my audio setup running smoothly, along with insights into future trends in equipment maintenance.
How do I maintain my audio gear over time?
Regular cleaning is the foundation of gear longevity. I use a microfiber cloth and a gentle electronic cleaner to wipe down my studio headphones and audio interface, preventing dust buildup that can lead to static or poor connections. For connectors and cables, I use contact cleaner spray—like DeoxIT—to remove oxidation, which can cause signal degradation. I also keep a small brush handy to clear dust from ports and vents. This simple maintenance prevents many common issues and ensures your gear performs at its best.
Beyond cleaning, monitoring your setup with software tools is essential. I rely on DAW software with built-in diagnostics to check for latency issues or driver conflicts. Regularly updating your firmware and drivers from official sources keeps your equipment compatible with the latest software enhancements and prevents security vulnerabilities.
In addition, I schedule quarterly checkups of my cables and power sources. Using high-quality power conditioners, such as those from Furman or APC, I protect my gear from voltage fluctuations and electrical noise. This is especially important if you record in an environment with unstable power supply, as it can cause subtle audio hums that are hard to eliminate during editing.
Tools I swear by
For cleaning contacts and ports, I prefer DeoxIT D5 because it effectively removes oxidation without leaving residue that could interfere with connections. My go-to for physical cleaning is a soft, lint-free cloth, and I avoid harsh chemicals that could damage sensitive components. When it comes to software, the latest DAW updates include maintenance tools that help optimize performance, such as disk cleanup and cache management.
Looking ahead, I predict that gear maintenance will increasingly incorporate smart monitoring. Future devices may feature built-in sensors that alert you to potential issues before they impact your recordings, similar to how smart thermostats notify you of temperature irregularities. This proactive approach will help creators avoid downtime and costly repairs.
To stay ahead, I recommend incorporating routine software diagnostics and physical inspections into your workflow. Start by scheduling monthly checks of your cables and connectors, and keep your firmware updated. These small actions save time and money in the long run and ensure your gear is always ready to deliver studio-quality sound.
Interested in more in-depth maintenance strategies? Check out the voiceover setup guide for expert tips on preserving your equipment’s performance. Try implementing a monthly cleaning routine today and experience the difference in your recordings!
The Hardest Lesson I Learned About Audio Gear
One of the biggest truths I uncovered was that even the most expensive microphone won’t save you if your room isn’t properly treated. I wasted money on high-end gear before realizing that acoustics make or break your recordings. Now, I always prioritize room setup before upgrading my equipment.
3 Myths About Audio Equipment That Held Me Back
I used to believe that simply buying the latest gear would instantly improve my sound. It’s not true. Mastering your existing setup and understanding how to tweak it makes a huge difference in achieving professional quality.
What Experts Won’t Tell You About Home Studio Success
Many professionals keep secret that consistent maintenance and calibration of your gear is key to long-term clarity. Regularly cleaning, updating firmware, and monitoring your setup prevent subtle issues that can ruin recordings over time.
My Essential Toolkit for Achieving Studio-Quality Audio
For my setup, I rely on trusted tools like high-quality studio headphones, a reliable audio interface, and acoustic treatment accessories. These essentials help me consistently capture clear, professional sound.
Push Yourself Forward and Embrace the Future of Audio
Now is the perfect time to upgrade your home studio and master your sound. With the right gear, environment, and maintenance, you can produce content that rivals professional studios. Don’t wait—start today and share your progress with the community.
What’s been your biggest challenge in setting up your home studio? Let me know below so we can learn from each other’s journeys.