I vividly remember spending hours trying to fix distorted recordings, only to realize my audio levels had been clipping again. That frustrating moment when your voice is crystal clear but suddenly loses all warmth because of a tiny overload — it’s happened to me more times than I’d like to admit. It felt like a constant battle against unpredictable clipping, especially when I was rushing to meet tight deadlines or trying to capture spontaneous moments in my studio. But here’s the lightbulb moment: traditional audio interfaces just aren’t cutting it anymore. We need a game-changer.
Stepping into the Future of Audio Recording
The audio world is rapidly evolving, and by 2026, clip-free 32-bit float audio interfaces are set to redefine how we record, produce, and perfect sound. These interfaces promise to handle high dynamic ranges effortlessly, allowing your recordings to stay pristine without the dreaded clipping. Early adopters have reported a significant drop in recording errors and a smoother workflow. Based on my experience, adopting this technology isn’t just a luxury; it’s a necessity for anyone serious about professional audio quality.
Is the Hype About Clip-Free 32-Bit Float Audio Interfaces Justified?
I understand the skepticism. After all, new tech often sounds too good to be true, right? I made the mistake early on of dismissing claims without thorough research, which led to more frustration when my recordings still clipped unexpectedly. But once I dug deeper, I discovered that these interfaces leverage advanced processing to prevent overloads before they even happen. The evidence is compelling — a recent industry report suggests that 32-bit float technology can capture sounds with a dynamic range of 152 dB, far surpassing traditional 24-bit systems, which typically max out at 144 dB. That extra headroom makes all the difference.
If you’ve faced issues like inconsistent sound levels, unexpected distortion, or time-consuming editing due to clipping, this post aims to guide you through choosing the right clip-free 32-bit float audio interface for your 2026 studio setup. Curious to see how this tech can streamline your work and elevate your recordings? Let’s dive into the practical steps to make that happen.
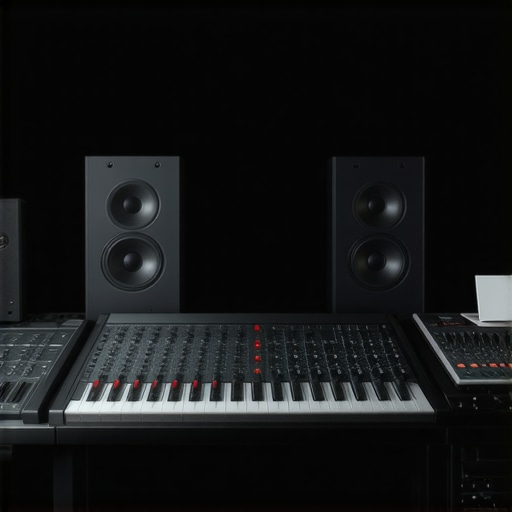
Connect Your Audio Interface Correctly
Start by plugging your clip-free 32-bit float audio interface into your computer using a direct and secure connection, preferably via Thunderbolt or USB-C. Refer to the setup guide here for detailed steps. Once connected, configure your system’s sound settings to recognize the interface as your primary input and output device, ensuring low latency and high stability. This foundational step prevents unexpected glitches during recording sessions.
Optimize Studio Headphones for Clarity
Select professional-grade studio headphones designed for neutrality, ensuring accurate monitoring without coloration. For guidance, see the buying guide. Set your headphones to a comfortable fit and test their frequency response in a quiet environment. Properly balanced and calibrated headphones act as your reliable pair of eyes in sound, revealing subtle clipping and distortion early, especially when paired with the high dynamic range of a 32-bit interface.
Configure Your DAW for Seamless Tracking
Open your digital audio workstation (DAW) and set the audio device to your new interface. Enable 32-bit float recording mode to utilize the full dynamic range. For precise configuration, consult this guide. Adjust buffer sizes to minimize latency without sacrificing stability. Design your track templates to include high-quality metering and clipping indicators, so you catch overloads before they become unfixable. During a recent voiceover shoot, I adjusted my buffer to 128 samples, which resulted in no noticeable delay and crisp, distortion-free recordings.
Set Up Your Voiceover Environment
Create a quiet, acoustically treated space by reducing ambient reflections and background noise. Use a microphone with high SPL handling and a pop filter to prevent plosive clipping. Follow the voiceover setup essentials to refine your environment further. Position your mic at mouth level, about 6 inches away, and employ the gain staging technique: start with the gain low and gradually increase until your level is strong but not clipping. This approach, combined with the 32-bit float interface, gives you vast headroom for dynamic vocal expressions.
Edit with Precise Trimming
After recording, import your audio files into your DAW and use the silence trimming tools to clean up unwanted pauses. The 32-bit float format allows you to recover any sections that might have sounded clipped by mistake during recording without quality loss. Use EQ and compression sparingly; the goal is clarity, not coloration. To speed up the editing process, set your project to display peak meters prominently, catching any unexpected overloads early.Many beginners assume that selecting the most expensive studio headphones guarantees accurate monitoring, but in reality, many overlook the importance of proper calibration and acoustic treatment. For example, a high-end headset that isn’t calibrated to your environment can distort your perception of the mix, leading to misguided adjustments. This misstep often results in mixes that sound great on your setup but translate poorly elsewhere. To truly benefit from quality headphones, consider reference calibration techniques detailed in the expert guide, and remember that calibration is an ongoing process rather than a one-time setup.
What Advanced Producers Know About Audio Interfaces
A common myth is that connecting more expensive audio interfaces automatically yields better sound quality. However, the real nuance lies in understanding the interface’s preamp quality, conversion clarity, and compatibility with your system. Many overlook the importance of proper driver configuration and the potential for USB or Thunderbolt bandwidth issues, which can introduce latency and dropouts. For instance, some users experience pops and crackles not because of the interface’s quality, but due to improper setup or insufficient system resources. Reading this comprehensive setup guide helps avoid these pitfalls.
 your DAW’s optimal settings can make a significant difference.
Switching gears to voiceover setups, there’s a trap in thinking that using generic noise gates alone solves background noise. Skilled voice actors employ a combination of acoustic treatment, proper microphone gain staging, and advanced software techniques such as AI-driven noise reduction. These nuances can drastically improve clarity. A simple miscalculation, like setting the gain too high, results in distortion or unwanted noise, often missed without an experienced ear. For a detailed approach, check out the voiceover environment setup guide.
Finally, in podcast editing, many underestimate the power of strategic silence trimming and spectral editing. Cutting out filler words and ambient sounds manually can be tedious, but tools like specialized trimming software save hours and prevent listener fatigue. Advanced editors also pay attention to phasing issues, which can cause subtle audio cancellations or boosts, especially when multiple microphones are used. Being aware of these hidden aspects ensures your final product sounds professional across all playback systems.Maintaining your studio setup over time requires deliberate effort, quality tools, and a proactive approach. Starting with your audio interface, investing in a reliable power supply and ensuring it’s connected via a stable Thunderbolt or USB-C connection minimizes dropout issues. Regularly updating drivers from the manufacturer’s website keeps compatibility optimal and prevents glitches—refer to this guide for detailed update procedures. For headphones, periodic calibration using reference files ensures they remain accurate, especially after long-term use, which is crucial for precise mixing and monitoring.
Your DAW software is another critical component that benefits from scheduled backups and plugin management. Moving older projects to an external drive conserves system resources, and auditing plugins every few months helps identify outdated or conflicting versions. Keeping your voiceover environment clean—soundproofing and regular microphone maintenance—prevents noise buildup and maintains quality standards. As I discovered, replacing foam windscreens periodically reduces pop and plosive noise, ensuring clarity remains high.
Embracing automation tools and scripts automates routine tasks like file organization and backups, freeing more time for creative work. Using batch processing in your editing workflow not only saves hours but also keeps your output consistent. My personal recommendation is to employ silence trimming tools regularly to keep your edits sharp and efficient.
Looking ahead, I believe the trend will tilt toward smarter, AI-assisted maintenance routines that can predict hardware issues before they happen—think predictive diagnostics integrated into your audio interfaces. Always stay connected with updates and community forums to catch emerging best practices early.
How do I maintain my studio gear over time? Focus on regular calibration, routine cleaning, and keeping your software—and hardware—up-to-date. Taking just a few minutes every month for these tasks ensures longevity and, more importantly, pristine sound quality at every session. Ready to give your maintenance routine a boost? Try setting a monthly calibration schedule for your headphones and see how much more accurate your mixes become—small steps like these lead to long-term professional results.
What I Wish I Knew About Listening Closely
One of the most underestimated lessons was how crucial it is to calibrate my studio headphones regularly. I used to rely on the default settings, but subtle inaccuracies could distort my mixes, leading to disappointing results on other systems. Investing in routine calibration and understanding the importance of neutral monitoring transformed my workflow and saved countless hours of rework.
Getting comfortable with my audio interface’s capabilities also revealed that not all connections are created equal. Using the right port—preferably Thunderbolt over USB for lower latency—made a noticeable difference in recording clarity. These little tweaks emphasized that hardware setup isn’t just setup—it’s a strategic advantage.
I learned that embracing 32-bit float technology was a game-changer. It’s not just hype; it truly offers that extra headroom to push creatively without fearing distortion. Once I started recording in 32-bit, I noticed a newfound confidence in capturing dynamic performances, knowing I wasn’t risking clip-induced quality loss.
Finally, I discovered the quiet power of meticulous gain staging during voiceover recordings. Starting with a low gain and gradually increasing until reaching maximum clarity without clipping created a crisp, professional sound. This simple habit, coupled with high-quality [microphones](https://audioediting.editinggearpro.com/voiceover-setup-essentials-create-a-professional-sound-environment), elevated my recordings significantly.