Have you ever recorded a voiceover only to realize later that your audio sounded muffled, distant, or full of unwanted background noise? I remember countless frustrating attempts where I thought I had the perfect microphone setup, only to be disappointed by the final sound quality. It was a lightbulb moment when I finally understood that the real magic happens with the right audio interface and studio headphones.
Why Your Voiceover Quality Depends on the Right Equipment
In my early days, I underestimated the importance of choosing quality audio gear. I thought a good microphone was enough. But I soon learned that even the best mic can’t perform well without a proper audio interface and headphones. The interface acts as the bridge between your microphone and computer, ensuring your voice is captured with clarity and minimal noise. Meanwhile, studio headphones allow you to monitor your recordings in real-time, catching issues before they go out to your audience.
According to a study by the Audio Engineering Society, poor monitoring can lead to significant audio quality issues, which might be unnoticed until post-production. That’s why investing in the right setup is crucial for creators aiming for professional-sounding voiceovers.
If you’re tired of re-recording because your voice doesn’t sound right or you’re unsure about your audio’s quality, don’t worry. Today, I’ll guide you through selecting the best audio interface and studio headphones for clear, professional voiceovers in 2024. Whether you’re a beginner or looking to upgrade your setup, this guide will help you make informed decisions and elevate your recordings to the next level.
Is Investing in High-End Equipment Actually Worth the Hype?
Many skeptics ask whether splurging on premium gear truly makes a difference. Early on, I made the mistake of buying cheap headphones, thinking they would suffice. The result? Fatigue during long editing sessions and a lack of accurate sound reproduction. Trust me, the difference between budget and professional-grade gear is astonishing. High-quality studio headphones and interfaces provide the precision needed to catch every nuance of your voice, ensuring your recordings are crisp and clear.
In the following sections, I’ll share my top picks for 2024 and practical tips on how to set up your gear for optimal results. Ready to transform your voiceover recordings? Let’s dive in!
,
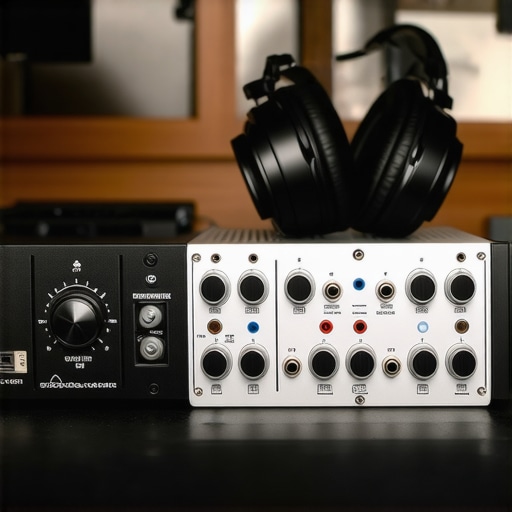
Choose the Right Audio Interface
Start by selecting an audio interface that matches your recording needs. Think of it as the translator that converts your microphone’s analog signal into digital data your computer can understand. For example, I once used a budget interface that caused latency issues, making my recordings sound delayed and unnatural. Upgrading to a mid-range model like Focusrite Scarlett 2i2 instantly improved my workflow, providing clearer sound and lower latency. When choosing, consider factors like the number of inputs, audio quality (look for 24-bit/192kHz), and compatibility with your computer. Check out this guide for detailed setup instructions.
Set Up Your Interface Properly
Connect your microphone to the interface, then link the interface to your computer via USB or Thunderbolt, depending on your model. Open your DAW (Digital Audio Workstation) and select the interface as your input/output device. Adjust gain levels so your voice is clear without clipping—think of it as setting the volume knob to hit that perfect sweet spot. I once recorded a session with too high gain, causing distortion. Lowering it just enough gave me crisp, professional sound. For further tips, visit this resource.
Selecting the Best Studio Headphones
Invest in closed-back studio headphones for accurate monitoring. They act like your personal sound engineer, letting you hear every detail without external noise interference. I made the mistake of using consumer headphones that colored the sound, leading to inaccurate editing decisions. Upgrading to models like the Audio-Technica ATH-M50x brought immediate clarity, allowing me to catch nuances I previously missed. When choosing headphones, prioritize flat frequency response for true-to-source sound. For a comprehensive review, see this guide.
Properly Monitor Your Recordings
Ensure your headphones are connected correctly and the volume is set appropriately. Always listen to your recordings in real-time to detect issues like background noise or uneven EQ. I remember once recording without monitoring, only to find later that the background hum was too loud. Listening during recording saved me hours of post-production. For optimal results, position your headphones comfortably and check your setup regularly. More tips can be found at this page.
Combine and Test Your Setup
Once your gear is connected, run test recordings to adjust levels and sound quality. Record a few sentences, then listen critically. Adjust gain, headphone volume, and microphone positioning until you achieve the clearest, most natural sound. I once spent an afternoon fine-tuning my setup, and the difference was night and day—my voice sounded richer and more professional. Use your DAW’s tools for equalization and compression, but remember, the best results start with proper hardware setup. For advanced editing tips, check this article.
Many aspiring voiceover artists and content creators operate under misconceptions that can hinder their progress. Let’s dig deeper into what most people get wrong about selecting and using professional-grade audio gear. These nuances are crucial for achieving that polished, broadcast-quality sound.
Myth: High-End Equipment Guarantees Professional Results
It’s a widespread belief that investing in the most expensive microphone, interface, and headphones automatically results in studio-quality recordings. While premium gear can significantly improve your audio, it’s not a silver bullet. Proper setup, room treatment, and technique are equally important. For instance, a high-end microphone used in a poorly treated room with bad mic technique will still sound subpar. According to a study published in the Journal of the Audio Engineering Society, environment and technique can sometimes outweigh hardware investments in determining final sound quality. So, focus on comprehensive setup rather than gear alone.
Oops! Beware of Over-Monitoring
Many newcomers obsess over perfect monitoring. They believe that constantly adjusting their headphones or interface settings will yield better recordings. The problem? Over-monitoring can lead to fatigue or over-editing, which might cause you to lose the natural dynamics of your voice. Instead, aim for a balanced monitoring environment and trust your trained ears. Remember, a well-calibrated setup is vital, but so is knowing when to step back and listen with fresh ears.
Advanced Question: How Do Room Acoustics Interact with Hardware Choices?
This is a nuanced topic often overlooked. Many believe that high-quality gear can compensate for poor room acoustics, but that’s a misconception. Good hardware can only do so much; if your room has reflective surfaces or excessive echo, your recordings will suffer regardless of your equipment quality. Treating your space with acoustic panels or diffusers enhances your gear’s performance and ensures your voice is captured accurately. As expert acoustician Ethan Winer states, “Room acoustics play a pivotal role in sound quality—hardware can’t fix a bad room.” For detailed tips on optimizing your environment, check out this resource.
Have you ever fallen into this trap? Let me know in the comments. Mastering these hidden nuances will elevate your voiceover game and help you produce professional-quality recordings every time.
Keeping your voiceover setup in top shape requires more than just choosing the right equipment; it involves regular maintenance and strategic updates to ensure long-term performance. Over time, dust, moisture, and even minor technical issues can degrade your gear’s quality or lead to unexpected failures. That’s why I emphasize the importance of a routine maintenance schedule and the right tools to keep everything running smoothly.
How do I maintain my audio equipment over time?
First, regularly clean your gear. Use a soft, lint-free cloth to wipe down your microphones, audio interfaces, and headphones. For connectors and ports, a gentle blast of compressed air can prevent dust buildup that might cause connection issues. I personally keep a microfiber cloth and compressed air handy, and I clean my gear after every few recording sessions. This simple habit prevents dust accumulation that could affect sound quality or cause hardware failures.
Next, check cables and connections periodically. Over time, cables can wear out or develop internal faults, leading to crackling sounds or intermittent signals. I recommend investing in high-quality, durable cables and replacing them at the first sign of damage. For connectors, a contact cleaner spray (such as DeoxIT) can restore conductivity and prevent corrosion, extending the life of your gear.
Tools I recommend for maintenance
- Compressed air: For cleaning dust from ports and vents. I use a can of compressed air from Amazon because it’s affordable and effective.
- Contact cleaner spray: To clean and maintain connectors and switches. I swear by DeoxIT because it’s proven to improve connectivity and prevent corrosion.
- Microfiber cloths: For wiping down delicate surfaces without scratching. I keep a few on hand for regular cleaning.
- Replacement cables: Always have spares, especially for your microphone and headphones, to swap out quickly if needed.
Regularly updating your software and firmware is equally critical. Keep your digital audio workstation (DAW) and audio interface drivers up to date. I follow the manufacturers’ websites and subscribe to their newsletters to stay informed about updates that often include bug fixes and performance improvements. This proactive approach ensures your setup remains compatible and runs smoothly over time.
What about long-term results and scaling?
As your voiceover career grows, your setup might need scaling. Start by evaluating your current gear’s performance. If you notice regular technical issues or your recordings lack clarity, it’s time to upgrade or expand. For instance, adding a second microphone or a more advanced audio interface can increase your flexibility. Planning for scalability means investing in modular components that can grow with your needs, rather than replacing everything at once.
Additionally, consider investing in room treatment to complement your hardware. Acoustic panels and bass traps can drastically improve your recording environment, reducing unwanted echoes and reflections. This is a long-term investment that pays dividends in professional sound quality.
Try this advanced tip
One game-changing approach I recommend is implementing a regular calibration routine for your monitoring setup. Use calibration tones and measurement microphones to ensure your headphones and room are producing an accurate sound profile. This step guarantees that what you hear during editing truly reflects your final product, maintaining consistency over time. Learn more about calibration techniques at this guide. Give it a try today to elevate your long-term reliability and sound accuracy!
The Hardest Lesson I Learned About Achieving Studio-Quality Voiceovers
One of the biggest realizations I had was that high-end gear alone doesn’t guarantee professional results. Early on, I spent a fortune on microphones and headphones, only to find my recordings still lacked clarity. The truth is, proper setup, room treatment, and technique are equally, if not more, important. A good microphone in a poor environment will never sound as good as a modest mic in a well-treated space. This lightbulb moment pushed me to focus on my environment and skills, not just my gear.
3 Myths About Audio Equipment That Held Me Back
For a long time, I believed that monitoring in ultra-high definition would solve all my sound issues. Turns out, over-monitoring can cause fatigue and lead to over-editing, which compromises the natural dynamics of your voice. Trusting your trained ears and knowing when to take a step back is key. Another myth was that expensive gear is necessary for good sound; I learned that even mid-range equipment, combined with proper room treatment, could produce stunning results. The biggest lesson? Equipment is only part of the story—technique and environment matter just as much.
What Experts Won’t Tell You About Optimizing Your Voiceover Setup
Many professionals keep quiet about the importance of regular maintenance. Dust, moisture, and connection issues can silently degrade your gear’s performance. I discovered that simple habits like cleaning connectors with contact cleaner and checking cables regularly are game-changers. Additionally, calibrating your monitoring setup with measurement microphones ensures your ears are hearing the most accurate sound possible, which is crucial for consistent quality over time. This behind-the-scenes knowledge has transformed my workflow and results.
My Essential Toolkit for Achieving Crystal-Clear Voiceovers
Over the years, I’ve come to trust certain tools that consistently deliver quality. The Audio-Technica ATH-M50x headphones are my go-to for accurate monitoring, providing flat frequency response that reveals every nuance. For my audio interface, the Focusrite Scarlett 2i2 strikes the perfect balance between quality and affordability. I also rely on DAW software like Reaper for flexible editing. These tools have become the backbone of my professional setup, helping me produce consistent, broadcasting-quality voiceovers.
Your Turn to Elevate Your Voiceover Game
Remember, achieving professional-quality voiceovers isn’t just about expensive gear; it’s about understanding your equipment, environment, and technique. Every minor adjustment and regular maintenance practice can make a significant difference. As you continue to learn and refine your setup, you’ll find your recordings becoming clearer, more natural, and engaging for your audience. Don’t be afraid to experiment with different tools and setups—your perfect voiceover environment is within reach. Keep pushing forward, and soon you’ll be surprised at just how much your sound can improve.
What’s the biggest challenge you face in setting up your voiceover studio? Let me know below—I’d love to hear your story!
,