I’ll never forget the moment I recorded my first voiceover. I thought I was ready, but when I listened back, all I could hear was a muffled, distant sound—nothing close to the professional clarity I envisioned. After countless hours and frustrated attempts, I finally realized my gear was holding me back. That lightbulb moment led me down a rabbit hole of research, trial, and error, and now I want to save you from the same pitfalls.
Why Getting the Right Gear Matters More Than Ever
In 2024, the quality of your audio can make or break your success as a voiceover artist or podcaster. With so many options out there, it’s easy to get overwhelmed or buy gear that doesn’t deliver what it promises. But here’s the truth: having the proper audio interface and studio headphones is essential for capturing crisp, clear sound that keeps your audience hooked.
Think about it—your voice is your brand. When listeners hear background noise, distortion, or muddled audio, they tune out faster than you can say “buffering.” According to a survey by Podcast Insights, over 60% of listeners will abandon a podcast if sound quality drops below a certain threshold. It’s harsh, but it’s the reality we face today.
So, what’s the secret? How do you ensure your recordings sound professional without breaking the bank or drowning in confusing tech jargon? That’s exactly what I’m going to help you with. From choosing the right interface to picking studio headphones that enhance your voice, I’ll walk you through the must-know tips to elevate your setup in 2024.
Is It Really Worth Investing in Top-Notch Gear?
Early in my journey, I made the mistake of thinking a fancy microphone alone would solve all my problems. Turns out, the weakest link is often the equipment that’s overlooked—like your audio interface or headphones. Investing in quality gear isn’t just about bragging rights; it’s about creating a consistent, professional sound that draws listeners in. If you’ve ever wondered whether splurging on that high-end interface or those studio headphones is justified, I’ll tell you — it absolutely is. And I’ll show you how to avoid common mistakes that beginners make, like ignoring proper setup or neglecting sound treatment.
Ready to ditch the guesswork and start producing crystal-clear audio? Let’s dive into how you can choose the right gear and set it up for success. Plus, I’ll share some expert tips to make your voice stand out in every recording. Want to learn more about perfecting your setup? Check out our setup tips for your home studio.
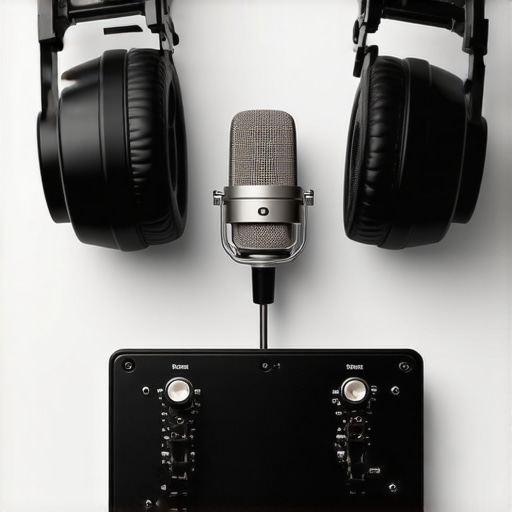
Invest in the Right Audio Interface
Choosing an audio interface is like selecting a high-quality translator—your voice needs to be accurately converted into digital sound. I remember one time I impulsively bought a budget interface, only to realize it added unwanted noise and latency to my recordings. To avoid this, research models that offer clean preamps and low latency, such as those recommended in our top audio interfaces for 2024. Connect it to your computer following our setup guide to ensure optimal performance.
Select the Perfect Studio Headphones
Your headphones are your critical listening tool. Think of them as your audio microscope—if they aren’t accurate, you’ll miss subtle issues in your recordings. I once used generic headphones during a session, which caused me to overlook background hiss. After switching to a pair from our studio headphones buying guide, my editing precision improved dramatically. Prioritize flat frequency response and comfort, and remember to calibrate your headphones regularly for consistent results.
Optimize Your Recording Environment
Even the best gear can falter if your environment isn’t sound-treated. Use foam panels, bass traps, or even thick curtains to dampen echo and background noise. I once recorded in a cluttered room, which introduced unwanted reverb. Once I applied basic sound treatment, the clarity of my voiceover skyrocketed. Combine your gear setup with a dedicated, quiet space for the best results. For more detailed advice, check out our voiceover setup essentials.
Fine-Tune Your Settings
Proper settings are crucial. Set your gain levels so your voice peaks around -6 dB to -3 dB, avoiding clipping. Use the software’s input monitoring to check for unwanted background noise. During my first recordings, I ignored this step, resulting in distorted audio. Now, I always test and tweak my levels before each session, which saves me hours of post-production. Familiarize yourself with your DAW’s software settings to streamline this process.
Practice Consistent Microphone Technique
Position your microphone about 6-8 inches from your mouth, slightly off-center, to reduce plosives and sibilance. I learned this through trial and error—initially, I was too close, which caused pops, or too far, which lost warmth. Use a pop filter to minimize plosives and maintain a consistent distance during recordings. Consistency is key; practice the same positioning to ensure uniform sound quality across takes.
Regularly Maintain Your Equipment
Keep your gear clean and check connections regularly. Dust and grime can degrade sound quality, and loose cables introduce noise. I once encountered a crackling sound during a session, which was caused by a loose cable. Simply reseating the connections resolved it. Incorporate routine checks into your workflow to prevent unexpected issues and ensure your setup remains optimal. For comprehensive tips, see our detailed gear maintenance guide.
Many aspiring voiceover artists and podcasters fall into traps that hinder their audio quality, often without realizing it. While most focus on choosing the right microphone or soundproofing their room, there’s a hidden layer of nuance that can make or break your recordings. Let’s dig deeper into what most people get wrong about their studio setup and how to avoid these pitfalls.
Is Your Soundproofing Doing More Harm Than Good?
It’s a common misconception that completely soundproofing your room is the best way to improve audio quality. In reality, overly sealed spaces can cause sound to become trapped, leading to unnatural acoustics and echo issues. Proper sound treatment involves balancing absorption and diffusion, which prevents sound from bouncing around excessively. A study published in the Journal of the Audio Engineering Society highlights that overly dead rooms can reduce clarity and make voices sound dull. Instead of obsessing over soundproofing, focus on acoustic treatment that enhances natural sound, like foam panels and bass traps, in combination with your gear setup. Want to learn more? Check out our voiceover setup essentials.
The Myth of the Microphone Setup
Many believe that the right microphone alone guarantees professional sound. However, the placement, proximity, and environment are equally important. Placing your mic too close can cause plosives, while too far can introduce noise and reduce clarity. Using a pop filter is a simple fix, but proper positioning—about 6-8 inches from your mouth—is crucial. An often overlooked detail is the angle of the microphone; angling it slightly off-center can minimize sibilance and popping. Remember, even the most expensive mic can sound terrible if set up poorly. For advanced tips, I recommend exploring our DAW and microphone setup guide.
Beware of Over-Processing Your Audio
One hidden mistake is over-processing during editing. Applying too much compression, equalization, or noise reduction can strip away natural dynamics and make your voice sound artificial. It’s tempting to fix everything in post, but subtlety is key. Aim for a balanced sound that preserves your voice’s character. A 2023 study in Audio Engineering Magazine emphasizes that over-processed audio can cause fatigue and reduce listener engagement. Focus on getting the best raw recording possible, then make minor adjustments as needed. Want to streamline your editing workflow? Our podcast editing hacks can help.
Advanced Question: How Do I Monitor My Audio Correctly Without Introducing Latency?
Monitoring your audio in real-time is essential, but many overlook latency issues that can distort your perception. Using low-latency audio interfaces and studio headphones designed for professional use can minimize delay, giving you a true sense of how your voice sounds. Also, setting your DAW’s buffer size appropriately ensures smooth monitoring without lag. Remember, high latency can lead to inconsistent mic technique and poor performance. For tips on optimizing your setup, check out our setup guide.
Have you ever fallen into this trap? Let me know in the comments. Avoid these common mistakes, and you’ll be well on your way to professional-sounding recordings in 2024!
Keeping your voiceover setup in top shape requires more than just choosing the right gear; it’s about implementing a sustainable maintenance routine and selecting tools that adapt to your evolving needs. Over time, dust, cables, and software updates can impact your recording quality, but with a few strategic practices, you can ensure your studio remains reliable and professional.
How do I maintain my equipment over time?
Regular maintenance is essential for preserving sound quality and extending the lifespan of your gear. I personally schedule monthly checks to clean my microphone, audio interface, and headphones. Use a soft, lint-free cloth to wipe down surfaces and avoid compressed air, which can push dust into sensitive components. Cables are often overlooked; I make it a point to disconnect and inspect all connections for wear or loose contacts, replacing any damaged cables immediately. Software updates are equally important. Keep your DAW and plugins up to date to benefit from bug fixes and new features, but always back up your settings before updating to prevent accidental data loss. For a comprehensive approach, visit our best DAW software guide.
Tools I recommend for long-term success
Investing in high-quality, durable tools is crucial. I rely on the best audio interfaces for 2024 because they combine low latency with robust build quality, making them suitable for daily use. For headphones, I prefer models from our studio headphones buying guide — they offer flat frequency response, which is critical for accurate editing and consistent monitoring over years. Additionally, I use a dedicated external hard drive for backups, ensuring my recordings and settings are safe from hardware failures.
How can I scale my setup as I grow?
As your skills develop, your studio should also evolve. Modular equipment allows for easy upgrades: start with a reliable audio interface and headphones, then add a high-quality microphone or acoustic treatment as needed. Cloud-based project management tools help track settings, plugins, and sessions, simplifying the transition when you expand. Also, consider upgrading your DAW software periodically; our latest DAW tips provide insights into maximizing your workflow for better quality and efficiency.
Finally, stay connected with the voiceover and podcasting community through forums and workshops. Sharing experiences and troubleshooting together keeps your skills sharp and your setup current. Remember, the key to long-term success is not just investing in gear but maintaining and evolving your tools and environment over time. Try implementing a routine check every three months and see how your recordings improve!
When I first started recording voiceovers, I underestimated the power of proper equipment. That realization came after countless hours of frustration, but it was a game-changer. Today, I want to share the most valuable lessons I learned about choosing and maintaining the right gear, so you can avoid common pitfalls and achieve studio-quality sound in 2024.
Lessons That Changed My Voiceover Game
- Don’t overlook the importance of your audio interface. A quality interface ensures your voice is captured with clarity and low latency. I used cheap models early on, which introduced noise and delays. Upgrading made an immediate difference. Check out our top audio interfaces for 2024.
- Studio headphones matter more than you think. Accurate, flat response headphones help you hear every nuance in your recordings. I once used generic headphones and missed background hiss. Switching to professional-grade headphones from our studio headphones buying guide improved my editing accuracy dramatically.
- Sound environment is key, but overdoing it can hurt. Completely soundproofing a room can cause unnatural acoustics. Instead, focus on balanced sound treatment with foam panels and bass traps. I learned this the hard way in a cluttered room, but now my recordings are crystal clear.
- Proper mic placement and technique are essential. Position your mic about 6-8 inches from your mouth, slightly off-center. Use a pop filter to reduce plosives. Consistency in your setup makes your recordings sound uniform and professional.
- Regular maintenance prevents surprises. Clean your gear, check cables, and keep software updated. I experienced crackling due to a loose cable, which was an easy fix once diagnosed.
My Essential Toolkit for Voiceover Success
- Audio Interface: I trust models with clean preamps and low latency. See our recommended list.
- Studio Headphones: Flat response headphones from our buying guide help me catch every detail.
- Sound Treatment Products: Foam panels and bass traps are critical for natural acoustics. Check out our setup essentials.
- Reliable DAW Software: For editing, I use top DAW software that streamlines my workflow.
Your Next Step Towards a Professional Voiceover Studio
Building a top-notch voiceover setup in 2024 doesn’t have to be overwhelming. Focus on quality gear, proper placement, and sound treatment, and you’ll notice the difference immediately. Remember, your voice is your brand, and investing in the right tools pays off in clarity and confidence. Ready to elevate your recordings? Dive deeper into our setup guide and take the next step today.
http://Evelyn%20Carter
This post hits home for me because I remember struggling with muffled audio early on, despite having a decent microphone. It wasn’t until I upgraded my audio interface to a model with cleaner preamps and lower latency that I saw a real difference. It’s a reminder that the gear we choose can significantly impact our sound quality—and ultimately, our credibility as voiceover artists. I also learned that even with good equipment, the environment matters just as much. Proper sound treatment truly transformed my recordings—things like foam panels and a dedicated, quiet space made all the difference. Has anyone here found that soundproofing or room treatment made a bigger impact than gear upgrades? I would love to hear your experiences. Balancing equipment, environment, and technique seems to be the secret sauce for professional-grade recordings.
http://Michael%20Reynolds
This post really hits the core of professional audio production—especially highlighting how gear choices, environment, and technique all come together. I remember when I first started, I invested heavily in a decent microphone but neglected sound treatment, which made my recordings sound dull and echoey. Upgrading my headphones and soundproofing the room made a more noticeable difference than just fixing the mic. It made me realize that every piece of the puzzle is vital. One thing I’ve found helpful is investing in a good pair of flat-response studio headphones, as they allow precise editing and monitoring. Have others noticed that your listening environment influences your editing choices just as much as your recording equipment? I’d love to hear how you balance these factors for the best results. Also, are there specific room treatments or setups you swear by that don’t break the bank? Thanks for sharing such a comprehensive guide—definitely a game-changer when building out a professional setup in 2024.
http://Andrea%20Bennett
This post really emphasizes what I’ve learned over the past year—getting professional results really does hinge on the entire chain, not just the mic or soundproofing alone. I upgraded my audio interface first, and the improvement in clarity was immediate; then, switching to flat-response headphones helped me catch even the tiniest issues in my recordings. One thing I found beneficial is investing in a fiber-optic acoustic diffuser, which slightly diffuses sound without over-absorbing, maintaining natural room acoustics. It’s a subtle tweak, but it made a noticeable difference in both recording and editing. Plus, I now routinely check and calibrate my headphones to avoid discrepancies over time. What are some inexpensive ways you’ve all found to improve room acoustics without breaking the bank? I’d love to hear your tips for creating a truly professional space on a budget.
http://Danielle%20Foster
Reading this post really resonated with me. I remember initially thinking that buying a high-quality microphone was enough, but I quickly learned that gear is just one piece of the puzzle. Upgrading my interface and investing in flat-response headphones dramatically improved my recordings, yet I still struggled with room ambience and background noise. It wasn’t until I added some affordable sound treatment — like foam panels and a thick rug — that my voice sounded truly professional. I find that balancing good equipment with a well-treated environment and solid technique makes the biggest difference.
I’m curious, how many of you have experimented with DIY acoustic treatments that didn’t break the bank? I’d love to hear your tips for creating an ideal studio environment on a budget. Also, do you think regular calibration of headphones makes a significant impact on editing accuracy? Thanks for sharing such a comprehensive guide—it’s a great reminder that every detail counts in building a top-notch voiceover setup.
http://Benjamin%20Taylor
This post really hits home for me, especially since I’ve gone through the same frustrating experience of recording muffled audio early in my journey. Upgrading my audio interface with cleaner preamps and lower latency truly changed the game, making my voice sound more professional and clear. I also learned the hard way how crucial environment and sound treatment are—simple things like foam panels and a quiet room drastically improved my recordings. I agree that gear is vital, but combining it with good soundproofing and proper mic technique makes all the difference. I’ve recently been experimenting with DIY acoustic treatments like thick rugs and additional diffusers, and I’ve noticed a real improvement without breaking the bank. How do others here balance investment in gear versus environment? Would love to hear more tips from the community on affordable solutions that deliver great results.