I remember the moment like it was yesterday. I was sitting in my home studio, frustration bubbling over. No matter what I tried, my recordings sounded flat, lifeless, and amateurish. I’d spent hours tweaking settings, switching software, and experimenting with microphones, but nothing seemed to click. It was only when I finally realized that my setup was the culprit that everything changed. That lightbulb moment taught me that choosing the right DAW and properly configuring my voiceover environment is the foundation of professional sound.
Why Getting Your DAW and Voiceover Setup Right Matters Now More Than Ever
In 2024, the demand for high-quality audio has skyrocketed. Whether you’re creating podcasts, voiceovers, or music, listeners expect clarity and professionalism. The difference between a hobbyist recording and a studio-quality production often boils down to your choice of digital audio workstation (DAW) and how well you set up your environment. A good DAW isn’t just a tool; it’s the backbone of your entire workflow. Combined with a proper voiceover setup, it can elevate your recordings from decent to exceptional.
But here’s the catch: with so many options out there, it’s easy to get overwhelmed. I’ve been there. I tried several popular DAWs before discovering the one that truly suited my style. And I’ve learned firsthand how a subpar microphone setup or poor acoustic environment can sabotage even the best software. According to a recent study, poor audio quality can cause listeners to lose interest within seconds — even if your content is gold. That’s why investing in the right setup is crucial if you want to stand out in this competitive space.
Have you ever faced the frustration of recording only to realize your voice sounds muffled or echoey? Or spent hours editing only to find your audio still doesn’t sound professional? If so, you’re not alone. Many creators overlook the importance of a proper voiceover environment and software configuration, but I promise it’s worth the effort. Today, I’ll walk you through some proven tips and tools that will help you create that crisp, professional sound you’ve been striving for.
Is All the Hype Around DAWs and Voiceover Setups Just Marketing?
Early in my journey, I fell for the hype. I bought the most expensive microphone, the fancy headphones, and the latest DAW — only to be disappointed. My mistake was neglecting the basics: proper microphone placement, acoustic treatment, and understanding how to optimize my software settings. It’s easy to assume that having the best gear guarantees pro results, but that’s not true. The real magic happens when you combine good equipment with smart setup practices. If you want to avoid my rookie errors, check out this voiceover setup guide and learn how to create a professional environment that makes your voice shine.
In the sections ahead, I’ll share actionable steps to choose the right DAW, optimize your voiceover setup, and avoid common pitfalls. Ready to transform your recordings? Let’s dive in and start building that professional sound together.
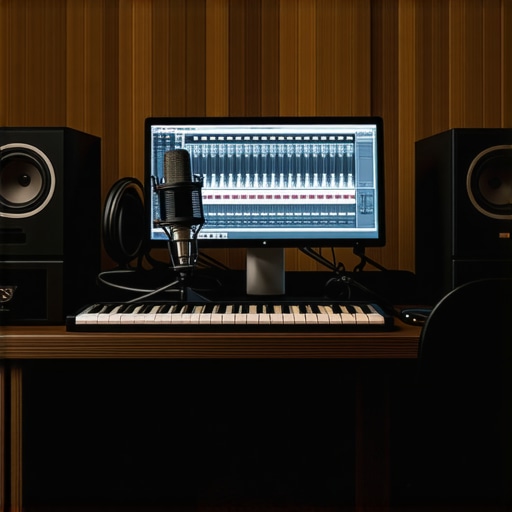
Select the Right DAW for Your Voiceovers
Choosing the appropriate digital audio workstation (DAW) is your first step towards professional-sounding recordings. I remember experimenting with different options—initially settling on free software that lacked advanced features. Switching to a dedicated DAW like best DAW software for precise music production changed everything. It offered better control over editing and mixing, making my voice sound clearer and more polished.
Look for a DAW that supports multi-track editing, has robust plugin integration, and offers a user-friendly interface. For voiceovers, features like noise reduction and spectral editing are invaluable. Once you’ve selected your DAW, spend time customizing your workspace to match your workflow, which will save you hours during editing.
Optimize Your Microphone and Acoustic Environment
After choosing your DAW, focus on your microphone setup. I once used a budget microphone without proper placement, resulting in muffled recordings. Experiment with positioning—aim for the microphone to be about 6-12 inches from your mouth, slightly off-axis to reduce plosives. Use a pop filter to prevent harsh sounds, and consider acoustic treatment to dampen echo and background noise.
Invest in soundproofing your space with foam panels or diffusers. For detailed guidance, check out this voiceover setup guide. This step is crucial; even the best microphone can’t compensate for a reflective room.
Enhance Your Listening Environment
High-quality headphones are essential for accurate editing. I initially used cheap earbuds, which made it difficult to catch issues in my recordings. I upgraded to studio headphones like those recommended in the studio headphones buying guide for crystal clear sound in 2025, and immediately noticed a difference in my ability to fine-tune audio. Proper headphones reveal subtle background noises and inconsistencies, ensuring a professional finish.
Set Up Your Audio Interface Correctly
Your audio interface acts as the bridge between your microphone and computer. Proper setup ensures clean, noise-free recordings. I once overlooked this step, resulting in hiss and hum in my recordings. After following expert tips from audio interface setup tips, I achieved a much cleaner sound. Connect your microphone to the interface, set the correct input levels, and configure your DAW to recognize the device. Spend time adjusting gain to avoid clipping and background noise.
Fine-Tune Your Software Settings for Optimal Sound
Once hardware is in place, optimize your DAW settings. Disable unnecessary plugins, set sample rates to 44.1kHz or 48kHz, and enable noise gates to eliminate background hiss. Use compression subtly to add presence without squashing dynamics. Don’t forget to save your custom presets. I learned this the hard way by spending hours fixing poor sound post-recording, but now I set my preferences once and focus on recording.
Implementing these concrete steps will dramatically improve your voiceover quality. Remember, the secret lies not just in the equipment but in how you set everything up and fine-tune your environment for professional results.
While many creators focus on selecting the right microphone or software, there’s a less obvious trap that can undermine your entire setup: misunderstanding the importance of acoustic treatment and environment control. A frequent misconception is that equipment alone guarantees professional sound, but in reality, the room and setup nuances are equally, if not more, critical. For example, even a top-tier microphone will produce muffled or echoey recordings if your space isn’t properly treated. This is a subtle but vital detail often overlooked by beginners and even some seasoned voiceover artists.
One of the most common myths is that high-end gear can compensate for poor acoustic environments. According to a study published in the Journal of Audio Engineering Society, environmental noise and room reflections significantly impact audio clarity, sometimes more than the quality of the microphone itself. This means that investing in acoustic panels, diffusers, or simply choosing a smaller, less reflective room can yield better results than upgrading your mic. I’ve seen creators spend thousands on equipment, only to record in a space with echoes and background noise that no software can fully fix. Remember, creating a controlled environment is a foundational step that often gets ignored.
Are You Falling for the Noise Gate Trap?
Another advanced mistake is relying too heavily on noise gates or aggressive editing to fix poor recording environments. While these tools are useful, they shouldn’t be your primary solution. Overusing noise gates can lead to unnatural cuts or ‘pumping’ effects, which detract from a natural, professional sound. Instead, focus on physical room treatment and proper microphone placement. A well-treated space combined with smart software settings results in cleaner recordings that need minimal editing, saving you hours in post-production. For tips on fine-tuning your setup, check out these advanced DAW setup tips.
And here’s a pro tip: always test your environment with a simple recording before starting your actual session. Walk around the space, clap your hands, and listen for echoes or background noise. If you hear issues, address them before you begin. This small step can prevent hours of frustration later. Have you ever fallen into this trap? Let me know in the comments!
Maintaining your voiceover setup over time is crucial to ensure consistent, professional-quality recordings. My own experience has shown that even the best equipment can degrade or become less effective without proper care. To keep everything running smoothly, I rely on specific tools and routines that help me troubleshoot, clean, and optimize my gear regularly.
How do I maintain my voiceover environment and equipment over time?
First, I emphasize routine cleaning. Dust and debris can accumulate on microphones, audio interfaces, and headphones, affecting sound quality. I use a soft, lint-free cloth and specialized cleaning sprays designed for delicate electronics. Regularly inspecting cables and connections is equally important; loose or frayed cables can introduce noise or cause signal loss. I replace or repair damaged cables immediately to prevent further issues.
Second, software updates are vital for long-term reliability. I keep my DAW, plugins, and drivers up to date, which often includes security patches, bug fixes, and performance improvements. For example, I regularly check for updates on my DAW software, ensuring compatibility with new hardware and avoiding crashes during critical sessions. Staying current reduces the risk of software conflicts that can disrupt your workflow.
Third, I use diagnostic tools that help me monitor my setup’s health. For instance, audio analyzers and noise level meters can detect unwanted hums or background noise early, allowing me to address issues before they become major problems. Additionally, maintaining a log of equipment performance and issues helps identify patterns, guiding timely replacements or adjustments.
Investing in quality replacement parts, such as spare cables, microphones, or headphone cushions, is a smart move. When I notice my headphones losing clarity, I replace the cushions with ones recommended in the headphone buying guide for 2025. These small updates keep my gear performing at its best without the need for costly upgrades.
Scaling your setup for long-term growth
As your voiceover skills develop, your setup might need expansion. I recommend planning for modular upgrades. For example, a dedicated audio interface with multiple inputs can accommodate future microphones or instruments. Choosing compatible components ensures seamless integration and reduces troubleshooting time. When I decided to add a second microphone for interviews, my existing interface supported it effortlessly, saving me money and setup time.
Predicting future trends, I believe that AI-powered plugins and automated noise reduction tools will become standard for maintaining quality. Staying adaptable by choosing versatile, upgradable hardware and software will keep your setup relevant and efficient over the years. For instance, exploring AI-driven noise suppression as explained in recent industry analyses can help you maintain pristine audio without extensive manual editing.
Finally, I encourage you to try implementing a regular maintenance schedule. Dedicate a few minutes weekly to check connections, update software, and clean equipment. It might seem minor, but this routine ensures your setup remains reliable and ready for your next project.
If you’re serious about long-term success, consider investing in a comprehensive maintenance toolkit. This includes contact cleaners, anti-static brushes, and software diagnostic programs. These tools make troubleshooting faster and more effective, saving you time and frustration in the long run. Remember, your gear is an investment—treat it well, and it will reward you with consistent, professional results.
Mastering your voiceover environment is more than just picking a good microphone or software; it’s about understanding the deeper lessons that can make or break your sound. Throughout my journey, I uncovered some surprising truths that transformed my approach to creating professional-quality recordings. Here are the key lessons I wish I had known earlier:
- Room treatment trumps gear upgrades. No matter how fancy your microphone is, echoey or reflective spaces will sabotage your sound. Investing in acoustic panels or even simple DIY solutions can dramatically improve clarity.
- Proper setup saves hours in editing. Spending time on microphone placement, gain staging, and environment optimization upfront reduces the need for complicated fixes during post-production. It’s a game-changer for efficiency.
- Know your software’s hidden features. Many voiceover artists overlook powerful plugins like spectral editors or noise gates. Learning to harness these tools can elevate your audio to professional levels with minimal effort.
- Consistency is key. Maintaining your gear and environment ensures your sound stays reliable over time. Regular cleaning, updates, and routine checks prevent unexpected issues that can derail your workflow.
- Don’t fall for the hype alone. High-end gear and flashy software won’t replace good technique and environment control. Focus on creating a balanced setup that emphasizes quality over quantity.
My Essential Toolkit for Voiceover Success
Over the years, I’ve curated a set of tools that consistently deliver professional results. These include:
- A dependable DAW — I rely on this for its intuitive editing features and plugin support.
- Studio headphones — Critical for detecting subtle issues and achieving a polished sound.
- Audio interface — Ensures clean, noise-free recordings with proper gain control.
- Environment setup guide — A step-by-step resource for acoustic treatment and room optimization to make your voice shine.
Step Into Your Voiceover Future
There’s a world of opportunity awaiting you, and the key to unlocking it is a well-crafted environment paired with smart software choices. Don’t wait to make improvements—your audience deserves the best sound you can deliver. Remember, the journey to professional voiceovers isn’t about perfect gear alone, but about creating a space where your voice can truly thrive.
What’s one setup change you’re excited to try first? Drop your thoughts below and let’s elevate our voiceover game together!