Have you ever recorded a podcast, only to find that your voice sounds muffled or distant once you listen back? I remember my early days of podcasting, staring at my microphone and headphones, feeling frustrated because no matter how much I tweaked my setup, the sound still wasn’t quite right. That lightbulb moment hit me hard: the quality of my gear was holding me back. It’s a common story among creators trying to produce professional-sounding podcasts from a home studio.
Why Good Podcast Gear Matters More Than You Think
Getting the right equipment isn’t just about bragging rights or impressing your listeners; it directly impacts your audio clarity, the listener experience, and ultimately, your growth as a content creator. If your audio isn’t crisp and clear, people will tune out faster than you can say “podcast.” According to a recent study, over 85% of podcast listeners cite audio quality as a key reason they stay tuned in or drop off. That’s a huge deal! Investing in quality gear isn’t just a luxury—it’s a necessity if you want to stand out in a crowded field.
But here’s the thing: the market is flooded with options. From microphones and audio interfaces to studio headphones and editing software, it’s easy to get overwhelmed. I’ve been there. Early on, I made a costly mistake—buying the most expensive microphone I could find, thinking that would automatically improve my sound. Turns out, it was just a paperweight until I paired it with a good audio interface and proper headphones. Trust me, gear alone won’t save you; it’s about how you use it. Want to avoid my rookie errors? I’ll guide you through choosing the best podcast editing gear and studio headphones that truly make a difference.
Is All Podcast Gear Created Equal?
One common skepticism I hear is whether investing in high-end gear really pays off. The truth? Not always. It’s about finding the right match for your needs and budget. For example, a high-quality studio headphone like those recommended in the studio headphones buying guide can make editing smoother and more enjoyable, catching even the tiniest audio flaws. The key is to avoid the mistake I made early on—buying gear just because it’s popular without understanding how it integrates into your workflow. Do you worry about wasting money on gear that won’t make a difference? You’re not alone. That’s why I’ll show you how to choose smartly and get the best results for your podcast.
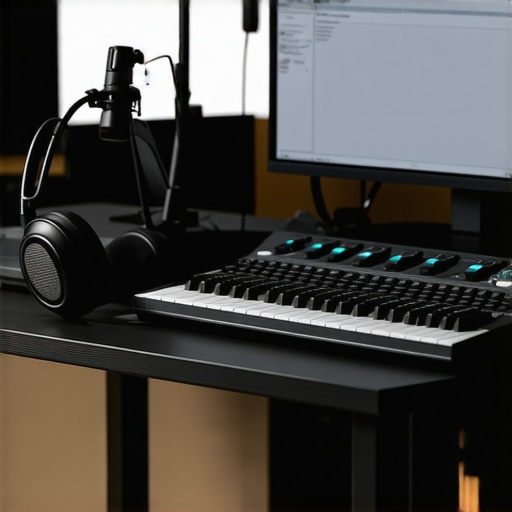
Choose the Right Audio Interface to Elevate Your Sound
Start by investing in a quality audio interface, which acts as the bridge between your microphone and computer. It’s like the engine of your studio—without it, even the best mic can’t deliver clear sound. When I upgraded from a basic model to a professional-grade audio interface, I immediately noticed a reduction in background noise and a richer tone in my recordings. Check out this guide for setup tips and recommendations.
Pick Studio Headphones That Reveal Every Detail
Next, select studio headphones designed for accurate audio playback. Think of these headphones as your audio microscope—they help you identify tiny flaws and ensure your editing is precise. I once used consumer-grade earbuds for editing, but I often missed subtle background hiss or muffled frequencies. After switching to recommended studio headphones from the studio headphones buying guide, my editing process became more efficient and my sound clearer.
Make Your Headphones Your Editing Ally
Understanding the importance of accurate headphones is crucial. They should have a flat frequency response—meaning they don’t color the sound. Imagine trying to paint a realistic landscape with a tinted lens—you’d lose true colors. In my experience, investing in high-quality studio headphones helped me catch issues I would have otherwise missed, leading to a more professional-sounding podcast.
Optimize Your Gear for the Best Results
Once you’ve selected your gear, proper setup is key. Position your microphone correctly—about six inches from your mouth—and use a pop filter to reduce plosive sounds. Adjust your audio interface’s gain to avoid clipping, which distorts your sound. Regularly test your setup by recording short clips and listening critically, making tweaks as needed. For detailed setup tips, visit this resource.
Keep Your Headphones Comfortable for Long Sessions
Comfort matters—a lot. Long editing sessions can be uncomfortable if your headphones are tight or cause fatigue. Look for models with adjustable headbands and plush ear cups. I once ignored comfort and experienced headaches after hours of editing; switching to ergonomic headphones changed my workflow entirely. Remember, your focus should be on your craft, not discomfort.
Test and Fine-Tune Your Setup Regularly
Finally, don’t set and forget. Regularly review your audio quality, update drivers, and clean your gear. Small adjustments can make a big difference over time. When I found a slight hiss in my recordings, I traced it back to a loose cable connection—a quick fix that saved hours of re-recording. Keep your gear in top shape for consistently professional results.
Many aspiring podcasters and even seasoned creators fall prey to misconceptions about podcast gear, which can subtly sabotage their audio quality and workflow. Let’s dig deeper into these nuances that often go unnoticed but have a significant impact on your final sound. First off, the idea that more expensive gear always equals better sound is a myth. While high-end equipment can certainly help, it’s crucial to understand that your setup’s effectiveness depends on compatibility, proper placement, and your skill in using it. For example, audio interfaces and headphones are often overlooked, yet they are the backbone of clear recordings. A common trap is investing heavily in a fancy mic without ensuring your audio interface can truly capture its potential, or worse, neglecting proper microphone placement altogether.
Another critical point is the misconception that studio headphones are just for mixing. In reality, studio headphones should be your primary tool during recording and editing to catch every nuance. Cheap or consumer-grade headphones often color the sound and hide subtle background noises or distortion, which can lead to poor editing decisions. Pro tip: Flat frequency response headphones are essential for accurate monitoring—think of them as your audio microscope, revealing flaws that would otherwise slip by.
Now, here’s a hidden nuance: many overlook the importance of acoustic treatment even with the best gear. You might have a state-of-the-art microphone and headphones, but if your room has reflective surfaces or excessive noise, your recordings will suffer. The real secret is a balanced setup—good gear paired with a well-treated environment. This combination ensures your equipment performs at its best, and your recordings sound professional. For detailed setup advice, check out this guide.
Are High-End Gear and Room Acoustics Equally Crucial?
Absolutely. Advanced podcasters recognize that the most overlooked aspect is room acoustics. Even with top-tier microphones and headphones, poor room treatment can introduce echoes, background noise, and frequency anomalies. According to a study published in the Journal of Audio Engineering, room acoustics influence perceived sound quality more than many realize. This is why investing in acoustic panels, diffusers, or even simple DIY solutions like foam or blankets can dramatically improve your recordings. Remember, gear is only part of the equation; environment matters just as much.
Finally, don’t fall into the trap of thinking that any one piece of equipment will magically improve your sound overnight. Focus on a balanced, well-considered setup—pairing quality gear with proper environment and technique. If you’re serious about elevating your podcast, consider reviewing your current setup and making incremental improvements. For expert tips on this, visit this resource. Have you ever fallen into this trap? Let me know in the comments!” ,
Maintaining your podcast setup over time is crucial to ensure consistent, professional-quality recordings. Even the best equipment can degrade or fall out of calibration if not properly cared for. I’ve found that a few disciplined habits can extend the lifespan of your gear and keep your workflow smooth. For example, regularly cleaning your audio interface and headphones prevents dust buildup that can cause static or connection issues. Using compressed air to gently clear dust from ports and connectors is a simple but effective practice. Avoid harsh chemicals; a soft, lint-free cloth slightly dampened with water or isopropyl alcohol works wonders for cleaning surfaces without damage.
Another key aspect is managing cable health. I recommend inspecting your cables periodically for signs of wear, such as fraying or corrosion, and replacing them before they fail during a critical recording session. Proper cable management, using cable ties or clips, prevents unnecessary stress on connectors, which can cause intermittent audio issues. Additionally, keeping your equipment in a dry, stable environment with controlled temperature helps prevent moisture buildup and component deterioration. Investing in a dedicated rack or shelf for your gear minimizes accidental knocks and dust exposure, prolonging its life.
When it comes to software, keeping your digital tools up to date is just as vital. Regularly update your DAW (Digital Audio Workstation) and drivers for your audio interface ensures compatibility and optimal performance. I make it a habit to check for updates at least once a quarter—this way, I benefit from bug fixes, new features, and security patches. For example, new versions of best DAW software often include workflow improvements that save me hours during editing sessions.
How do I maintain my equipment over the long term? I follow a simple but effective routine: after every session, I wipe down my gear, check cables, and store everything in a dust-free case. Every six months, I perform a thorough inspection and replace worn parts. Additionally, I back up my project files to cloud storage regularly, preventing data loss due to hardware failure. These habits keep my setup running smoothly and my projects safe.
Looking ahead, I believe the trend towards smart, self-monitoring gear will grow. Future equipment might include built-in diagnostics that notify you when maintenance is needed, much like modern cars. Until then, disciplined upkeep remains your best bet for reliable, high-quality podcast production. If you want to streamline your workflow and ensure your gear stays in top shape, try implementing a regular maintenance schedule today. It’s an investment that pays off in consistent audio quality and fewer headaches down the line.
Need detailed tips on how to fine-tune your setup? Check out this guide for expert advice on keeping your gear in prime condition and optimizing your workflow.
The Hardest Lesson I Learned About Podcast Gear
One of my biggest mistakes early on was assuming that buying the most expensive microphone would instantly elevate my podcast quality. It wasn’t until I paired it with a proper audio interface and learned microphone placement that I realized gear alone doesn’t guarantee professional sound. This taught me that understanding how each piece works together is crucial.
3 Myths About Podcast Equipment That Held Me Back
I used to believe that studio headphones were only for mixing and not for recording or editing. That misconception limited my ability to catch subtle audio flaws. When I started using accurate, flat-response headphones recommended in the studio headphones buying guide, my editing became far more precise and efficient.
The Truth About Room Acoustics and Gear
No matter how high-end your microphone or headphones are, poor room acoustics can sabotage your sound. I learned this the hard way, thinking my gear was enough until I treated my space with acoustic panels. The combination of good gear and a well-treated environment is what truly makes the difference in podcast clarity.
What Experts Won’t Tell You About Maintaining Your Podcast Setup
Regular maintenance of your gear—like cleaning cables and updating software—can extend its lifespan and keep your recordings consistent. I now schedule bi-annual inspections and keep a cleaning routine that saves me from unexpected hardware failures during critical recordings.
http://Sophia%20Carter
I really resonate with this post because I’ve been through a similar journey. One thing I learned early on is that having a good microphone isn’t enough if your room isn’t treated acoustically. I used to think that upgrading my mic would instantly improve my sound quality, but I kept noticing echoes and background noise. Once I invested in some basic acoustic treatment with foam panels and diffusers, the difference was night and day. It’s easy to overlook room acoustics when shopping for gear, but I’ve found that pairing quality equipment with a controlled environment makes a huge impact on clarity.
Has anyone experimented with DIY acoustic solutions, like hanging blankets or foam panels from budget-friendly sources? I’d love to hear what has worked effectively for others on a budget. After all, creating a professional sound doesn’t always mean spending a fortune—sometimes, a bit of creativity goes a long way.
http://Benjamin%20Lee
Great insights here! I totally agree that upgrading gear like microphones and headphones can make a massive difference, but environment and setup are equally crucial. I’ve learned the hard way that even the best mic will struggle in a room with lots of echo or background noise. I started experimenting with DIY acoustic treatments—hanging thick blankets and placing bookshelves with books—just to see what the impact would be. Surprisingly, those simple solutions helped reduce echoes significantly without breaking the bank. Have others tried any DIY acoustic fixes that proved effective? It’s encouraging to know that you can improve your sound quality with some easy, budget-friendly tricks, especially when professional treatment isn’t feasible. Also, regularly testing your setup by recording short clips makes a huge difference in catching issues early and tweaking accordingly. Who else has tips for affordable yet effective acoustic treatments? Would love to hear your experiences and recommendations!
http://Emily%20Johnson
I really appreciated this post because it hits so many points I’ve learned through my own podcasting journey. It’s true, having the best gear is crucial, but without proper room treatment, no microphone or headphone can truly shine. I’ve found that DIY solutions like hanging thick blankets or using even inexpensive foam panels can make a noticeable difference. One trick I’ve tried is placing bookshelves filled with books around my recording space—this helps absorb sound and reduce echoes without a big budget. I’m curious, has anyone experimented with layering different materials, like combining foam panels with household items? I’d love to hear more tips on how to maximize sound quality on a budget. Also, regular testing and tweaking my setup has been invaluable—sometimes you only notice issues after recording a few clips and listening back critically. Do others recommend specific routines for maintaining consistent sound quality? Thanks again for such a helpful, comprehensive guide—definitely motivates me to keep refining my setup!