I remember the moment vividly. Sitting in my tiny makeshift studio, frustrated after trying countless microphones and audio interfaces that either sounded like cardboard or drained my wallet faster than I could say “professional quality.” That lightbulb moment hit me—why does building a *professional* voiceover setup have to break the bank? What if I told you that in 2026, you can craft a studio that sounds as good as pro environments, all for under $500? Many aspiring creators just like you and I are battling the same hurdles: limited budgets, overwhelming gear options, and the confusing maze of tech jargon. But here’s the truth—it’s entirely possible with some strategic choices, and I’m here to show you how.
Why You Can Totally Achieve Pro-Level Voiceovers on a Budget
In today’s market, the idea that high-quality audio requires expensive gear is a myth. Thanks to advances in technology, affordable yet powerful equipment is within reach. Take, for example, the digital audio workstation (DAW) software options available now—they’re more capable and affordable than ever. But the real kicker? Proper setup and technique matter even more than gear price. I’ve learned that when I invested in the right microphone, paired with a decent audio interface and some acoustic treatment, my voice recordings transformed overnight. And guess what? You can do the same without draining your savings.
Before diving into the specifics, let me share an early mistake I made: thinking name-brand equipment was always better. That assumption nearly doubled my costs and left me overwhelmed. It wasn’t until I explored affordable DAW setups and tested less pricey hardware that I started making real progress. Quality sound isn’t about price tags; it’s about smart choices. Now, I want to guide you through creating your own professional-quality setup on a budget—so stick around.
Is It Really Worth the Hype to Build a Low-Cost Studio?
Many skeptics ask whether a budget-friendly setup can truly match the quality of high-end studios. I get it—conventional wisdom suggests that cheap gear equals poor sound. But recent innovations and user-friendly tech platforms prove otherwise. The secret is in pairing the right components and mastering your environment. Plus, dedicating yourself to learning editing techniques—like those shared in these podcast editing hacks—can elevate your recordings exponentially.
Initially, I wasted time and money chasing after flashy gear without understanding the fundamentals. That mistake set me back and almost dissuaded me from pursuing my passion. Now, I understand that knowing what to prioritize—like a good microphone, decent headphones, and proper acoustic placement—brings the best results. If you’ve faced similar doubts, ask yourself: Are you ready to ditch the expensive myths and start building a real, budget-friendly studio? If so, let’s explore the essentials that will turn that dream into reality in 2026.
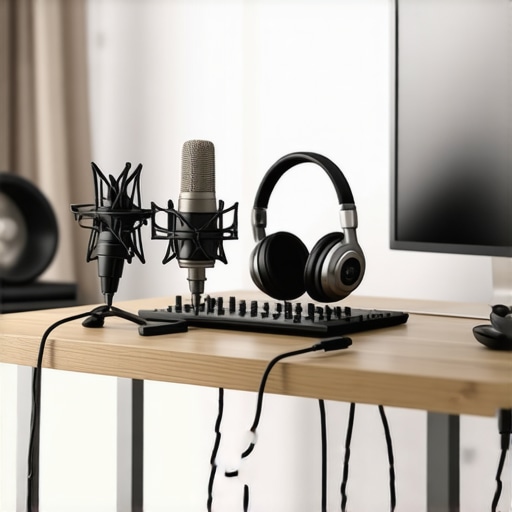
Selecting the Right Microphone
Start with a condenser microphone, which captures the nuance of your voice. I recently grabbed a <$100 condenser mic like the Audio-Technica AT2020 at a local store, and initial recordings sounded surprisingly professional. Avoid overly complex models; focus on ones known for vocal clarity.
Position Your Microphone Properly
Place the mic about 6–8 inches from your mouth, slightly off-axis to reduce plosive sounds. Use a pop filter, which you can DIY using a stocking stretched over a wire frame, to minimize breath noise. I experimented by placing the mic next to a bookshelf to see how room reflections affect audio. The difference was clear—sound more direct and less echoey.
Upgrade Your Audio Interface
The audio interface acts as a bridge between your mic and computer. I recommend models like the Focusrite Scarlett 2i2, which costs around $150 but offers excellent preamps. Connect your mic to the interface’s XLR input, and ensure it’s plugged into a USB port. For optimal clarity, set the gain level so your loudest speech peaks around the -6dB mark. Check out these setup tips for detailed guidance.
Invest in Quality Studio Headphones
Good headphones help you catch every nuance. I went for the Audio-Technica ATH-M40x, which provides clear, flat sound at a reasonable price. Wear them while editing to identify background noise or unintended artifacts. Proper headphone calibration makes the difference between a good and a pro-sounding final product. For detailed recommendations, see this headphone buying guide.
Optimize Your Recording Environment
Control room acoustics to reduce echoes. Place foam panels or DIY solutions like thick blankets on walls behind you and around your mic. Sit near a desk or bookshelf to dampen reflections. I once stuck blankets around my corner setup, which instantly improved clarity. Remember, a quiet, non-reverberant space dramatically enhances audio quality.
Set Up Your Digital Audio Workstation
Choose user-friendly software like [Reaper](https://audioediting.editinggearpro.com/best-daw-software-for-precise-music-production-this-year) or your preferred DAW. Familiarize yourself with basic editing functions: cutting ums, noises, and adjusting volume levels. I once spent a lazy Saturday trimming silences and noise from my recordings, which made my voiceovers sound much cleaner. Use a compressor and EQ for polish, but aim for natural sound, not overly processed effects.
Implement Editing Hacks for Efficiency
Streamline your workflow with shortcuts and templates—learned from these hacks. For example, create a template with predefined tracks, effects, and markers. This saved me hours during editing sessions, especially when recording multiple takes. Consistent editing practices ensure your final audio is professional-grade without excessive effort.
Test and Improve Regularly
Periodically record test clips, listen on different devices, and tweak your setup accordingly. I did this after noticing my voice sounded off when played on my phone. Small adjustments—like repositioning my mic or improving room acoustics—made a noticeable difference. Keep iterating until recordings sound clear, warm, and professional, all while staying within your budget.Many newcomers believe that choosing the most expensive gear automatically guarantees professional-sounding podcasts or voiceovers. However, as I’ve learned through experience, this isn’t the case. One prevalent myth is that a high-end digital audio workstation (DAW) like Pro Tools or Logic Pro is essential to produce quality content. In reality, many affordable DAWs such as Reaper offer powerful tools that, when mastered, can rival or surpass pricier options. The key lies in understanding the *nuances* of your chosen software and customizing workflows accordingly. Another misconception revolves around studio headphones. Some assume that the most expensive models deliver the best clarity. Yet, what truly matters is flat frequency response and comfort for long editing sessions—qualities found in headphones like the ATH-M40x, which are budget-friendly.
Are More Expensive Headphones Always Better for Editing?
Contrary to popular belief, overpriced headphones often emphasize bass or boost certain frequencies, which can skew your perception during editing. Experts recommend choosing headphones with a neutral, flat response, ensuring you hear your audio exactly as it is. This insight stems from audio industry studies indicating that accurate monitoring is crucial for post-production precision. Moreover, many overlook the importance of an *audio interface*. Some think that plugging a microphone directly into a computer’s headphone jack suffices. But, without a dedicated audio interface—like the Focusrite Scarlett 2i2—your recordings risk being noisy, distorted, or lacking clarity. Investing in a quality interface significantly improves preamp quality and reduces latency, making a noticeable difference in final output. It’s a trap to assume that any interface will do; instead, selecting one with high-quality preamps and proper connectivity ensures your setup’s effectiveness.
Lastly, one of the most overlooked aspects is acoustic treatment. Many believe that placing a mic in a quiet room is enough, but reflections and background noise can sabotage clarity. Strategic placement of foam panels or DIY solutions like blankets can dramatically enhance sound quality. Remember, creating a *balanced* environment is as vital as choosing the right gear.
In essence, mastering these nuanced details transforms a basic setup into a professional-sounding studio. It’s about understanding how gear interacts with your environment and workflow—so you’re not just buying the latest gear but making smart choices. Don’t fall into the trap of equating cost with quality; focus instead on *how* you use and configure your equipment. This knowledge can save you time and money, propelling your content to new heights. Have you ever fallen into this trap? Let me know in the comments.
Keep Your Gear Running Smoothly
Ensuring your podcast equipment stays reliable over time requires regular maintenance and awareness of common issues. Start by periodically inspecting your cables and connections; loose or frayed cables can cause crackling or dropout sounds. Regularly cleaning dust and debris from your audio interface’s ports and your microphone’s grille prevents buildup that could degrade sound quality. I find that a gentle brush and a compressed air can are invaluable tools for these tasks. Implementing a routine check each month keeps your setup performing at its best and prolongs its lifespan.
Tools I Recommend for Longevity
Investing in quality cleaning supplies, such as contact cleaner for your connectors and microfiber cloths, helps maintain optimal connections. Additionally, a backup power supply or surge protector safeguards your gear against voltage spikes, which can be disastrous over time. For software maintenance, regularly updating your DAW and drivers ensures compatibility and security. I personally use recommended DAW options that receive timely updates, reducing bugs and improving performance. Relying on trustworthy tools not only enhances longevity but also minimizes troubleshooting in critical moments.
Where Will Your Setup Be in Five Years?
As technology evolves, so should your gear and workflows. Trends like AI-assisted editing and virtual acoustic modeling promise to simplify post-production and improve sound quality. Future-proofing involves choosing modular components, like audio interfaces that support higher sample rates, and keeping an eye on firmware updates. Building a system that can adapt to these advancements ensures your setup remains relevant and efficient for years to come.
How do I maintain my setup over time?
The key to long-term maintenance is consistency. Schedule monthly inspections, keep software up to date, and stay informed on new tools and techniques—like those revealed in workflow hacks. Remember, a proactive approach prevents small issues from escalating into costly repairs or replacements. Consider documenting your maintenance routine to stay on track and avoid missing critical steps. Adopting this method turns your gear into a dependable partner, so your focus stays on creating great content rather than troubleshooting technical problems. Ready to implement these tips? Start with scheduling your first equipment check today and experience the difference it makes.
Hard-Won Tips You Won’t Find Elsewhere
One of the most eye-opening lessons I discovered was that obsessing over the latest microphone tech can be a distraction. Instead, focus on understanding your space and how your gear interacts within it. I once spent a fortune on a fancy mic, only to realize that acoustic treatment made a far bigger difference in clarity. Remember, real progress often comes from mastering fundamentals—like microphone placement and room acoustics—rather than chasing every new gadget.
Another revelation was the importance of consistent editing practices. Investing time to learn quick workflow hacks here transformed my post-production process. It’s not just about gear; it’s about your skills in making the most of what you have. Small tweaks in your editing routine can elevate your sound from amateur to professional, regardless of budget.
And perhaps most unexpectedly, visibility matters. A good setup is a stepping stone, but sharing your work and engaging with a community can bring invaluable feedback. I learned to embrace constructive criticism and saw my recordings improve rapidly. It’s a reminder that building a professional studio is as much about mindset and learning as it is about hardware.
Tools That Accelerate Your Progress
From my experience, these resources have been game-changers:
- Reaper: Affordable, powerful, and customizable—perfect for budding creators. Its <$100 price point and extensive tutorial library here made mastering processing techniques accessible.
- Audio-Technica ATH-M40x: Flat frequency response, great for accurate editing without the sticker shock. Check this guide for more headphone options.
- Focusrite Scarlett 2i2: Reliable, with superb preamps, this interface here can be integrated seamlessly into your setup.
- DIY Acoustic Treatments: Simple DIY ideas like blankets and foam panels inspired me to optimize my space without breaking the bank. Practical tips here show you how to transform any room.
Your Next Step Towards Voiceover Mastery
Building a podcast studio on a budget isn’t just achievable—it’s empowering. Each small upgrade, each learned technique, adds up to professional-quality audio that can compete with the best in the business. The key is to stay curious, keep learning, and not let myths or costs hold you back. What’s stopping you from taking that first step to elevate your voice-over game? Dive in, experiment, and share your progress—the community is here to support you. Remember, your future as a confident creator begins today—don’t wait for perfect conditions, create your ideal setup in your own right now.
http://Melissa%20Carter
Reading this post really resonated with my own journey into voiceover work. I started out with a small budget, and like many, I was skeptical that I could achieve professional sound without a huge investment. But focusing on essential gear, like a good condenser microphone and acoustic treatment—stuff I could DIY—made a noticeable difference in my recordings. I also learned that software is just as important as hardware; I switched to Reaper, which is budget-friendly and quite powerful. What I find interesting is how much environmental factors influence sound quality. Have others manually treated their spaces with DIY solutions? I used thick blankets and foam panels, and the improvement was significant. It’s inspiring to see how strategic choices and proper setup can make a huge difference. What’s been the biggest challenge for others trying to optimize a limited budget studio? Would love to hear tips or experiences from this community.
http://Jason%20Moore
This post really hit home for me. I started building my home studio on a tight budget and quickly learned that planning and prioritization are everything. I’d add that even small upgrades—like better cables or a decent mic stand—can make a surprisingly big difference without blowing your budget. The tips on acoustic treatment are especially useful; I used egg cartons and thick curtains, which improved the room’s sound noticeably. The point about mastering your DAW is crucial as well; I spent a lot of time watching tutorials and discovering shortcuts that sped up my editing process. It makes me wonder, how many other creators overlook the importance of soundproofing or proper mic placement because they focus too much on the gear? Also, what are some affordable options for portable soundproofing solutions for those with limited space? Would love to hear everyone’s experiences and tips on making small spaces work effectively for voiceover work.