I vividly remember the moment I discovered my voiceover recordings were riddled with hiss — after hours of editing, only to find a constant, annoying background noise sneaking in. It was as if my microphone had developed a mind of its own, whispering secrets of frustration every time I hit ‘Record.’ That lightbulb moment wasn’t just a minor annoyance; it threatened to derail my entire workflow, making me question if my setup was good enough for professional work. Sound familiar?
Why Your Voiceover Setup Needs to Kill Mic Hiss Now
The reality is, mic hiss isn’t just an irritating backdrop; it can harm the clarity of your entire audio project and diminish your credibility as a voiceover artist. According to a recent Sound On Sound article, background noise is one of the top culprits that make or break professional recordings, especially in a competitive market like voiceover work. If you ignore mic hiss now, it will only amplify in the future, turning a minor fix into a major headache during post-production.
Skeptical? Think Fixing Gain Is Overrated
Believe me, I made the mistake early on of cranking my gain to boost quiet voices, thinking it would save me time. Instead, I ended up with more hiss, frying my audio quality and increasing editing time. That experience taught me that proper gain staging isn’t just a technicality — it’s the foundation of a clean, professional sound. In the following sections, I’ll share three practical gain fixes rooted in real-world experience, so you can set your 2026 voiceover setup to deliver crystal-clear recordings without the unwanted noise. Ready to get your audio sounding like a pro? Let’s jump in.
Set Your Gain Properly from the Start
Think of gain staging like adjusting the volume knob on your favorite amp—balance is key. I recall a time I was desperate to record before a session, so I turned my mic gain all the way up. The result? An overwhelming hiss that made my audio unlistenable. Instead, I reduced the gain knob to an optimal level, just enough to capture my voice without distortion or hiss. This foundation prevents unnecessary noise from sneaking into your recordings and makes post-production much smoother. To fine-tune your gain settings, use your audio interface levels to keep input signals within the recommended range, avoiding clipping and background noise.
Optimize Your Physical Environment
Your studio environment is like a blank canvas—what you put in dictates your sound quality. To minimize mic hiss, start by treating your room with bass traps and foam panels, especially around reflective surfaces. I once draped moving blankets over my studio walls, which reduced ambient noise and echo surprisingly well. For more professional solutions, consider using soundproofing foam and diffusers. This guide offers practical tips to create a quiet, controlled environment conducive to clean recordings.
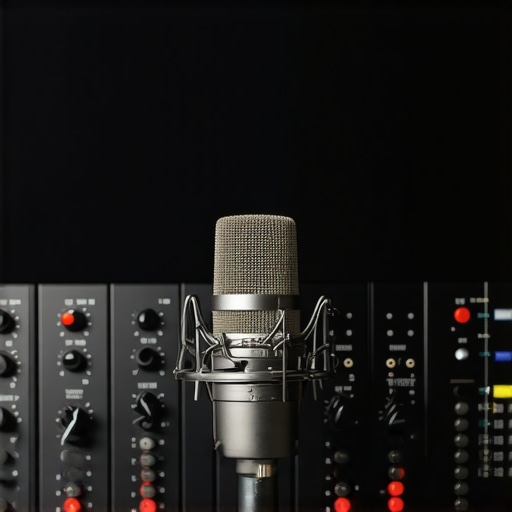
Choose the Right Hardware
Imagine trying to row a boat with a leaky paddle—your hardware directly impacts your audio clarity. Select a high-quality audio interface that offers clean gain and low noise floors. Pair it with studio-grade studio headphones designed for flat response—these will give you an accurate representation of your audio without coloring it with unnecessary hiss or coloration. I swapped my basic microphones for a studio-grade condenser mic, which markedly improved signal clarity and reduced hiss.
Employ Proper Connection and Cable Techniques
Sometimes, hiss appears because of faulty cables or improper connections. Think of your cables as the roads transporting your sound—smooth, well-shielded cables prevent interference. I learned this firsthand when a cheap XLR cable introduced a constant static hiss; switching to a balanced, shielded cable eliminated it entirely. Always ensure your cables are properly grounded and free of damage. Avoid chaining multiple adapters or extension cords that can introduce noise, and consider using ground loops fixes if you notice a hum accompanying your hiss.
Leverage Software Noise Reduction Carefully
After setting your hardware correctly, some residual hiss may remain. In my experience, subtle noise reduction via a noise reduction plugin in your DAW can save the day—but use it sparingly. Over-application can make your voice sound unnatural, similar to listening through a fuzzy radio. Instead, rely on spectral editing tools and equalization to reduce hiss without destroying the natural quality of your voice. Remember, hardware fixes should come first, with software as the finishing touch in your quest for pristine audio.
Many voiceover enthusiasts and even seasoned professionals fall into common traps because of misconceptions about their gear and workflow. One pervasive myth is that having the latest DAW software or the most expensive studio headphones automatically guarantees top-notch audio quality. In reality, these tools are just part of a larger equation that includes proper setup, calibration, and technique. For example, some assume that high-end headphones like the studio-grade models can compensate for poor room acoustics or inaccurate calibration, but this isn’t the case. Calibration and environment often outweigh hardware specs when achieving a truly neutral sound.
Don’t Make This Classic Error When Choosing Your DAW
Many believe that switching to the latest or most feature-rich DAW software will dramatically improve their workflow. While having powerful tools helps, the real difference lies in understanding hidden settings like buffer size, latency management, and plugin delay compensation. Overlooking these aspects can lead to frustrating delays or audio glitches, especially in complex projects. Advanced users tweak these settings meticulously, contributing significantly to seamless editing sessions. If you want to optimize your Daw setup for efficiency, don’t just settle for defaults—dig into the software manual or consult expert guides like this Ultimate guide to DAW setup.
Choosing the Right Studio Headphones Can Seem Trivial — Don’t Fall for the Fluff
A common misconception is that any closed-back headphone will do for voiceover recording. But, as I’ve discovered, truly neutral headphones—like the studio-grade options—are critical for accurate monitoring. They reveal subtle issues like mic bleed or room echo that cheaper models hide. Furthermore, calibration plays a vital role: headphones require proper level matching to avoid misleading your ears. Regular calibration practices, as outlined in this comprehensive guide, help maintain consistent reference points for your mixes. Remember, precision in monitoring leads directly to professional results in the final product.
Mid-Level Audio Interface or Full Professional Gear — What’s the Secret?
Many believe that the more expensive the audio interface, the better their recording quality will be. But this isn’t always true. The real trick is in the gain staging and understanding how your interface’s features—like clean gain, low noise floors, and proper grounding—impact your signal. Some mid-range models have quality preamps that outperform overpriced units riddled with interference issues. An overlooked mistake is neglecting proper cabling and shielding, which can reintroduce noise and hiss that hardware alone can’t fix. Focus on comprehensive setup practices instead of relying solely on gear investments.
What About Editing and Post-Processing? Is Software the Weak Link?
Many think that software noise reduction or automatic de-clickers can fix poor recordings. While these tools are valuable, overusing them can lead to unnatural-sounding audio and mask issues that should be addressed hardware-wise. Subtle steps, such as manual silence trimming, proper EQ moves, and spectral editing techniques, often produce more natural results. Remember, software should complement a solid signal chain—not replace good hardware and environment. As highlighted in this post-production guide, understanding these nuances saves time and preserves audio integrity. Don’t let the misconception that software can fix everything lead you astray—focus on getting the on-record sound right first.
Have you ever fallen into this trap? Let me know in the comments and share your experiences with setup mistakes or misconceptions. The more we understand these hidden nuances, the closer we get to professional-quality recordings every time.
Keep Your Gear Running Smoothly
One of the most overlooked aspects of a professional voiceover setup is ongoing maintenance. Regularly inspecting your equipment ensures consistent quality and prevents unexpected failures. I recommend scheduling monthly check-ins for your hardware—cleaning connectors with compressed air, checking cables for wear, and tightening loose connections. Use a high-quality audio interface and keep its firmware updated; manufacturers often release updates that improve stability and add features. Additionally, calibrate your studio headphones periodically, following specific guides to ensure your monitoring remains accurate, which is essential for detecting subtle issues early on.
Tools I Use to Keep Everything in Top Shape
My go-to toolkit includes a precision contact cleaner for XLR connectors and a set of Sichuan-style cable testers to identify any hidden faults in my cabling. For software, I rely on up-to-date DAW versions that optimize performance and feature fixes. Automate backing up your recordings and configurations using cloud services, ensuring nothing is lost if hardware fails. Proper storage in a cool, dry environment extends the lifespan of sensitive equipment, especially microphones and interfaces, maintaining clarity over years of use.
Future-Proof Your Voiceover Station
Looking ahead, I see a trend toward smarter maintenance routines with IoT devices that monitor equipment health in real-time, alerting you to potential issues before they become critical. This proactive approach can save countless hours and money. Implementing remote diagnostic tools or firmware update systems can streamline your upkeep process, making your setup more resilient against technical hiccups.
How do I maintain my setup over time?
The secret lies in establishing disciplined routines—regular physical inspections, software updates, calibration, and cleanings. I also recommend setting aside annual upgrades or replacements for aging gear; digital components like interfaces and DAWs evolve quickly and can become bottlenecks if neglected. Consistency is key. For an even smoother workflow, consider integrating a dedicated maintenance workflow, such as detailed checklists or automation scripts, to keep your system reliable. Get into the habit of verifying your setup’s performance before every recording session, and don’t hesitate to consult experts—my favorite is the support team—for personalized advice. To start practicing, try running a full calibration check on your studio headphones today, utilizing a calibration app or reference test tones to ensure your monitoring remains precise. Maintaining your setup is a continuous process, but with these disciplined habits, you’ll ensure your recordings stay clean, clear, and professional for years to come.
The Hardest Lesson I Learned About Voiceover Setup and Gear
- Early in my journey, I believed that upgrading my microphone or audio interface would instantly improve my recordings. I soon discovered that without proper gain staging and environment setup, even the priciest gear produces hiss and noise, leading to wasted time and frustration.
- One time, I spent hours trying to fix a persistent hiss, only to realize it was a grounding issue with my cables. This taught me that hardware calibration and cable quality are often overlooked but critical for clean audio.
- I used to think software noise reduction alone could solve hardware flaws. Now I understand that investing in environment control and hardware calibration saves more time and preserves natural voice quality.
My Toolbox for Consistent Voiceover Clarity
- Audio Interface: I trust the highest quality audio interfaces with low noise floors to keep hiss at bay.
- Studio Headphones: The calibrated, neutral headphones give me accurate feedback during recordings and mixing.
- Room Treatment: Moving blankets, bass traps, and foam panels have transformed my space into a quiet, reflective environment, crucial for reducing ambient noise and hiss.
- Cables and Connections: Shielded XLR cables and proper grounding eliminated static and hum. I learned that high-quality, well-shielded cables are worth every penny.
Keep Your Voiceover Confidence Growing
Engineering professional-sounding voiceover recordings is both an art and a science. By applying these insights and trusting your setup, you’ll produce clear, hiss-free audio that stands out. Remember, even the best equipment needs proper care, calibration, and environment control to perform at its peak. Start integrating these practices today, and don’t let mic hiss hold back your voice—you’re capable of delivering studio-quality sound every time. What’s been your biggest hurdle in achieving clean recordings? Share your story below and keep learning together!