I remember the exact moment I realized my podcast sounded like I was recording inside a tin can. It was frustrating. All that effort I put into my content was lost behind muffled audio, static, and inconsistent volume. It wasn’t until I finally invested in quality gear—top audio interfaces and studio headphones—that everything changed. My voice sounded professional, clear, and engaging. That lightbulb moment transformed my entire approach, and I want to help you get there too.
Why Your Podcast Deserves Better Sound Quality
If you’re serious about making your mark as a creator, you already know that audio quality can make or break your success. Listeners are tuned into more than just your words—they’re immersed in the overall experience. Bad audio can turn off potential fans faster than you can say “skip ahead.” According to a recent study, over 70% of podcast listeners cite audio quality as their top reason for staying tuned or dropping off. That’s a staggering number, and it’s why investing in the right equipment is so crucial.
But here’s the truth—choosing the right gear isn’t just about buying the most expensive microphone or headphones. It’s about understanding what makes your sound clear and professional. When I started, I made the mistake of thinking that any microphone would do. Big mistake. That’s why I recommend you check out the studio headphones buying guide for crystal-clear sound in 2025. It helped me avoid costly mistakes and guided me toward gear that truly elevates my recordings.
Have you faced the frustration of poor sound quality? If so, you’re not alone. But I promise, the right setup can transform your podcast from amateur to pro in no time. So, let’s dive into the practical steps you need to take to ensure your sound is crisp, clear, and engaging. Ready to upgrade your audio game? Let’s go!
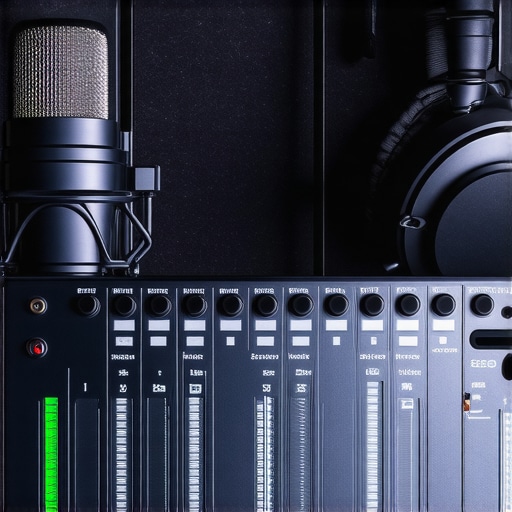
Choosing the Best Audio Interface and Headphones for Your Podcast
Pick the Right Audio Interface for Crisp Sound
Think of your audio interface as the bridge between your microphone and your computer. A high-quality interface converts your voice into a digital signal with minimal noise and distortion. When I upgraded to a reputable model, I immediately noticed clearer recordings and less background hiss. To choose the right one, consider features like preamp quality, input/output options, and compatibility with your DAW. Check out the audio interface setup guide for expert tips on setup and optimization.
Invest in Studio Headphones That Deliver Clarity
Your headphones are your best tool for monitoring audio accurately. Imagine trying to edit a podcast with muddy, bass-heavy headphones — it’s like trying to paint with a blurry brush. I learned this the hard way during my first recordings, where I couldn’t catch subtle background noises. I switched to studio headphones recommended in the buying guide, and my editing process became more precise. Look for flat frequency response and comfort for long sessions.
Matching Your Gear for Optimal Performance
Combining a top-tier interface with excellent headphones is like pairing a fine wine with a delicious meal — synergy is key. When I paired my new interface with my studio headphones, the difference was night and day, enabling me to catch nuances in my recordings I never heard before. Also, ensure your setup is optimized by following guides like the voiceover setup essentials. Proper placement and environment control, including sound-treated rooms, are essential for professional results.
Fine-Tune Your Settings for the Best Sound
Once your gear is selected, tweak your settings. Adjust gain levels to avoid clipping, and set your sample rate and bit depth for clarity. During my first setup, I made the mistake of leaving the gain too high, which caused distortion. After consulting the DAW software tips, I learned to calibrate my levels precisely. Remember, small adjustments can make a huge difference in your final audio quality.
Test and Iterate Until Perfect
Before recording your main content, do test recordings. Listen critically, and make adjustments to your environment, gear, or settings. My breakthrough came when I recorded a quick test, noticed a slight hum, and fixed my grounding issues. This iterative process ensures your setup is dialed in for consistent, professional sound. Keep refining, and don’t be afraid to experiment—your perfect podcast sound is within reach.
Many podcasters believe that simply owning a high-end microphone will automatically ensure professional sound quality. While gear is important, this is a classic misconception that can lead to costly investments with minimal returns. The real nuance lies in understanding how your equipment interacts with your environment and setup. For example, even the most expensive microphone can produce muddy recordings if placed improperly or if your room isn’t sound-treated. This is why I emphasize the importance of creating a controlled environment, as detailed in the voiceover setup essentials.
Another common myth is that higher sample rates or bit depths always translate into better audio quality. While these settings are crucial, many podcasters overlook the fact that improper gain staging or poor monitoring can negate these benefits. For instance, setting your gain too high can cause clipping and distortion, which is a mistake I made early on. Fine-tuning your audio interface and mastering proper levels is vital. Remember, quality gear combined with correct setup makes all the difference.
How can advanced monitoring techniques improve your sound?
Many creators underestimate the power of precise monitoring. Using headphones with a flat frequency response, as recommended in the studio headphones buying guide, allows you to hear every detail in your recording. This prevents issues like background noise or uneven EQ from slipping into your final product. Moreover, advanced techniques such as spectral analysis and using reference tracks can help you identify problematic frequencies that might be invisible to the untrained ear. Experts like Bob Katz stress that understanding your monitoring environment and employing these techniques can elevate your production quality significantly.
Be wary of the trap of relying solely on visual cues from your DAW’s meters. These indicators don’t tell you how your audio actually sounds. Instead, perform regular test recordings, listen critically, and adjust accordingly. This iterative process is often overlooked but is essential for achieving truly professional results.
Finally, avoid the myth that post-production can fix all audio issues. While editing tools are powerful, they can’t fully compensate for poor initial recordings. It’s better to get it right in the first place by understanding the nuances of your setup and environment. If you want to dive deeper into creating a professional sound, check out the ultimate guide to DAW setup for detailed tips on aligning your hardware and software for optimal results. Remember, mastering these advanced aspects can make your podcast stand out and sound polished, even to the most discerning listeners.
Maintaining your podcast equipment and workflow is just as crucial as investing in the right gear initially. Over time, dust, wear, and software updates can impact your sound quality. To ensure your recordings stay crisp and professional, I recommend adopting a few key practices and tools that I personally rely on. These strategies not only extend the lifespan of your equipment but also streamline your editing process, helping you deliver consistent quality to your listeners.
Regular Calibration of Your Equipment
One of the most overlooked maintenance steps is calibrating your audio interface and headphones regularly. I set a monthly reminder to check my audio interface levels, ensuring gain staging remains optimal. This prevents distortion and maintains clarity. Similarly, I revisit my studio headphones calibration to detect any drift in sound response. Consistent calibration guarantees your monitoring remains accurate, which is fundamental for high-quality editing.
Software Updates and Backup Protocols
Software tools are vital in your workflow. I keep my Digital Audio Workstation (DAW) and plugins up to date. Developers frequently release updates that fix bugs, improve stability, and add features. To avoid losing hours of work, I automate backups using cloud services and local drives. Implementing a robust backup routine is a lifesaver—I’ve lost projects before and learned the hard way why redundancy is key.
Cleaning and Physical Maintenance
Dust and dirt can affect your microphone capsules and connectors. I use a soft brush and compressed air periodically to clean my gear, especially around the microphone grille and cables. This simple maintenance prevents static noise and ensures consistent performance. Additionally, keeping your workspace organized minimizes accidental damage or misconnection. Think of your gear as a finely tuned instrument—regular cleaning preserves its performance.
Plan for Future Upgrades
Technology evolves rapidly. I predict that emerging digital tools like AI-assisted editing and smarter noise reduction algorithms will become standard. To stay ahead, I allocate a small budget each year for upgrades. For example, I recently invested in a new audio interface with enhanced preamps and better compatibility, which made a noticeable difference. Keeping your gear current ensures your workflow remains efficient and your sound stays competitive.
How do I maintain my setup over time?
Creating a schedule for regular checks—covering calibration, software updates, cleaning, and backups—ensures your setup remains reliable. I also stay engaged with online communities and expert blogs, like voiceover setup essentials, where I learn about new tools and techniques. This proactive approach not only prolongs the life of my gear but also keeps my podcast sounding fresh and professional. I highly recommend trying a monthly calibration routine; it’s a simple step that yields long-term benefits and peace of mind.
The Hardest Lesson I Learned About Achieving Pro-Level Podcast Sound
One of my biggest realizations was that even the most expensive microphone won’t save a poorly treated room or bad setup. I used to think gear alone could make my sound professional, but I learned the hard way that environment and technique matter just as much. Now, I always prioritize sound treatment and proper placement, which transformed my recordings from muffled to crystal clear.
3 Myths About Podcast Equipment That Held Me Back
Early on, I believed that high sample rates automatically meant better quality. Turns out, without proper gain staging and monitoring, those settings are meaningless. I also thought that owning a top-tier microphone was enough—it’s not. The real magic happens when you combine the right gear with disciplined setup and calibration.
What Experts Won’t Tell You About Creating a Professional Podcast Sound
Many professionals focus on gear but overlook the importance of critical listening and iterative testing. Regularly performing test recordings, listening with accurate studio headphones, and adjusting your environment can catch issues before they reach your audience. These small, often overlooked steps are what truly elevate your podcast’s sound quality.
Curated Resources That Changed My Approach to Podcast Audio
- Voiceover Setup Essentials: This guide helped me understand the nuances of environment and equipment placement, which is crucial for professional-sounding recordings. Learn more here.
- Studio Headphones Buying Guide for 2025: I trust these recommendations for accurate monitoring. Clear, flat response headphones are a game changer for editing. Check it out.
- Audio Interface Setup Tips: Proper calibration of your audio interface can make a huge difference. This guide helped me avoid distortion and clipping. Read more.
- Podcast Editing Hacks: Streamlining your workflow with smart editing tools saves time and improves sound. Discover hacks here.
Your Turn to Try Achieving Studio-Quality Sound
Remember, reaching professional podcast sound isn’t about owning the most expensive gear—it’s about understanding and fine-tuning your setup, environment, and listening skills. Start with small steps: calibrate your equipment, treat your room, and listen critically during editing. Your audience will notice the difference, and your confidence will grow.
What’s the one setup change you’re planning to make next? Let me know below!
http://Jamie%20Taylor
Reading through this post really resonated with my own journey into podcasting. I used to think that just buying a good microphone was enough, but I quickly realized that environment, setup, and monitoring are just as crucial. I remember one of my first recordings where I tried to save the session with heavy EQ only to find all my background noise emphasized later in editing. It was a learning moment. Now, I always start with proper sound treatment and accurate headphones for monitoring. Has anyone here tried spectral analysis to troubleshoot frequency issues? I started experimenting with it recently and it’s helped me refine my sound much faster. Would love to hear your tips or experiences on advanced monitoring techniques that have worked for you.
http://Rachel%20Morgan
I totally relate to the frustration of muffled audio before upgrading my setup. When I first started, I underestimated the importance of environment and monitoring tools. Using quality studio headphones really changed the game for me—being able to catch those tiny background noises made a huge difference in my editing process. I’ve also started exploring spectral analysis just like Jamie mentioned, and it’s eye-opening to see what frequencies are lurking that I can’t hear with regular monitoring. It’s fascinating how much control you can gain with the right tools and setup adjustments. Have any of you tried using room treatment alongside your gear upgrades? I found that it really enhances the clarity and reduces unwanted reflections. Combining these physical and technical improvements has led to a much more professional sound. What’s been your biggest challenge when working to refine your audio quality? Would love to hear more tips or experiences from this community!
http://Derek%20Johnson
This post hits home for me. I used to think that the microphone was the end-all of achieving good sound, but I quickly learned that environment and monitoring are just as important. How many of you have struggled with room echo or background noise even after upgrading your gear? I found that investing in some basic sound treatment like foam panels and bass traps made a world of difference. Also, using flat-response studio headphones helped me catch those subtle issues in real-time, rather than relying solely on my speakers which may color the sound. One thing I’ve been exploring is spectral analysis; it’s incredible how visualizing frequency content can help you identify problem areas in your recordings. Has anyone here successfully used spectral analysis to improve their sound? I’d love to hear how you set it up and what insights it gave you. Ultimately, the key is patience and continuous testing—getting your setup just right takes time, but the results are worth it.