I remember the exact moment I realized my recordings sounded flat, dull, and unprofessional. I had invested hours into perfecting my voiceovers, only to be met with muddy sound, distracting background noise, and a frustrating never-ending battle with my equipment. It was like trying to paint a masterpiece with a broken brush. That lightbulb moment led me down a rabbit hole of trial, error, and finally, understanding what truly makes a voiceover setup shine.
Why Getting Your Audio Equipment Right Matters More Than Ever
In 2024, the demand for high-quality audio content has skyrocketed. Whether you’re creating podcasts, voiceovers, or music, your audience expects crisp, clear sound. But here’s the truth — without the right tools and setup, your voice can get lost in the noise. The good news? You don’t have to be an audio engineer to get this right. I’ll walk you through exactly how to choose the best DAW software and voiceover gear to elevate your recordings.
Ever wondered if your current setup is holding you back? Many creators overlook the importance of a well-configured audio interface or the right studio headphones. Trust me, I’ve made that mistake early on — thinking that expensive microphones alone could fix everything. Spoiler: It’s all about the whole chain. If you want to learn how to streamline your workflow and avoid those rookie pitfalls, check out this guide.
Is Your Voiceover Setup Actually Worth the Effort?
I used to believe that simply getting a decent microphone was enough. But then I realized I was wasting hours fixing sound issues that could have been avoided with proper equipment and setup. A common mistake I made was choosing headphones that didn’t reveal the true quality of my recordings — resulting in mixes that sounded fine on my speakers but terrible on other devices. It’s a mistake many beginners make, but it’s easily fixable once you understand what gear truly matters. If you’re serious about professional results, investing in quality studio headphones and a good audio interface can change everything.
By mastering your DAW software and voiceover setup, you’ll save hours in editing and produce content that stands out. Ready to get started? Let’s dive into the practical steps to build a setup that works for YOU and sets your content apart in 2024.
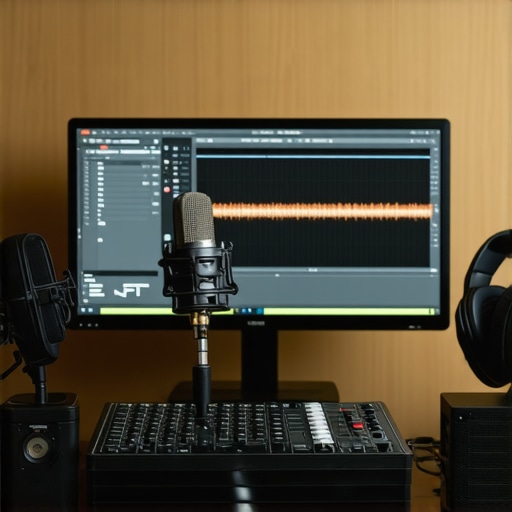
Choose the Right Audio Interface to Capture Crisp Sound
Start with a quality audio interface, the backbone of your setup. I once bought a cheap one thinking it would save money, but my recordings sounded muddy. After upgrading to a mid-range model like those discussed in this guide, my voice clarity improved dramatically. Connect your microphone via XLR to ensure clean, noise-free sound. Remember, a good interface not only enhances sound quality but also provides lower latency for real-time monitoring.
Invest in Studio Headphones for Accurate Mixing
Next, pick studio headphones that reveal every nuance of your voice. I initially used regular consumer headphones, which masked background noise and made mixing a guessing game. After switching to studio headphones recommended here, I could fine-tune my recordings with precision. Look for closed-back headphones with flat frequency response, which help you hear your voice as listeners will.
Set Up Your DAW Software for Seamless Workflow
Your Digital Audio Workstation (DAW) is where magic happens. I struggled initially, often wasting hours troubleshooting tracks. To streamline, I followed this comprehensive guide. Choose software like Reaper or Audacity, then customize your workspace to minimize clutter. Use templates for voiceover projects, so you’re not reinventing the wheel each time. Consistent settings for sample rate (preferably 44.1kHz or 48kHz) and bit depth (24-bit) ensure professional sound quality.
Optimize Your Microphone Placement and Environment
Microphone placement is critical. I once recorded with my mic too close, causing harsh plosives, or too far, losing warmth. Use a pop filter and place your mic about 6-8 inches from your mouth, slightly off-axis. Also, create a quiet environment—soft furnishings, foam panels, or even blankets can reduce echo and background noise. For guidance, check this setup checklist.
Refine Your Workflow with Editing and Noise Reduction Techniques
Once recorded, editing becomes crucial. I used to spend hours fixing issues until I adopted efficient techniques from this guide. Normalize your audio levels, remove background hums with noise reduction plugins, and cut out breaths or stumbles. Editing smartly saves time and produces a polished final product. Remember, a clean, balanced mix is what makes your voice stand out.
Many audio enthusiasts believe that simply investing in high-end equipment guarantees professional sound quality. However, this is a misconception that can lead to overlooked nuances and costly mistakes. Let’s dig deeper into what most people get wrong about audio interfaces, studio headphones, DAW software, podcast editing, and voiceover setups, and how to avoid these pitfalls.
Why the Gear Isn’t the Only Thing That Counts
It’s a common myth that buying the most expensive microphone or interface automatically yields studio-quality recordings. In reality, the correct setup and understanding of your gear’s capabilities are crucial. For instance, many overlook the importance of proper impedance matching between microphone and audio interface, which can cause significant sound degradation. Even the best gear can produce poor results if not configured correctly. For expert advice on optimizing your audio interface setup.
Beware the Noise Floor Trap
Another common mistake is neglecting the noise floor— the background noise level that your system emits. Even high-quality studio headphones and interfaces can amplify hums and hisses if not properly shielded or grounded. This can be especially insidious in home studios where electrical interference is prevalent. Ensuring proper grounding and using shielded cables are simple yet vital steps often overlooked by beginners.
Advanced Question: How do I optimize my DAW for professional editing?
Many creators stick with default settings, unaware that this can limit their editing precision and workflow efficiency. Tweaking your DAW settings—such as buffer size, sample rate, and plugin latency—can significantly improve performance. For example, setting a lower buffer size during recording reduces latency, while increasing it during mixing ensures stability. Additionally, learning how to effectively use noise reduction plugins, like those discussed in this guide, can help produce cleaner audio that stands out.
Remember, the secret isn’t just in having the right gear but understanding its nuances and how to leverage them. Avoid the trap of thinking more expensive always means better. Instead, focus on proper configuration, environmental control, and mastering your editing workflow. Have you ever fallen into this trap? Let me know in the comments.
Keeping your audio setup reliable over time is essential for consistent quality and smooth workflows. I’ve found that investing in the right tools and establishing a routine maintenance schedule can save you headaches and costly repairs down the line. To ensure your equipment remains in top shape, I rely on specific products and methods that have proven effective in my own studio.
How do I maintain my audio gear for long-term success?
First, regular cleaning is a must. Dust and grime can accumulate on your audio interface and studio headphones, leading to poor connections or even damage. Use a soft, lint-free cloth and compressed air to gently remove debris from vents and connectors. For connectors, I swear by contact cleaner sprays like DeoxIT to keep the connections pristine.
Second, software updates are critical. Keep your DAW software and plugins up-to-date. These updates often include bug fixes, security patches, and new features that can improve stability and performance. Set a monthly reminder to check for updates and install them during your off-hours to prevent disruptions during recording sessions.
Third, create a checklist for your setup. This includes inspecting cables for wear, testing your microphones, and verifying your audio interface settings. Document your preferred configurations so you can quickly troubleshoot if something goes awry. Routinely calibrate your headphones and speakers, ensuring your levels stay consistent and accurate over time.
Additionally, consider investing in a UPS (Uninterruptible Power Supply). Power surges or outages can damage sensitive equipment like your audio interface or computer. A reliable UPS not only protects your gear but also allows you to save work during unexpected outages.
Future trends in gear maintenance
As technology evolves, expect more integrated monitoring tools that can diagnose issues remotely or automatically alert you to potential problems. For instance, smart power strips with surge protection and energy monitoring can extend the life of your gear and save power. Additionally, cloud-based backups of your configurations and projects will become more common, ensuring you never lose your settings or work due to hardware failures.
Don’t wait until something breaks to act—regular maintenance is your best defense. I highly recommend trying out a routine check like cleaning cables and updating firmware monthly. These simple steps can keep your setup performing at its best and save you money in the long run. Want to dive deeper into optimizing your audio environment? Check out this guide for professional setup tips.

The Hardest Lesson I Learned About Audio Setup
Early in my journey, I believed that investing in the most expensive microphone would instantly improve my recordings. I was wrong. It wasn’t until I learned about proper microphone placement, environment control, and gear configuration that I finally started to see real progress. The key lesson? Quality gear is only part of the equation; understanding how to use it makes all the difference.
3 Myths About Audio Equipment That Held Me Back
I used to think that a high-end audio interface would automatically produce studio-quality sound. That’s simply not true. Proper impedance matching, grounding, and cable quality matter just as much. Additionally, I believed that regular consumer headphones were sufficient for mixing—until I discovered the importance of flat-response studio headphones for accurate monitoring. Breaking free from these myths transformed my workflow and results.
What Experts Won’t Tell You About Workflow Efficiency
Most creators overlook the importance of customizing their DAW workspace. I spent hours troubleshooting tracks until I learned to optimize buffer sizes, set up templates, and use noise reduction plugins effectively. These tweaks saved me hours and elevated my sound quality. The secret? A well-tuned workflow is as vital as the gear itself.
Curated Recommendations for Your 2024 Voiceover Studio
My essential toolkit includes the best audio interface for clean sound, studio headphones that reveal every nuance, and DAW software tailored for voiceovers. These tools have personally helped me craft professional-sounding recordings and are trusted by many industry professionals.
Harness Your Voiceover Potential and Take Action
The future of your voiceover career depends on your willingness to learn and adapt. With the right setup, ongoing learning, and consistent maintenance, you can produce content that truly stands out in 2024. Don’t wait—start applying these insights today and elevate your recordings to the next level. What’s the first step you’re going to take to improve your voiceover setup? Share below and let’s grow together!