Ever sat in front of my microphone, headphones on, ready to record, only to be greeted by a room echo or weird background noise that ruins the take? That moment of frustration hits hard. I’ve been there—thinking, “Why does my voice sound so unprofessional when I’ve spent hours trying to get it right?” It’s a lightbulb moment for many creators — the realization that a solid setup isn’t just about buying top gear, but knowing how to configure your DAW and voiceover environment properly.
The First Step to Professional Sound—Getting Your Setup Right
In this guide, I promise to demystify the overwhelming world of digital audio workstations, audio interfaces, and studio headphones. Together, we’ll walk through the essentials that separate amateur recordings from those that sound polished and broadcast-ready. Whether you’re starting your podcast venture or sharpening your voiceover skills, understanding the right tools and their setup can dramatically elevate your audio quality.
Is All This Tech Actually Worth the Hype?
Early on, I made the mistake of assuming that fancy gear automatically meant professional sound. I spent a fortune on equipment, but my recordings still sounded flat. The truth is, proper configuration matters more than the shiny gadgets. According to a recent study, even the best microphones underperform without correct placement and interface setup. If you’ve faced similar setbacks, rest assured—you’re not alone. And today, I’ll help you avoid those costly missteps.
So, if you’ve ever wondered why your voice doesn’t sound as clear as professionals, or why your recordings pick up too much room noise, keep reading. We’re about to dive into the DIY essentials that will turn your home studio into a sound powerhouse.
,
Layer Your Digital Audio Workstation Correctly
Begin by choosing a reliable DAW like Adobe Audition or Reaper. Install it on a dedicated computer or partition to avoid unwanted background processes. When setting up, optimize preferences to reduce latency—check buffer size and sample rate settings, ensuring they match your audio interface’s capabilities. During my first attempt, I mistakenly set the buffer too low, which caused constant pops. Adjusting buffer size upward eliminated those artifacts and provided smoother recordings.
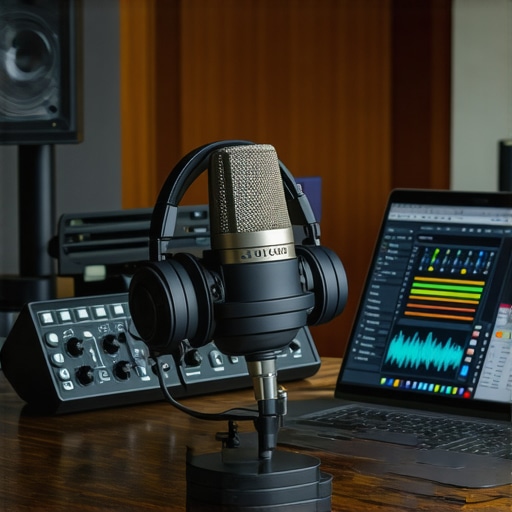
Position Your Microphone for Optimal Quality
Place your microphone about 6-8 inches from your mouth, slightly off-axis to minimize plosive sounds. Use a shock mount and a foam windscreen to prevent vibrations and sibilance. Think of your mic placement like a camera lens—proximity influences clarity. I once ignored this and ended up with distant-sounding audio; after adjusting mic position, my voice was front and center, much easier to process later.
Set Up Your Audio Interface for Clarity
Your audio interface acts as the bridge between your microphone and DAW. Connect it properly, ensuring proper grounding. Use high-quality cables and set the input gain so that your peaking levels stay below -6dB. I initially cranked the gain too high, causing distortion. Lowering it and watching the input meter carefully, I achieved clean, distortion-free audio. For detailed tips, consult the audio interface setup guide.
Choose the Right Studio Headphones
Invest in closed-back headphones with flat frequency response, such as those recommended in the studio headphones buying guide. I once used consumer earbuds which colored the sound, making editing guesswork. Now, with proper headphones, I hear every detail—pops, sibilance, room echo—so I can address issues during recording, not months later.
Configure Your Power of Voice Tools
Set your cleanup plugins and equalization early in the workflow. Use a noise gate to cut background noise—think of it like raising a gate to keep unwanted sounds out. When I recorded in a noisy room, applying a noise gate and gentle EQ transformed my muddy recordings into crisp audio, saving hours of editing time. For more advanced techniques, refer to the podcast editing hacks.
Test, Tweak, and Repeat
Before recording your main content, do quick tests—record a 10-second clip, listen on your high-quality headphones, and adjust levels accordingly. Practice makes perfect: I found that moving my mic slightly closer or further changed the tone significantly. This iterative process ensures each session starts with clarity, reducing post-production headaches.
Many aspiring content creators invest heavily in the latest DAW software, flashy interfaces, and premium headphones, believing these are the ultimate keys to professional sound. While these tools are undoubtedly important, there’s a pervasive myth that newer or more expensive gear automatically guarantees superior audio quality. In reality, mastering the nuances of your setup is far more critical than chasing the latest gadget. For example, an overemphasis on plugin chains without proper room treatment or microphone placement can lead to muddy recordings, regardless of your software’s capabilities. Moreover, a common mistake is neglecting proper headphone calibration; even the most accurate studio headphones need to be set up correctly to provide a true reference. Advanced users often overlook the importance of proper gain staging in the audio interface, which can introduce unwanted noise or distortion if mishandled. Additionally, many believe that complex editing techniques are necessary for professional sound, but in my experience, meticulous attention to basic fundamentals—like proper room acoustics and correct mic positioning—yield far better results.
One surprising trap many fall into is assuming that digital plugins can solve every problem in post-production. While plugins are powerful, they can’t compensate for poor initial recordings. According to a comprehensive guide, setting up your environment to minimize noise and room echoes is the foundation upon which all your editing relies. Skipping this step often results in a thin, unprofessional sound that no amount of plugin magic can fix. Another overlooked aspect is the importance of monitoring your audio on different devices—what sounds good through studio headphones might not translate well through consumer speakers or earbuds. This is why, as explained in the studio headphones buying guide, investing in versatile monitoring tools is essential for a balanced mix.
For advanced creators asking how to refine their setup, consider the importance of proper gain staging and signal flow management within your workflow. Incorrect gain levels can not only degrade sound quality but also cause clipping and distortion sharing your audio with listeners. Ensuring your audio interface’s input levels are optimized before recording is a step many neglect, leading to unnecessary re-recordings or post-editing headaches. To streamline these processes and avoid common pitfalls, check out the podcast editing hacks that emphasize efficient workflow tweaks, including proper gain structure. Keep in mind that every element in your chain, from microphone to DAW, needs to be tuned precisely, not just the expensive gear meant to impress beginners.
Keeping Your Studio in Top Shape for Long-Term Success
Once you’ve established a solid initial setup, the key to sustained quality lies in ongoing maintenance and fine-tuning. Regular updates of your DAW software, like your chosen digital audio workstation, ensure compatibility with new plugins, bug fixes, and performance improvements. I make it a point to check for updates every month and back up my custom settings to prevent loss during upgrades.
Equally important is caring for your hardware. Keep your studio headphones clean and store them properly to avoid damage. Replace cables periodically to prevent connectivity issues, and dust your audio interface to maintain optimal signal flow. Setting a routine check helps catch problems early before they escalate.
Automate Your Workflow with Reliable Tools
Adopting automation tools like workflow enhancers can save hours and ensure consistency. For example, I use template projects in my DAW for different recording scenarios, which include predefined tracks, plugins, and routing—making starting a new session swift and error-free. These templates grow more valuable over time, adapting to my evolving needs.
Investing in tools like a *clean* audio interface with excellent preamps, such as the U Audio ProX, ensures you have a stable and transparent signal path. Regularly calibrate your interface’s input levels using known reference sources to prevent degradation of your audio quality over months or years.
Predicting Future Trends in Maintenance and Tools
Looking ahead, machine learning-based diagnostic tools may become commonplace, alerting creators proactively about hardware health or software conflicts, much like automotive diagnostics. Embracing these emerging technologies now can future-proof your setup and reduce downtime.
How do I maintain my setup over time?
Building a consistent maintenance routine—such as scheduled updates, hardware checks, and backup protocols—keeps your gear performing at its best, minimizes unexpected failures, and preserves your investment. I recommend setting recurring reminders to revisit every part of your audio chain, from microphones to plugins, ensuring everything functions smoothly. Remember, well-maintained tools are your secret weapon for professional-grade recordings.
If you want to take your workflow to the next level, experiment with integrating advanced automation templates in your DAW. This small step can dramatically reduce setup time and keep your recordings consistent, especially when scaling up your projects. Start by customizing a template for your typical podcast or voiceover session and see how it streamlines your process—confidence in your tools makes all the difference.
Throughout my journey, I realized that the most profound lessons often stem from mistakes, not manuals. One of the hardest truths I learned is that tech gear alone won’t make your voice sound professional—it’s how you set up and optimize each component that truly matters. For instance, I once believed that a pricier mic would automatically fix my audio quality. Turns out, placement and environment played a bigger role than the device itself. This insight pushed me to focus on refining my setup, which transformed my recordings from amateurish to broadcast-quality.
Unspoken Hacks That Accelerate Your Progress
- Switching to templates in your DAW isn’t just about saving time—it’s about consistency. Every session starts on a solid foundation, allowing you to focus on content rather than technical tinkering.
- Understanding gain staging saved me from clipping and noise issues. Properly setting your input levels ensures clarity, making post-production less about fixing and more about polishing.
- Investing in quality headphones was a game-changer. They reveal subtle artifacts and room reflections that cheaper options mask, guiding you toward better mic placement and environment tweaking.
Resources That Elevated My Workflow
- Adobe Audition became my go-to for reliable editing and noise reduction. Its intuitive interface and powerful plugins accelerated my editing process and elevated sound quality.
- My chosen studio headphones from the earlier guide provide flat frequency response, critical for accurate mixing and monitoring.
- Workflow templates in my DAW optimized my recording sessions, making setup swift and consistent—saving hours each week.
- Guides on environment setup helped me minimize room noise and reflections, crucial for crisp voice recordings.
Say Yes to Your Sound Evolution
The magic isn’t just in the gear—it’s in how you understand and harness each element of your setup. Every tweak, every test, brings you closer to that professional sound you’ve always admired. Your home studio holds untapped potential; sometimes, all it takes is a willingness to learn and refine. Remember, the journey to great audio is ongoing, but with persistent effort, your voiceover work can resonate with clarity and confidence. Don’t wait for perfect conditions—create them. Dive into the resources, experiment boldly, and let your voice be the strongest element in your recordings.