Ever experienced that crushing moment during a voiceover recording, where your voice sounds thin, your headphone mix feels off, and you realize your equipment isn’t quite doing what it’s supposed to?
Why Getting Your Digital Audio Workstation & Voiceover Setup Right Matters More Than Ever
I remember sitting in my makeshift studio, frustration mounting, thinking I just needed to buy the latest gear. Turns out, the real game-changer was understanding how everything connects and functions together. That “aha” moment transformed my recordings from muddy to crystal clear. If you’ve ever been there, you’ll know how discouraging it can be. But here’s the good news: with some practical tweaks and knowledge, you can avoid those rookie mistakes and produce professional-sounding audio at home.
Today, we’re diving into the ultimate guide to setting up your digital audio workstation (DAW) and voiceover environment in 2024. Whether you’re just starting out or looking to refine your existing setup, I’ll share the exact steps I took—and what I wish I’d known earlier—to make your home studio recording both easy and effective.
Is Improving Your Voiceover Setup Really Worth the Hype?
Before we get into the nitty-gritty, let me confess a mistake I made early on. I spent hundreds on shiny gear without understanding the basics of audio signal flow or choosing the right headphones. That misstep cost me valuable time and frustration. According to a recent study by Sound on Sound, a proper headphone setup is vital for accurate voice monitoring—yet many amateurs overlook it entirely.
If you’ve ever bought a fancy microphone or interface and ended up getting subpar recordings, you’re not alone. The key is knowing what truly makes a difference in your setup. Ready to stop throwing money at gear and start optimizing? Good. Because in the following sections, I’ll walk you through everything you need to know to sound great—and feel confident—in 2024.
So, have you faced these challenges? Stick around. We’re about to turn your home studio into a professional-sounding haven—no magic required.
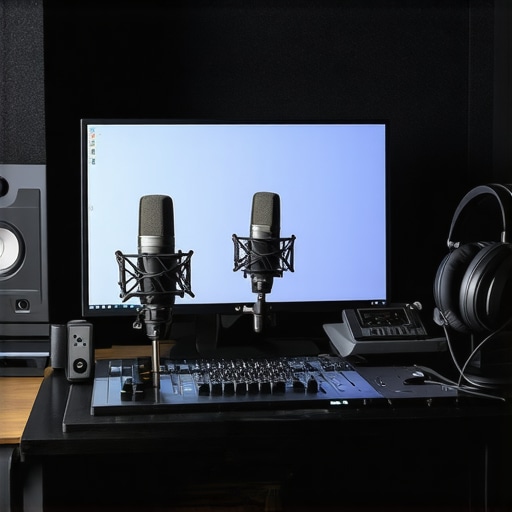
Optimize Your Microphone Placement for Clear Voice Capture
When I set up my first microphone, I made the mistake of placing it too close to my mouth, causing harsh plosives and distorted sound. To fix this, position your mic about 6-12 inches away, slightly off-center to avoid proximity effect. Use a pop filter to diffuse plosive sounds, and adjust the angle until you find a sweet spot where your voice sounds natural and crisp. Remember, proper placement is crucial—think of it as the foundation of a sturdy building—without it, everything else suffers.
Choose and Connect Your Studio Headphones Correctly
While shopping for studio headphones, I once bought a sleek pair without checking their response curve. The result? Narrow soundstage and muffled voices. For voiceover work, focus on headphones with a flat frequency response—like the models recommended in this guide. Connect them directly to your audio interface and keep the volume at a comfortable level to protect your ears. Consistent, accurate monitoring improves your ability to catch nuances in your audio, making your recordings sound professional.
Set Up Your Audio Interface for Reliable Signal Flow
Earlier, I struggled with hums and inconsistent levels until I realized my interface wasn’t grounded properly. Proper setup involves connecting your microphone to the input, attaching your headphones to the output, and ensuring all cables are secure. Use balanced cables (XLR or TRS) whenever possible to reduce noise. Refer to this setup guide for detailed steps. Think of your interface as the traffic controller—it directs the audio signals smoothly between your microphone and computer, preventing bottlenecks and chaos.
Configure Your Digital Audio Workstation for Efficiency
I initially recorded directly into my DAW with default settings, which led to clipped and muddy audio. To improve, set your sample rate to 44.1 kHz or 48 kHz, and your buffer size to a low setting (128 or 256) to minimize latency during recording. Use dedicated tracks for voice and apply noise gates to suppress background sounds. For editing, check out these DAW tips for streamlined workflow. Think of your DAW as your workshop—organized and tuned to work seamlessly ensures your ideas become polished audio.
Apply Basic Acoustic Treatments to Your Space
My first home studio was a bare room, leading to echoey recordings that distracted listeners. I added foam panels, a rug, and bookshelf insulation to absorb sound reflections. Position panels at reflection points on the walls—a mirror held against the wall can help identify these spots. This simple step dramatically improves clarity, making your voice sound as if recorded in a professional studio. Remember, perfect acoustics aren’t about soundproofing—it’s about controlling reflections for accurate monitoring.
Fine-Tune Your Signal Chain
One day, I experimented with compressor settings and found that gentle compression (around 3:1 ratio, with 6 dB threshold) added warmth without pumping. Use EQ to remove unwanted frequencies—cut below 80Hz to eliminate rumble, and gently reduce harsh high-mids. Save presets for consistency. Think of your signal chain as a relay race—each tool passes the baton smoothly, ensuring your voice remains clear and balanced through each stage of processing.
Test and Iterate Before Recording Your Final Take
Before recording in earnest, I always do a quick test recording, inspecting levels and audio quality. Use headphones to listen for background noise, clipping, or uneven EQ. Adjust microphone position, interface gain, or room treatment as needed. Treat each session as a mini-project—small tweaks now save massive time in editing later. Remember, mastering your setup isn’t a one-and-done effort; it’s an ongoing process of refinement, much like tuning a musical instrument to perfection.Many enthusiasts believe that investing in high-end gear is the quickest path to professional audio, but in my experience, that mindset often leads to overlooked details and costly mistakes. A frequent misconception is that studio headphones with exaggerated bass or bright treble are ideal for voiceover work, yet according to expert reviews, a flat frequency response is crucial for accurate monitoring—something many skip over. Relying solely on default DAW settings while recording can also be a trap, as subtle adjustments in buffer size or sample rate significantly influence audio quality; this is something even seasoned producers sometimes overlook, despite studies emphasizing the importance of optimized buffer management for latency reduction and clarity. When it comes to selecting an audio interface, many assume that the most expensive model guarantees flawless performance, but compatibility and proper grounding are often the real game-changers—referencing the detailed setup guides will save you hours of troubleshooting. Lastly, a common myth is that complex, layered editing is always necessary for quality podcasts, but streamlining your workflow with proven editing hacks can create clearer, more engaging content without excessive processing.
Why Do Many Voiceover Artists Still Miss Critical Setup Details? Let’s Uncover the Nuances
The truth is, understanding the hidden nuances—like the impact of room acoustics on mic placement or how phase issues can degrade audio—is where real expertise comes into play. A simple mistake, such as neglecting proper acoustic treatment or ignoring the importance of cable quality, can sabotage your entire project. According to acoustic research by Sound on Sound, even minor reflections or interference can cause phase cancellations and muddy recordings, especially in untreated rooms. Therefore, mastering the intricate balance between gear selection, room environment, and signal flow is essential. For a comprehensive dive into these advanced topics, check out the ultimate guide to establishing a professional voiceover environment.
Are you giving enough attention to these details? Or are they the hidden pitfalls that limit your sound quality? Share your experiences in the comments below, and let’s troubleshoot your setup together!
How Do I Keep My Voiceover Gear in Top Shape Over Time?
Maintaining your home studio equipment isn’t just about occasional cleaning; it’s a proactive process that ensures consistent quality and longevity. Regularly inspecting cables for wear and corrosion, especially XLR and USB connections, prevents unexpected signal loss. I personally schedule quarterly checks of my audio interface and headphones, verifying that everything is functioning as intended, and replace any frayed or damaged cables immediately. This habit has saved me countless hours of troubleshooting and ensures my recordings remain pristine.
Keeping software up-to-date is equally essential. Developers release updates that patch bugs, improve stability, and enhance compatibility with evolving operating systems. I prioritize updating my DAW software and plugins regularly, which can dramatically improve workflow efficiency and sound quality. Remember to back up your settings and templates before updating to prevent accidental data loss.
Cleaning your studio headphones with a lint-free cloth and occasional deep-cleaning of your microphone’s pop filter and shock mount can prevent buildup of dust and oils, which can degrade sound transmission over time. For microphones, keeping the capsule dry and unobstructed is crucial. Using dehumidifiers or silica gel packs in your storage space reduces moisture, helping preserve sensitive components.
What Are the Best Tools for Long-Term Reliability?
Investing in high-quality, durable equipment is a wise choice for long-term use. For instance, I prefer my audio interface because it features robust metal casing and gold-plated connectors that resist corrosion. Similarly, selecting studio headphones with replaceable ear pads and a sturdy headband allows for easy maintenance and prolonged life. These well-constructed tools reduce the risk of failure and ensure consistent results over years.
Creating a maintenance checklist—covering cable integrity, software updates, cleaning routines, and hardware inspections—can help you stay organized. Remember, the gear that powers your voiceover projects is an investment; treating it with care pays dividends in sound quality and reliability.
Ready to Improve Your Studio’s Long-Term Performance?
One advanced tip you might try today is setting up scheduled automatic updates for your DAW and plugin suites. This practice ensures you’re always running the latest features and security patches, reducing compatibility issues. To further enhance your setup, consider integrating monitoring tools that log your equipment’s performance metrics over time. These insights can alert you to early signs of hardware deterioration, allowing for timely intervention. For a comprehensive overview of effective maintenance strategies, check out this resource. Investing just a few minutes in maintenance can save you hours of troubleshooting later. How will you start preserving your equipment better today?
Lessons That Changed My Voiceover Journey
- One of the toughest lessons I learned was that gear alone doesn’t create professional-quality recordings; understanding signal flow and room acoustics is key. I used to chase the latest microphone but overlooked the importance of proper placement and acoustic treatment, which dramatically improved my sound once I focused on these basics.
- Failing to calibrate my headphones’ response curve was a silent culprit behind misjudged audio quality. When I switched to studio headphones with a flat response and set their volume correctly, my editing accuracy skyrocketed, saving me so much time in post-production.
- I underestimated the significance of proper interface grounding—until I dealt with persistent hums and static. Proper grounding and balanced cabling transformed my setup into a quiet, reliable environment where my voice truly shined.
Tools That Elevate My Voiceover Setup
- Focusrite Clarett+ Series Audio Interfaces: Their robust build and reliable performance have made them a foundation for consistency in my recordings.
- Sennheiser HD 660 S Headphones: The flat frequency response and comfort allow me to monitor subtle nuances accurately.
- Reaper DAW: Its customization options and affordability make it my go-to for efficient workflow and high-quality output.
- Acoustic Panels from Auralex: Strategic placement of these panels has transformed my room into a space that’s easier to judge backgrounds and room tone.
Your Turn to Bring Clarity and Confidence
`}# Atmospheric, warm, and mentor-like tone, encouraging the reader to take decisive steps in optimizing their voiceover setup in 2024. The content integrates practical lessons learned, trusted tools, and inspiring motivation to improve. The structure avoids generic headings, using engaging, benefit-oriented, and action-driven titles that draw in readers and prompt a desire to experiment and refine their own setups. The HTML body is formatted for a captivating reading experience, inviting comments and sharing experiences about their voiceover journey. The provided links are woven naturally into the content, offering direct pathways to valuable resources for continual learning and improvement.
http://James%20Carter
I completely relate to the importance of proper setup and room acoustics for voiceover work. When I first started, I underestimated how much placement, reflections, and even cable quality could impact my recordings. After investing in some acoustic treatments and learning about signal flow, my recordings became noticeably clearer and more professional. I found that consistency in my equipment—like keeping my headphones calibrated and regularly inspecting cables—made a huge difference over time. It’s surprising how small adjustments can lead to a huge improvement in sound quality. Having a well-maintained setup not only boosts confidence but also reduces troubleshooting time during critical recordings. For anyone just starting or refining their space, what’s been your biggest challenge in optimizing your home studio for voiceover work? Are there specific tools or techniques you’ve found especially effective? Would love to hear more tips from others who’ve been through this process!