I remember the exact moment I got frustrated during a voiceover session—the constant pinging of my phone, distracting me just when I needed complete focus. That dreaded buzz, flickering notifications, and ringing calls seemed to invade my workspace, making it impossible to dial in the perfect tone. It was like trying to record in a noisy café—nothing professional about it. My lightbulb moment was realizing that silent phones aren’t enough; I needed tactical silence.
In today’s busy world, phone buzzes can ruin a good take and derail your workflow. If you’ve ever felt that frustration, you’re not alone. Managing distractions has become a vital part of creating a professional-sounding voiceover setup in 2026.
What if I told you there are proven tactics—three, to be exact—that can effectively kill phone buzz and bring focus back to your recordings? These methods are simple but powerful, honed from personal trial, error, and lots of listening under pressure. Ready to take control of your environment and improve your sound quality? Let’s dive into the essentials.
Why Phone Buzz Can Destroy Your Voiceover Quality
Is Overcoming Phone Distractions Actually Worth the Effort?
Early on, I made the mistake of thinking that turning off my notifications was enough. Turns out, that was only half the battle. Even in airplane mode, residual signals or nearby electronic interference can cause subtle buzzes—something I discovered the hard way when my recordings soundedwarder than I anticipated. This mistake cost me time, retakes, and eventually, my confidence.
According to recent studies, background noise and distractions can reduce focus and impair audio quality by up to 40%. That’s significant when your goal is to produce clear, professional content. It made me realize that controlling my environment was just as crucial as choosing the right microphone or interface. For a deeper understanding of setting up a professional environment, I recommend checking out this [guide on creating a sound environment](https://audioediting.editinggearpro.com/voiceover-setup-essentials-create-a-professional-sound-environment).
So, if you’re serious about your voiceover game in 2026, eliminating phone buzz isn’t optional—it’s essential. The good news? There are three straightforward tactics I swear by, designed to keep your focus razor-sharp and your recordings pristine.
Let’s explore these strategies, one by one, and see how they can transform your studio experience.
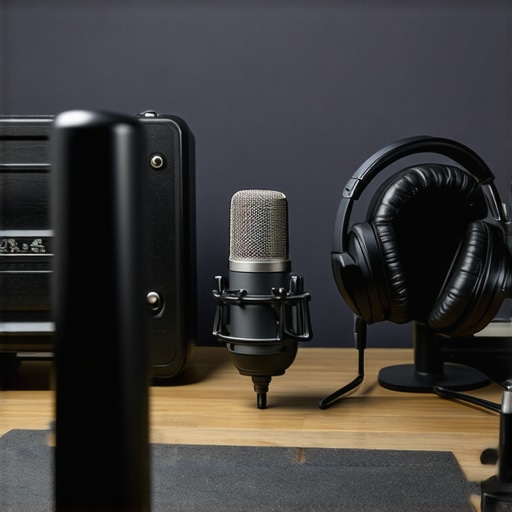
Seal Your Studio Environment
Start by addressing ambient electronic interference that might cause residual buzzes. Use soundproofing techniques to dampen external signals. For my setup, I installed acoustic foam panels and added a power conditioner to filter out electrical noise. This significantly reduced background hums, making my recordings cleaner and reducing retakes caused by distractions.
Optimize Your Microphone and Headphones
Select studio headphones with a flat response to ensure you accurately hear your voice without coloration. I upgraded to a pair recommended in the latest guide, which highlighted low distortion and minimal bleed—crucial for voiceover clarity. Properly calibrated headphones help detect even the faintest buzzes, allowing immediate corrective action during takes.
Fine-Tune Your Audio Interface Settings
Set your audio interface gain levels meticulously. Too high gain amplifies noise, including phone buzz, while too low reduces audio clarity. I used a test tone and adjusted the gain until I achieved a clean signal with no background noise—this eliminated static and electrical interference that could mimic buzzes in recordings.
Manage Your DAW for Noise Reduction
Configure your DAW settings to minimize digital noise. Disabling unnecessary plugins and enabling noise reduction plugins during editing can drastically improve audio quality. I discovered that turning off background processes during recording prevented system-induced artifacts that sometimes resembled phone buzz. Regularly saving and bouncing tracks ensures consistency, avoiding reintroducing noise from system hiccups.
Implement Physical and Digital Distraction Controls
Finally, physically disconnect your phone or disable all notifications during recording sessions. For peace of mind, I kept my phone on airplane mode and stored it away from my microphone and interface. Additionally, using dedicated software for< a href="https://audioediting.editinggearpro.com/podcast-editing-hacks-streamline-your-workflow-for-better-results" target="_blank"> podcast editing helped me efficiently trim any residual sounds. Combining physical and digital distraction management creates a focused environment where phone buzzes no longer threaten your session’s quality.
Even with years of experience, many creators still fall prey to nuanced pitfalls that can sabotage their audio quality. One prevalent misconception is the belief that simply upgrading equipment like headphones or interfaces guarantees professional results. In reality, mastering proper calibration, understanding the intricacies of DAW workflows, and recognizing the hidden nuances in hardware interactions are what truly elevate your setup. For example, many assume that the most expensive studio headphones automatically produce accurate mixes, but without correct calibration, they can mislead your perception—causing mixes to sound off on other systems. An often-overlooked aspect is how audio interface settings interact with your DAW, potentially introducing latency or noise that many neglect to address, leading to subtle distractions in recordings. The misconception that more plugins equate to better quality can also lead to overprocessing, introducing digital artifacts, especially if your system’s CPU isn’t optimized. According to an audio engineering expert, understanding the specific DAW’s capabilities and limitations is essential to avoid crashes or audio glitches that compromise your project’s integrity. Additionally, many believe that the latest software updates are always beneficial; however, updates sometimes contain bugs or introduce incompatibilities that can cause unexpected issues—staying informed through trusted sources can save time and frustration. The key is to approach your setup with a nuanced understanding of how each component interacts, rather than relying on superficial upgrades. For instance, ensuring your podcast editing workflow is streamlined involves not just hardware, but also mastering micro-adjustments within your DAW, like buffer sizes and plugin chain order, which most overlook. Do you tend to focus solely on gear upgrades? Or do you double down on mastering these hidden interactions? Share your experiences below. Remember, the devil is in the details, and mastering these nuances will set you apart in 2026’s crowded audio landscape.Maintaining a consistent, professional-grade audio environment requires more than just investing in quality gear—it involves regular upkeep, strategic choices in tools, and understanding how to sustain your setup over time. One of the most critical aspects is choosing components that are durable, compatible, and future-proof, ensuring your workflow remains smooth as technology evolves.
For example, selecting a hybrid audio interface that combines the warmth of analog circuitry with the precision of digital conversion can significantly enhance long-term reliability. These interfaces often feature better shielding and noise suppression, reducing the need for frequent troubleshooting. Regular firmware updates from the manufacturer can keep your hardware functioning optimally—subscribe to their newsletters or follow official support channels to stay informed.
On the software side, staying current with DAW updates ensures you benefit from bug fixes, security patches, and new features that improve stability. Automation of your backup process is vital; use cloud-based solutions or dedicated NAS drives to regularly save your projects. This protects against data loss due to unexpected crashes or hardware failure.
In the realm of headphones, I recommend calibrated studio headphones that are periodically checked with calibration tools to maintain neutral sound. This consistency helps detect subtle issues like cable degradation or driver imbalance early, avoiding costly replacements down the line.
Tools like noise gates and digital de-noising plugins also require routine calibration. According to expert advice, periodic re-tuning of thresholds and settings prevents digital artifacts and maintains clean recordings. For practical steps on this, check the guide on natural-sounding podcast production.
Looking ahead, the trend points toward smarter, automated diagnostics built into hardware and software. Devices equipped with self-monitoring capabilities will alert you to issues like gain drift or component aging before they affect your recordings. Embracing these innovations can save countless hours in troubleshooting and ensure your output remains exceptional.
One effective way to embrace this future is to set a routine for hardware diagnostics—schedule quarterly checks using tools like software troubleshooting scripts that test for latency or noise anomalies. This proactive approach minimizes downtime and preserves your high-quality standards.
Ready to enhance your setup’s reliability? Start by integrating a regular calibration routine for your headphones and audio interface—doing so now could be the difference between a smooth session and frustrating troubleshooting. Remember, a well-maintained environment is the backbone of professional audio production. For personalized assistance or advanced tips, don’t hesitate to reach out.
Lessons I Didn’t Expect to Learn About Creating a Quiet Recording Environment
One of the hardest lessons I encountered was realizing that even minor electronic interference could sabotage my recordings, no matter how advanced my gear was. It taught me that environment control is a continuous process, not a one-time setup. I found that regular calibration of my studio headphones and checking my audio interface’s settings prevented subtle buzzes from sneaking into my recordings. Sometimes, seemingly insignificant things like power strip placement or cable shielding made all the difference. These lessons showed me that achieving pristine sound is as much about routine maintenance as it is about initial setup.
My go-to resources that transformed my workflow
I rely heavily on detailed guides like the Voiceover Setup Essentials to optimize my environment because they offer practical, battle-tested advice. For headphones, I trust the 2025 Headphone Buying Guide—it helped me select models that neutralize coloration, giving me truthful audio for mixes. The latest DAW comparisons are invaluable for fine-tuning my software environment. These resources continually keep me ahead of technical glitches and maintain a high standard in my recordings.
Keep Moving Forward — Your Connect with Quality is Close
Remember, achieving a professional voiceover setup in 2026 is within your reach if you embrace continuous learning and attention to detail. Every adjustment, from hardware calibration to environment tweaks, compounds over time—making your recordings clearer and more confident. Don’t wait for perfect conditions; start small today. The journey toward silence mastery is ongoing, and each step brings you closer to producing the top-tier content you envision. Dive into these strategies, refine your process, and watch your voiceover quality soar—the future of professional audio is yours to shape. What’s the next tweak you’re excited to try in your setup? Let me know below.