I’ll never forget the moment I recorded a voiceover line, only to be interrupted by a loud, unwanted hum from my equipment. That sudden buzz was like a needle scratching across a vinyl record—disruptive and impossible to ignore. It made me realize how crucial silence is in achieving professional sound quality. If you’ve ever battled with background noise or hiss creeping into your recordings, you know how frustrating it can be to get that pristine, crystal-clear vocal.
Why Quiet Preamps Make All the Difference in 2026
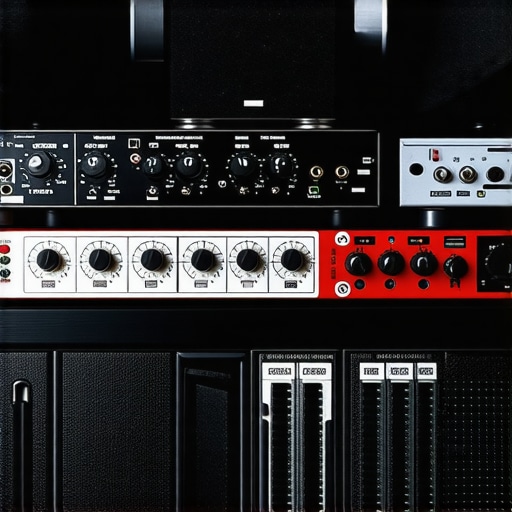
In the world of professional voiceovers, every nuance counts. Your microphone, audio interface, and preamp form the backbone of your sound chain. Yet, many setups suffer from an insidious problem—noise. Even the slightest hiss or hum can ruin an otherwise perfect take, requiring hours of editing and reducing your workflow efficiency. That’s why investing in the quietest preamps today isn’t just a luxury—it’s a necessity. These preamps eliminate or significantly reduce noise floor, allowing your voice to shine without distraction. According to latest industry insights, sound clarity directly impacts listener engagement and perceived professionalism.
Have You Faced This Problem?
If you’ve ever been caught off guard by unwanted background noise during a critical recording session, you’re not alone. Many voiceover artists and podcasters overlook the importance of choosing the right preamp, only to regret it later. Making a smart choice now can save you time, frustration, and costly re-recordings down the line. Stay tuned, because in the sections that follow, we’ll explore the top five preamps that deliver silence and clarity, helping you elevate your voiceover game to the next level.
Calibrate Your Equipment for Optimal Performance
Start by ensuring your microphone, audio interface, and studio headphones are properly configured. Connect your audio interface to your computer using a high-quality USB or Thunderbolt cable, then calibrate your interface settings according to the manufacturer’s instructions. Set the input gain so that your voice peaks around 75% of the meter, avoiding clipping while maintaining a strong signal. Don’t forget to test headphone monitoring levels to prevent ear fatigue and ensure accurate playback. For guidance on selecting the right gear, consult the audio interface and studio headphone setup guide.
Focus on Soundproofing Your Space
Transform your recording area into a quiet zone by adding sound-absorbing panels or foam to walls, sealing gaps around doors and windows, and using a microphone isolation shield. This reduces ambient noise and prevents sound reflections that muddy your recordings. I once set up a makeshift booth with moving blankets and acoustic panels, which dramatically improved my vocal clarity even without professional studio space. Remember, a cleaner environment translates into fewer edits later.
Master Your Recording Technique
Position your microphone correctly—about 6-8 inches from your mouth, slightly off-axis to reduce plosives. Use a pop filter to minimize
Why Most People Misunderstand Audio Quality Optimization
Many creators believe that investing in high-end gear alone guarantees professional sound. However, in my experience, the real nuance lies in mastering the correct settings and workflows. For example, it’s a widespread misconception that simply buying the most expensive studio headphones will automatically deliver perfect mixes. According to industry experts, understanding the headphone’s response curve and how to calibrate it is more critical than price alone. Overlooking this often leads to mixing errors, especially in nuanced frequencies like bass or high mids.
The Oops You Might Make When Setting Up Your Digital Audio Workstation
Here’s a common pitfall: many users opt for default DAW settings without fine-tuning based on their hardware and project needs. For example, buffer size settings are frequently ignored, leading to latency either too high for real-time editing or so low that it causes cracking sounds. Instead, I recommend adjusting buffer sizes to match your workflow—smaller for recording, larger for mixing, as discussed in this guide. This fine-tuning can drastically improve your efficiency and avoid frustration during critical recording sessions.
Advanced Question: Is There an Edge in Using DAW Plugins for Voice Clarity?
Absolutely, but with caution. Many believe that adding multiple plugins—like noise gates, EQ, or compression—will automatically enhance vocal clarity. However, overprocessing often results in a boxy or unnatural sound. A better approach is to use high-quality plugins judiciously, focusing on transparent processing. Studies, such as those from sound quality research, show minimal differences when top-tier plugins are used correctly versus heavily processed tracks. The key lies in understanding when and how to apply these tools, ensuring your voice remains natural and professional.
Common Mistakes in Setup That Kill Your Podcast Sound
One trap is neglecting proper gain staging. Setting input levels too high can cause clipping, while too low levels add unwanted noise. Instead, aim for consistent levels around -12 to -6 dBFS in your DAW, as suggested in this resource. Another mistake involves using generic microphone placement without considering voice characteristics. Adjusting mic distance and angle can wash out or hone in on certain frequencies, significantly impacting clarity. These nuances can be the difference between amateur-sounding recordings and studio-quality output.
Have you ever fallen into this trap? Let me know in the comments. Mastering these subtle distinctions will elevate your podcast’s audio quality, setting you apart from the competition.
Keep Your Setup Running Smoothly
Maintaining a reliable podcasting environment requires more than just investing in high-quality equipment. Regular upkeep ensures consistent sound quality and minimizes technical hiccups. Personally, I schedule monthly checks of my audio interface and DAW settings, verifying that firmware and driver updates are current. These small but crucial steps prevent unexpected failures during critical recording sessions. To make this process easier, I rely on a dedicated checklist that covers cable inspections, plugin updates, and disk cleanups, which I update based on ongoing experiences.
Essential Tools I Trust for Longevity
One tool I vouch for is the audio interface setup checker. It helps identify potential issues before they escalate, such as fluctuating outputs or latency spikes. Additionally, high-quality studio headphones with balanced response curves are vital; I prefer models that provide flat response to catch subtle audio inconsistencies. Regularly testing these headphones against reference tracks ensures they stay reliable over years of use.
Stay Ahead with Proper Maintenance Strategies
Beyond hardware, keep your software environment optimized by applying updates from trusted sources. Also, back up your sessions daily—cloud storage solutions like Dropbox or dedicated NAS devices prevent data loss. I recommend setting automated backups at the end of each working session to avoid forgetting. Plus, periodically review your plugin arsenal; removing unused plugins reduces startup times and system load, enhancing stability during editing.
Long-Term Results Come from Consistent Care
Adopting routine maintenance practices leads to stable, professional-grade audio for years. It’s about creating a habit of checking connectors, cleaning ports, and updating firmware, which prevents equipment degradation. I’ve experienced firsthand how neglecting these steps causes sudden dropouts or noise, interrupting workflow. Staying proactive ensures your recordings sound as polished as your vision. As technology advances, expect smarter tools—like AI-driven diagnostics—to further simplify ongoing maintenance. Tracking these innovations through industry blogs and forums will keep your setup cutting-edge.
Scaling Your Podcast Production Effectively
When growth demands more, consider upgrading your audio interface with features like multiple inputs or higher sample rates. My next move is investing in a scalable digital setup, integrating additional microphones and headphones seamlessly. To support expansion, I plan to explore the latest DAW enhancements that handle multi-track sessions efficiently. Proper maintenance now can make scaling smoother, avoiding headaches down the line. Experimenting with these tools and practices will ensure your podcast maintains quality, even as production volume increases.
How Do I Maintain My Equipment for Long-Term Success?
The key is establishing a routine: schedule monthly equipment diagnostics, keep firmware and software updated, regularly clean and inspect cables, and back up your data. Also, stay informed about emerging tools and techniques. For example, investing in a reliable audio interface that supports future upgrades can save money and frustration. Implementing these habits turns maintenance from a chore into a strategic advantage, preserving your professional sound for years to come. I challenge you to try the tip of setting automated backups and see how it reduces stress during critical sessions.
Reflecting on all I’ve learned, the biggest revelation is that even the most advanced gear won’t save a poorly managed sound environment. Relying solely on high-end equipment can lull creators into a false sense of security, making us overlook the importance of meticulous setup and ongoing maintenance. Additionally, I’ve discovered that embracing a mindset of continuous learning—staying curious about new tools and techniques—keeps our recordings fresh and professional. Remember, the silence between your takes is just as vital as the vocal performance itself; nurturing an environment of quiet focus amplifies authenticity and clarity in every word you deliver.
What Secrets Do Top Producers Keep Quiet About Shaping Perfect Voiceovers
- It took me years to realize that investing in a whisper-quiet preamp was more cost-effective than endlessly editing out hiss and hum. Don’t underestimate the power of such subtle hardware upgrades to elevate your sound.
- I once overlooked the necessity of proper gain staging, leading to distorted recordings that took hours to fix. A simple, consistent gain setup can save your workflow and keep your voice crystal clear.
- Regularly cleaning connectors and updating firmware might seem mundane, but these routines prevent unexpected noises and dropouts—saving precious studio time and frustration.
- Understanding your equipment’s response—like calibrating your studio headphones—is far more impactful than chasing after the latest designer gear. Knowledge beats price in the quest for perfection.
My Favorite Choices for a Noise-Free Voiceover Studio
- The Ultimate Whisper: My go-to is a high-quality, ultra-quiet preamp. It directly influences clarity, making every word pop with professional contrast. Check out the best audio interfaces that emphasize low noise floors.
- Sturdy Soundproofing: Sound-absorbing panels, isolation shields, and sealing gaps are essential. This investment creates a dedicated sanctuary, shielding your recordings from unwanted echoes and ambient noise.
- Calibrated Headphones: Accurate monitoring is non-negotiable. I prefer flat-response headphones, like those discussed in this guide, ensuring I catch every nuance.
- Precise DAW Settings: Fine-tuning buffer sizes and plugin chains, as outlined in this resource, makes a profound difference in smooth, professional recordings.
Your Next Step Toward Studio Excellence
It’s time to embrace these insights and craft a space where silence and precision come together to elevate your voiceover craft. By refining each detail, from hardware to habits, you’ll unlock levels of clarity and professionalism that truly resonate. The journey to mastering your sound isn’t just technical—it’s a commitment to excellence that rewards every word spoken with confidence and impact. Keep pushing forward, because your best recordings are yet to come.
Have you encountered a moment when tiny adjustments made the biggest difference? Share your story below and join the conversation on perfecting your voiceover environment!
http://Emily%20Johnson
Reading through this post, I was reminded of my own struggles with background hum that would suddenly appear during critical voiceover recordings. Upgrading to a high-quality, ultra-quiet preamp really made a difference for me, especially when I noticed how much cleaner and professional my audio became. Soundproofing my room with thick Acoustic panels and sealing gaps around windows and doors was another game-changer, significantly reducing ambient noise. I’ve also found that getting microphone placement right—about 6 inches off-axis—helps minimize plosives and improve clarity. One thing I’d love to hear others’ thoughts on is how often they calibrate their monitoring headphones. Do you guys check calibration periodically, or just when you notice issues? I think routine calibration might be overlooked but is so vital for consistent critical listening. Anyway, great insights here, especially on mastering DAW settings—adjusting buffer sizes really helped me cut down on latency during live recordings. Looking forward to more tips from the community!
http://Michael%20Carter
This post hits home for me, especially the bit about soundproofing and proper gain staging. I’ve learned the hard way that even the most expensive preamp can be rendered useless if the environment isn’t controlled. A while back, I upgraded my preamp to a super quiet model, but I still struggled with background noise until I focused on sealing my room and adding acoustic foam. It’s amazing how much that improves clarity. Also, I’ve started calibrating my headphones monthly—it’s a small step that makes a huge difference in ensuring my mixes translate well across different playback systems.
Regarding calibration, does anyone use calibration tools or software to streamline the process? I’ve found that standard calibration often isn’t enough, and professional tools really help dial in the accuracy. Plus, I’m curious—how many of you have experimented with different mic distances and angles for various voice types? I’d love to hear experiences on what’s worked best for different voices or soundproofing setups. It’s these small but crucial tweaks that truly elevate overall sound quality.