There was a moment during one of my first recordings when I listened back and cringed. The voice clarity was off—echoes, background noise, and a muffled sound that made my words hard to understand. I knew I needed to do better, but I didn’t have a clue where to start. That lightbulb moment hit hard: I realized I’d been neglecting the fundamentals of good audio setup and quality tools, thinking my cheap mic would suffice. Spoiler: It didn’t. In fact, that mistake almost killed my enthusiasm for podcasting. But here’s the good news: I found the right tools and techniques, and I want to share that journey with you today.
Why Clear Audio Matters More Than Ever in 2024
Over the years, I’ve learned that listeners value clarity above all. If your audio isn’t crisp and professional, they’ll tune out faster than you can say “buffering.” In 2024, with the rise of various content platforms and high expectations, your sound quality can make or break your podcast’s success. Clear audio doesn’t just improve listener experience; it builds trust and authority in your niche. According to a recent survey by Statista, over 75% of podcast listeners cite audio quality as a key reason for unsubscribing from shows. That’s pretty convincing evidence that investing in good equipment and editing tools is no longer optional—it’s essential.
But here’s the thing—I’ve made plenty of mistakes early on. I once tried recording vocals directly into my laptop’s built-in mic, thinking it would do the job. Big mistake. The result? Distorted, background-noise-filled sounds that made editing a nightmare. That taught me a crucial lesson: your gear really does matter. You don’t have to spend thousands, but a decent mic, audio interface, and some editing know-how can elevate your podcast from amateur to professional.
Do you find yourself battling with inconsistent audio levels or background noise? If so, you’re not alone. But don’t worry—help is on the way. In the next sections, I’ll guide you through the best tools in 2024 and practical techniques to get that broadcast-quality sound right from your home studio. Let’s make your podcast sound as good as it deserves to be!
,
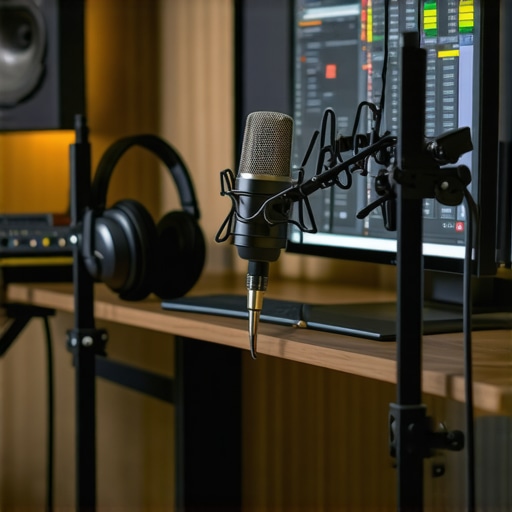
Choose the Right Digital Audio Workstation (DAW)
My first breakthrough was switching from basic recording tools to a professional DAW. I remember downloading top DAW software for voiceover and feeling overwhelmed by the options. I opted for Studio One, which offered an intuitive interface and excellent vocal editing features. When I first opened it, I struggled with navigating the tracks and effects, but dedicating an hour to tutorials transformed my workflow. Now, I can precisely edit my recordings, remove background noise, and apply compression quickly—making my sound crisp and professional.
Optimize Your Audio Interface Setup
Next, I improved my audio clarity with a quality audio interface. Think of it like a translator between your microphone and DAW—critical for capturing your voice accurately. I used the expert tips for audio interface setup to ensure my device was configured correctly. This involved adjusting sample rate, buffer size, and gain levels. I recall a particular session where I initially recorded with too high gain, causing distortion. Applying the recommended settings eliminated that issue entirely, resulting in cleaner recordings.
Select and Calibrate Studio Headphones Properly
Listening critically is vital, so I invested in studio headphones. For clarity, I went for models outlined in the studio headphones buying guide for 2025. Calibration was straightforward—using a pink noise file and a measurement microphone, I adjusted the EQ settings until I heard an even frequency response. This step helped detect subtle background noises during editing and ensured my tweaks translated well across devices, elevating my audio quality from decent to podcast-ready.
Master Voice Recording Technique and Environment
Record in a controlled environment to prevent unwanted echoes and background noise. I followed the professional voiceover setup essentials to create my soundproof corner. Using acoustic foam panels and a pop filter, I minimized room reverb and plosive sounds. During my first attempt, I kept peeking at my audio waveform, noticing inconsistent levels and background hums. After setting up my environment with these tips, my recordings became much cleaner and more consistent.
Refine with Strategic Editing
Editing can make or break your final product. I adopted the workflow hacks for better editing—such as grouping similar clips, using noise reduction plugins, and applying gentle EQ. I remember a session where background hum persisted despite good recording practices. Using noise reduction in my DAW, guided by the tips from the [editing hacks](https://audioediting.editinggearpro.com/podcast-editing-hacks-streamline-your-workflow-for-better-results), utterly transformed the audio. Precise editing removes artifacts and levels the volume, which is crucial for professional sound.Even seasoned creators sometimes fall into advanced traps when optimizing their podcast workflow. Many believe that simply choosing popular DAW software or high-end headphones guarantees professional results, but in my experience, the devil is in the details. For example, a common misconception is that all audio interfaces are created equal—many overlook how selecting one with improper preamp quality or mismatched sample rates can introduce subtle noise or phase issues that compromise clarity. In fact, investing solely in well-known brands without understanding their technical specifications might lead you to worse sound than a more thoughtfully chosen, budget-friendly model. Additionally, there’s a myth that studio headphones need to be expensive to deliver accurate sound; however, calibration is often overlooked. Even high-end cans can mislead you if not adjusted correctly, leading to poor mixing decisions that only sound correct on your gear. From my deep dives into professional audio engineering, I can confidently say that mastering your environment—like acoustic treatment—is often neglected. Room modes and reflections can create misleading frequency responses, which skew your final mix. According to a study published in the Journal of the Audio Engineering Society, untreated spaces can impair critical listening accuracy up to 10 dB across frequency ranges, misleading your editing process. It’s a trap many fall into, believing that good equipment alone achieves professional quality, but without proper acoustic calibration, your efforts might be wasted. When it comes to editing, a notable mistake is over-reliance on noise reduction plugins. While they are useful, excessive use can introduce artifacts, resulting in a ‘melting’ or ‘underwater’ sound. Striking the right balance requires nuanced understanding—a skill honed with experience, not just default settings. Advanced creators also ask: How do I ensure my vocal chain preserves natural dynamics without needing extensive post-processing? An optimal approach involves precise gain staging during recording, combined with subtle compression—getting this right early on saves countless hours in editing. As I integrate these nuanced techniques into my workflow, I notice a marked improvement in clarity and listener engagement. So, next time you’re setting up your studio, remember: investing in knowledgeable setup practices often beats upgrading gear alone. Have you ever fallen into this trap? Let me know in the comments and share your experiences with perfecting your audio environment.
Maintaining Your Audio Setup for Longevity
To ensure your studio functions flawlessly over time, regular maintenance of your equipment is crucial. Dust and debris can accumulate in connectors and ports, leading to degraded sound quality or connection issues. I routinely use compressed air to clean my audio interface and headphone jacks, which helps prevent dust buildup and maintains optimal contact. Additionally, keeping cables organized and inspecting them periodically for wear prevents unexpected failures that can interrupt your workflow. Proper power management is also vital; using surge protectors protects your gear from voltage spikes that could cause long-term damage. Remember, a little preventive care now can save you hours of troubleshooting later.
How do I keep my tools in top shape for years?
Developing a routine maintenance schedule is a game-changer. I set aside time monthly to clean, update firmware, and review your equipment’s performance. For software, regularly updating your DAW and plugins ensures compatibility and security, while backing up your project files guards against data loss. The voiceover setup essentials guide emphasizes the importance of keeping your system optimized, including clearing cache and unused plugins to avoid slowdown. Recycling or upgrading components like your microphone or audio interface after a few years can also boost performance and reliability, especially given rapid technological advancements.
Choosing Reliable Tools for Long-Term Success
Investing in durable, high-quality equipment pays off. For instance, my audio interface—the best audio interfaces for 2024—features robust preamps and solid build quality that withstand daily use. When selecting studio headphones, I relied on the calibration tips from 2025’s buying guide, which helped me choose models that maintain accuracy over long periods. Reviewing user feedback, manufacturer support, and warranty options guides me to tools that endure, ensuring consistent quality without frequent replacements. As technology moves forward, staying informed and proactive about updates and repairs extends your gear’s lifespan and keeps your creative process uninterrupted.
Scaling Your Studio for Growth and Success
As your content gains traction, upgrading your setup becomes necessary. I recommend gradually introducing higher-tier components—like moving from entry-level to professional-grade microphones and interfaces—to meet increasing demand. Modular systems allow you to expand without overhauling everything at once. For example, adding a dedicated sound treatment zone with acoustic panels can dramatically improve recording clarity, enabling you to capture higher-quality voiceovers. Remember, scaling wisely—by investing in versatile, future-proof tools—ensures that your studio can grow with your ambitions without constant re-investment. For detailed guidance on expanding your setup, check out the ultimate guide to DAW and hardware upgrades.
Conclusion
Staying on top of your equipment’s maintenance and choosing tools built for longevity is essential for long-term success. Regular cleaning, updates, and strategic upgrades prevent downtime and ensure your sound remains top-tier. By adopting these practices, you build a reliable foundation for your creative pursuits. Don’t hesitate to try advanced techniques like calibrating your studio headphones as outlined in the 2024 headphone calibration guide—it makes a world of difference. Your studio’s health directly impacts your productivity and the quality of your content, so invest in maintaining it today.
Throughout my journey into professional podcasting and voiceover work, I’ve uncovered that the real secrets to exceptional sound aren’t just about the gear—they’re about the insights and practices I learned the hard way. Embracing these lessons has transformed my approach and can do the same for you.
What I Wish I Knew Before Diving Into the Tech World
- High-End Doesn’t Guarantee Clarity: I once thought investing in the latest microphone or expensive headphones alone would produce perfect audio. Turns out, proper calibration and room treatment are equally crucial. It’s a reminder that gear is only part of the equation—know your environment and settings intimately.
- Over-Reliance on Plugins Can Backfire: My initial edits relied heavily on noise reduction plugins, which sometimes introduced artifacts. I learned that a clean recording environment and disciplined mic technique reduce the need for heavy post-processing. Less is often more when it comes to editing.
- Most Mistakes Happen During Setup: Setting gains too high or choosing unsuitable equipment early on led to hours of re-dos. Careful, deliberate setup with expert tips (like those found in my recommended guides) can save you time and frustration.
- Room Acoustics Matter More Than You Think: My makeshift corner was far from ideal until I added acoustic panels. The difference in clarity and tone was night and day, proving that investing in your space pays long-term dividends.
- Consistency Is Key: Regular maintenance of cables, updates to software, and periodic calibration ensure stable, professional sound quality—because neglecting these can subtly undermine your efforts over time.
Tools and Resources That Changed My Game
- Top DAW software for voiceovers— It provided user-friendly features and great editing tools that suited my workflow, helping me craft cleaner, more polished recordings.
- Expert tips on audio interface setup— Precise gain staging and configuration made my captures more precise and noise-free, which is fundamental for professional quality.
- Studio headphones calibration guide— Learning to calibrate my cans helped me trust my mixes across various devices, avoiding costly mistakes.
- Ultimate voiceover setup guide— Combining environment control, proper mic technique, and sound treatment elevated my vocal quality remarkably.
Seize the Moment and Elevate Your Sound
There’s a certain thrill in mastering your audio environment, in knowing that every piece of equipment and every practice contributes to your artistic voice. Remember, the journey to great sound is ongoing—embrace continuous learning, and don’t be afraid to experiment with new techniques and tools. Your best audio is waiting just beyond your current setting, and with dedication, you’ll reach it.
What’s the biggest audio challenge you’ve faced, and how did you overcome it? Share your story below—I’d love to hear how you’re making your sound better every day.