I remember the exact moment I realized my recordings sounded like they were coming from a tin can. It was late one night, headphones on, editing my latest podcast episode. No matter how much I tweaked, the audio just didn’t sit right. That lightbulb moment hit me hard: I was using the wrong tools. The difference between decent sound and professional clarity isn’t just about speaking well—it’s about having the right gear and software. Since then, I’ve tested countless options, and I want to share what truly works in 2024.
Why Clear Sound Matters More Than Ever
In a world flooded with content, listeners won’t stick around if your audio quality isn’t top-notch. Clear, crisp sound engages your audience and enhances your credibility. It’s not just about microphones or headphones; it’s about the whole setup—software, hardware, and workflow. Getting this right can transform your podcast from amateurish to professional-grade. And with tools constantly evolving, staying updated is essential.
Is It Really Worth Investing in High-Quality Gear
Early on, I made the mistake of thinking that cheap equipment would do the job. Spoiler: it doesn’t. My first microphone was a budget pick, and I wondered why my voice sounded hollow and distant. Once I upgraded to better studio headphones and a quality audio interface, everything changed. The clarity I gained made editing faster and more effective. If you’re serious about your podcast, investing in the right gear is non-negotiable. Curious about the top gear for 2024? Check out this guide to the best audio interfaces and headphones.
Choose the Right Hardware for Crisp Audio
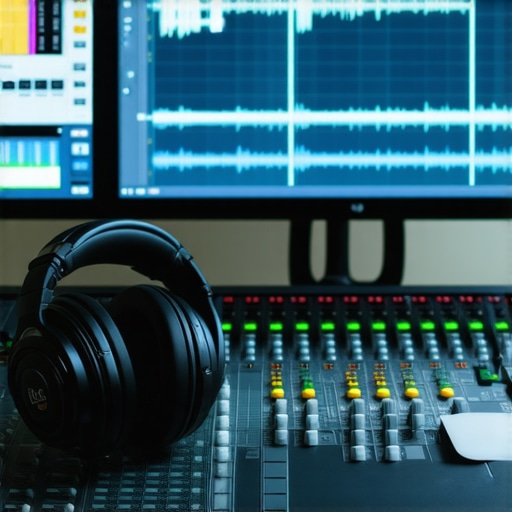
Start by selecting a quality microphone that suits your recording environment; a dynamic mic is often better for noisy spaces, while condenser microphones excel in controlled settings. I once switched from a budget microphone to a professional-grade condenser, and the difference was night and day. Pair it with studio headphones—like those recommended in this buying guide—to monitor your recordings accurately. Connect your microphone to a reliable audio interface, which acts like a bridge, converting analog signals into digital data. An optimized setup minimizes background noise and distortion, giving your voice clarity and presence.
Set Up Your Equipment Properly
Proper placement and configuration are critical. Position your microphone about six inches from your mouth, slightly off-axis to reduce plosives. Use a pop filter to prevent harsh sounds from hitting the mic directly. Adjust gain settings on your audio interface to avoid clipping—overly loud inputs cause distortion. An effective setup is described in this setup guide. Remember, consistent placement ensures even sound quality, saving you editing time later.
Optimize Your Software Workflow
Choose a digital audio workstation (DAW) that suits your needs; options like top DAWs offer advanced editing features. When I switched to a more intuitive DAW, my editing speed doubled. Use templates or presets to streamline your workflow, and consider using editing hacks to cut down post-production time. Record in a quiet, treated space—think of it as dressing your sound for the occasion—using acoustic panels or foam to reduce echo and background noise.
Leverage Monitoring and Editing Tools
Always monitor your audio through high-quality studio headphones—like those detailed in this monitoring guide. This helps catch issues early, such as inconsistent levels or background noise. During editing, use spectral editors or noise reduction plugins to clean up recordings. I once had a rough take with background hum, but a quick pass with noise reduction made it sound professional. Regularly check levels to keep your voice consistent, avoiding the unpleasant experience of listeners turning down their volume or experiencing distortion.
Test and Refine Your Setup
Before recording your main episodes, do test recordings. Listen carefully, adjust your mic placement, gain, or software settings as needed. I spent an afternoon tweaking my setup, and the improvement was immediate—sound became clearer, and editing became easier. Keep notes on what works best for your space and voice. Periodically revisit your gear and workflow, especially as new tools emerge in 2024, to maintain top-notch sound quality. This ongoing process ensures your podcast always sounds as professional as possible.
Many podcasters fall into the trap of oversimplifying what it takes to produce crisp, professional-quality audio. While investing in good gear is essential, the real pitfalls lie in misconceptions about setup, software, and maintenance. Let’s dig deeper into what most people get wrong and how to avoid these common mistakes that can sabotage your audio quality in 2024.
Why Your Efforts Might Be Going to Waste Without Proper Acoustic Treatment
One of the biggest myths is that high-end microphones alone guarantee clarity. In reality, the room’s acoustics play a crucial role. Even the best mic will pick up echo, background noise, or room tone if your environment isn’t properly treated. Acoustic panels, bass traps, and proper positioning can make a dramatic difference. Skipping this step is a common mistake that often remains invisible to beginners but is obvious to seasoned audio engineers. For a detailed guide, check out this voiceover setup essentials.

Imagine a professional studio environment with sound-absorbing panels and controlled acoustics, illustrating the importance of room treatment for crystal-clear audio.
Beware of Over-Reliance on Software Noise Reduction
While noise reduction plugins are powerful, many podcasters believe they can fix any poor-quality recording after the fact. This can lead to over-processing, which introduces artifacts and unnatural sounds, making your audio sound layered or muffled. The key is to get it right during recording—using a good microphone, proper gain staging, and a quiet environment. Then, use noise reduction sparingly, only to clean up residual noise. This nuanced approach preserves natural voice tone and clarity. For advanced editing tips, explore this workflow guide.
What Advanced Setup Mistakes Are Sabotaging Your Sound?
Many experienced creators overlook proper gain staging and cable quality, which can introduce hum, buzz, or distortion. Using cheap cables or mismatched impedance settings on your audio interface can degrade sound quality significantly. Moreover, not calibrating your microphone’s distance or positioning accurately can result in inconsistent levels and tonal issues. It’s a subtle, often overlooked detail that makes the difference between decent and professional sound. For setup intricacies, review this audio interface setup guide.
Keeping your podcast sound pristine over time requires more than just good gear; it demands consistent maintenance and smart tool choices. As technology evolves rapidly, staying on top of your setup ensures your audio remains crystal clear and professional. I personally rely on a combination of hardware upkeep and software optimization to achieve lasting results, and I want to share my proven strategies for 2024.
How do I maintain my audio setup for long-term success?
Regularly inspecting and updating your equipment is crucial. Start with your audio interface—dust it off, check cables for wear, and ensure firmware is up-to-date. I make a habit of calibrating my microphone placement monthly, which might seem minor but significantly impacts consistency. Software updates are just as vital; I keep my DAW and plugins current to leverage improvements. This proactive approach prevents issues before they escalate, saving time and money.
Another tip is to back up your settings and presets regularly. I use cloud storage to save my configurations, ensuring I can restore my preferred workflow after hardware replacements or software reinstallation. Additionally, periodically review your acoustic treatment. Over time, panels can shift or accumulate dust, diminishing their effectiveness. Cleaning and realigning them keeps your space sound-treated and minimizes echoes or background noise.
Invest in tools that grow with your needs
Quality headphones are essential for monitoring; I swear by the latest studio headphones because they reveal nuances in my recordings that cheaper models miss. For my microphone, I choose a dynamic model with a cardioid pattern, ideal for noisy environments, and I replace my cables annually to prevent signal degradation—cheap cables can introduce hum and buzz, undermining your clarity. The audio interface is another cornerstone; I prefer models with low latency and high headroom, ensuring my recordings stay clean and balanced.
Software-wise, I optimize my workflow with the editing hacks I’ve perfected over the years. Using templates and presets saves me hours during post-production, and I regularly run test recordings to tweak my setup. These small investments in maintenance and tools ensure my podcast remains professional, even as I scale or experiment with new formats.
What’s next for long-term audio quality
Looking forward, I believe the trend will shift toward smarter, AI-driven tools that automate routine maintenance tasks—detecting and correcting issues in real-time. Staying ahead involves embracing these innovations while maintaining a disciplined upkeep routine. I encourage you to try implementing a monthly equipment audit and software review—small steps that yield big rewards in clarity and consistency.
Don’t let your hard work fade due to neglect. Make maintenance a regular part of your workflow, and choose tools that adapt to your growing needs. If you want to dive deeper into optimizing your setup, check out this ultimate guide on selecting the best gear for 2024. Remember, a little effort now keeps your audio sounding pristine for years to come. Start with a simple equipment check today, and notice the difference it makes!
The Hardest Lesson I Learned About Sound Quality
One of my biggest surprises was realizing that even the best microphone can’t save poor room acoustics. I used to think upgrading gear alone would improve my sound, but I overlooked the importance of acoustic treatment. Once I added panels and bass traps, my recordings instantly sounded more professional, proving that environment matters just as much as equipment.
My Eye-Opening Experience with Software Limitations
Early on, I believed noise reduction plugins could fix any background hum. Turns out, over-relying on them can make your audio sound muffled or layered with artifacts. The real breakthrough came when I focused on recording in a quiet space and using high-quality gear, then applying noise reduction sparingly during editing. Less is more in preserving natural voice tone.
The Unexpected Power of Proper Setup
Positioning my microphone about six inches from my mouth and using a pop filter drastically reduced plosives and background noise. Simple adjustments like these saved me hours of editing and improved clarity immediately. It’s a small investment of time that yields massive benefits, especially if you’re aiming for professional sound.
Curated Tools That Transformed My Workflow
- Audio Interface: I trust the latest audio interfaces for clean conversion and reliability.
- Studio Headphones: My go-to is the top monitoring headphones that reveal every nuance.
- DAW Software: Using an intuitive digital audio workstation has sped up my editing process exponentially.
Let’s Keep Improving Your Sound
Regularly inspecting and updating your gear, calibrating your microphone placement, and maintaining acoustic treatment are key. As AI-driven tools emerge, I plan to incorporate them into my workflow for real-time quality checks. Remember, consistency in maintenance and a growth mindset can keep your podcast sounding professional for years to come. What’s one setup tweak you’ve been hesitant to try? Share below—I’d love to hear your story!