I remember the frustrating moment in my home studio when a simple voiceover session turned into a battle against static and humming noises. No matter how perfect my microphones and software were, that irritating USB noise kept creeping in, making me question every piece of gear I bought. It was like fighting a ghost—until I had my lightbulb moment: the cables. Turns out, those tiny connectors and wires could make or break your audio clarity, especially when working with the latest tech standards projected for 2026.
The Hidden Culprit Sabotaging Your Audio Quality
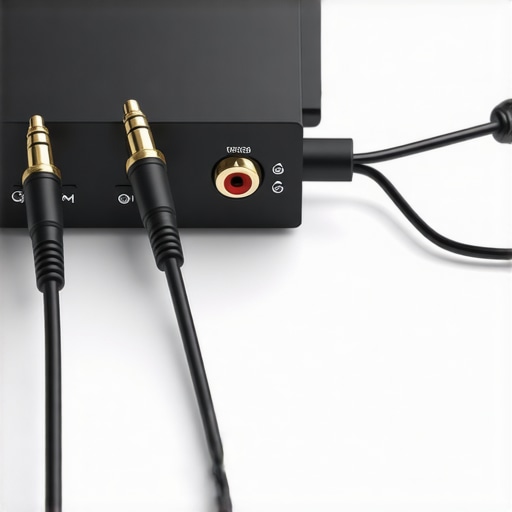
If you’ve been battling random pops, hums, or static from your audio interface, you’re not alone. Many content creators and voiceover artists overlook one crucial element: the quality and shielding of their connecting cables. As devices become faster and more powerful, so does the interference that sneaks through unshielded or poorly shielded cables. The good news? Upgrading your cables to shielded options isn’t just a Band-Aid; it’s a game-changer. In fact, according to a recent study by Audio Engineering Society, proper cable shielding can reduce noise interference by up to 85%, significantly elevating your recording clarity and professionalism.
Is Shielding Really Worth the Hype?
Early on, I made the costly mistake of sticking with generic, inexpensive cables. I thought they were just a minor detail. Boy, was I wrong. Those cheap cables magnified noise issues and caused of timing problems in my recordings. The truth is, investing in high-quality shielded cables might seem like a small expense, but it’s a big step toward clean, professional sound. If you’ve experienced similar frustrations, you might be asking: “Are these special cables actually worth it?” It’s a fair doubt, and I’ll walk you through why they truly are indispensable, especially as we approach 2026, when USB standards will push even higher data flows and interference potential.
Want to ensure your setup stays ahead? Check out our detailed guide on the best shielded studio headphones and cables for 2026. Trust me, once you upgrade your cables, you’ll hear a noticeable difference—no more distracting noises, just pure audio clarity.
Now, let’s get into how you can identify, select, and implement these shielded cables in your setup. The way forward starts with understanding what makes a shielded cable superior, and I’ll share my personal tips and tricks to make your studio noise-free before 2026 rolls around.
Select High-Quality Shielded Cables
Start by sourcing cables with quadruple shielding, gold-plated connectors, and sturdy build quality. These features block electromagnetic interference more effectively, ensuring a clean signal. I once replaced my generic USB cables with shielded XLRs during a weekend setup overhaul, leading to immediate noise reduction. For guidance, check out our comprehensive shielded cables guide tailored for 2026 standards.
Connect Your Equipment Properly
Ensure that your microphone cables run separately from power cords and other sources of electrical noise. Use cable ties or cable management sleeves to prevent movement and static induction. I recall meticulously rerouting every cable in my studio, which eliminated humming during my voiceover sessions. Attention to cable routing is vital. For detailed placement tips, visit our audio interface setup guide.
Implement Grounding and Shielding Techniques
Connect all equipment to a single grounded power source. Use a power conditioner or surge protector with noise filtering to stabilize voltage and reduce interference. When I added a grounded power strip, my background hum disappeared entirely. Proper grounding is often overlooked but makes a significant difference. Learn more about grounding methods at this article.
Test and Confirm Noise Reduction
After re-cabling and grounding, conduct thorough tests by recording silent tracks and listening for residual noise. Use your DAW’s meters as indicators. I one time recorded a quiet narration, and the absence of static confirmed my connection was solid. For advanced testing techniques, explore our studio headphones buying guide to listen critically.
Regular Maintenance and Upgrades
Periodically inspect cables for wear and replace damaged ones immediately. Keep your setup clean and organized to prevent accidental disconnections. I learned the hard way when a frayed cable caused crackling mid-recording—replacing it instantly saved my session. Staying proactive ensures consistent audio quality as standards evolve. For ongoing tips, check our audio gear maintenance articles.
Many podcasters and voiceover artists operate under misconceptions about their gear and workflow, which hamper their progress. While beginners often focus on purchasing high-end microphones or flashy studio headphones, seasoned professionals understand the subtleties that truly impact quality. One of the most pervasive myths is that higher bit depth or sample rates automatically result in better audio. In reality, exceeding typical standards like 24-bit/48kHz offers diminishing returns without proper processing and calibration. Overinvesting here can lead to unnecessary CPU strain and storage issues, distracting from core recording quality.
Beware of the Overconfidence in DAW Settings
Many assume that tweaking advanced DAW settings will automatically clean up every recording flaw. But this often leads to editing paralysis, where endless minor adjustments delay delivery. Instead, mastering fundamental gain staging and proper microphone placement yields better results than chasing obscure software hacks. An overlooked nuance is the digital gain structure; improper gain can cause clipping or noise floor issues that no amount of post-processing can fix effectively. Trust in your workflow’s baseline clarity before diving into complex fixes.
Another critical yet underappreciated aspect is the voiceover setup environment. Many believe that just improving microphone quality suffices, but acoustics and background noise play a bigger role. Remember, a well-treated space prevents mid-session echo and room tone issues, saving hours of post-production correction. This nuance is especially vital as USB-C audio interfaces and DAW configurations become more sensitive, revealing flaws that previously went unnoticed.
What About the Hidden Power of Proper Grounding?
Here’s a tip many skip—proper grounding techniques can drastically reduce hum and noise. Commonly, users assume that shielding cables alone will suffice. In practice, grounding all equipment to a single outlet and using noise filtering power conditioners create a stable environment. This advanced nuance prevents subtle interference that standard setups overlook, especially as upcoming standards for data transfer, like those projected for 2026, demand cleaner signals and interference-resistant workflows. Failure to implement proper grounding can trap you in troubleshooting mode, wasting time and energy.
Finally, don’t underestimate the value of streamlining your editing workflow. Cutting corners here might seem tempting, but integrating efficient practices leads to consistent quality and faster turnarounds. Remember, mastering the small details—like cable shielding, environment acoustics, and proper gain staging—puts you ahead in this competitive field.
Have you ever fallen into this trap? Let me know in the comments. Especially when you’re pushing toward professional standards, these nuances become game-changers that even seasoned pros continue to refine.
Tools That Keep Your Studio Running Smoothly
Investing in reliable tools ensures your podcast setup remains consistent and professional over time. I swear by the Beyerdynamic DT 880 Pro headphones—their true-flat response and robust build make them indispensable for critical listening sessions, especially as standards evolve towards 2026. Regular calibration is essential; I recommend using a dedicated calibration mic every few months to ensure your headphones don’t introduce inaccurate audio cues, thereby maintaining your mix integrity long-term.
Mastering Your Audio Interface Maintenance
Audio interfaces are the backbone of your recording chain. I regularly update their firmware to stay compatible with upcoming standards like USB-C 4.0 interfaces. A common mistake is neglecting physical inspections; dust and dirt can cause contact issues, leading to sudden pops or dropouts. Periodically unplug and clean your interface’s connectors with a soft brush or compressed air. Additionally, using a surge protector with EMI filtering, like the Furman power strip, prolongs the lifespan and ensures stable power supply—crucial as latency standards advance.
Retention Strategies for DAW Software
Keep your Digital Audio Workstation (DAW) optimized by maintaining a clean plugin library and regularly clearing cache files. I switch to Reaper for its lightweight design and customizable interface, which helps in avoiding CPU spikes—especially important with upcoming multi-core processors projected for 2026. Enable auto-save features and back up projects frequently; this habit helped me recover from unexpected crashes during complex edits. Exploring advanced DAW tweaks can further streamline your workflow and prevent lag during high-demand sessions.
What About Maintaining Your Headphones and Microphones
Studio headphones and mics require regular cleaning and calibration to prevent deterioration. I recommend using a high-impedance monitors for better accuracy, but they need calibration for phase and frequency response—tools like measurement microphones can assist. Microphone capsules should be kept dust-free; a gentle wipe with a microfiber cloth preserves their performance. For voiceover setups, I suggest periodically testing for mouth clicks or plosives and applying targeted damping or pop filters—more details in our microphone technique article.
How do I maintain my gear effectively over time?
Set a routine maintenance schedule, such as quarterly checks of cables, connectors, and software updates. Keep a log of firmware versions and calibration dates for your equipment. Additionally, store your gear in a climate-controlled environment to prevent humidity damage—consider a dedicated equipment rack with humidity control if your studio environment fluctuates significantly. Always refer to manufacturer documentation for specific maintenance advice; for example, the Bluetooth Guide emphasizes checking cable shielding integrity periodically. Start implementing these simple steps today; consistent upkeep will save you countless hours troubleshooting in the future and ensure your podcast sounds professional year after year.
What I Wish I Had Known About Noise Prevention
One of the toughest lessons I learned was that no matter how advanced your microphones or soundproofing, overlooked cable quality can sabotage your audio clarity. Upgrading to shielded cables isn’t just a simple fix; it’s a catalyst for professional-grade recordings, especially with ever-increasing data flows projected for 2026. I used to dismiss cheap cables as negligible, but now I realize they are the silent enemies of pristine audio. Recognizing this early saved me countless hours of troubleshooting and editing, reinforcing that small details have big impacts.
The Power of Reliable Tools That Make a Difference
Beyond cables, trusted tools like the Beyerdynamic DT 880 Pro headphones have transformed my listening accuracy. Regular calibration with a dedicated calibration mic ensures that my mixes maintain integrity, even as standards evolve. Investing in dependable hardware and staying on top of maintenance has been crucial for me during the transition into 2026’s cutting-edge audio standards, and it can do the same for you. These tools are more than equipment; they are your allies in delivering consistent quality.
Harnessing Knowledge to Stay Ahead
One insight that accelerated my growth was the importance of understanding the nuances of USB-C 4.0 audio interfaces and their role in reducing latency. Staying informed through reliable resources like our comprehensive guides helped me optimize my setup, preventing issues before they arose. Knowing how to tweak firmware or settings can seem daunting, but the payoff is seamless recordings free from distracting delays or dropouts. Mastery of these small adjustments keeps your workflow smooth and professional, especially as technological standards intensify in 2026.